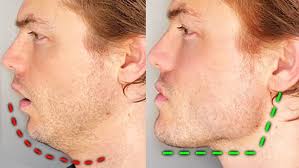
Mouth Breathing Face: How Chronic Mouth Breathing Can Reshape Your Appearance and Health

What You Need to Know About the “Mouth Breather Face” Phenomenon

Mouth breathing is often dismissed as a minor habit — something people do when they have a cold or during heavy exercise. But when it becomes chronic, especially in children and teens, the effects go far beyond just dry lips or bad breath. Over time, habitual mouth breathing can actually reshape the structure of the face, alter jaw development, and affect long-term health. This condition, sometimes referred to as “mouth breathing face” or “mouth breather face,” is gaining attention not only from parents and orthodontists, but also from professionals in sleep medicine, ENT (ear, nose, and throat), and craniofacial research.

In this guide, we’ll explore what a mouth breathing face is, how it develops, the health risks associated with it, and what you can do to prevent or reverse it. We’ll also cover the science behind facial growth, provide actionable advice for parents and adults, and answer some of the most common questions people have about this under-discussed but important topic.

Why Does This Matter?

According to a study published in the Journal of Otolaryngology – Head & Neck Surgery, up to 50% of children show signs of habitual mouth breathing, and many parents aren’t even aware of it. If left untreated, this seemingly harmless habit can affect not only facial development, but also oral health, breathing efficiency, posture, and cognitive function.

“Mouth breathing is not just an aesthetic problem — it’s a health problem. The face grows differently when the mouth is habitually open. That changes everything.”
Dr. John Mew, Orthotropic Specialist

We’ll break down this concept section-by-section, starting with the basics of what mouth breathing is and how it differs from the natural and optimal method of nasal breathing.


What Is Mouth Breathing?

Mouth breathing refers to the act of inhaling and exhaling through the mouth instead of the nose. While it’s normal to breathe through the mouth occasionally — such as during intense exercise or when the nose is blocked — chronic mouth breathing becomes problematic when it becomes a person’s default breathing mode, even during rest or sleep.

Definition and Explanation

Mouth breathing is defined as persistent breathing through the mouth during waking hours and/or sleep, particularly when it is not due to temporary congestion or illness. It often starts in childhood but can persist into adulthood if not addressed.

How It Differs From Nasal Breathing

FeatureNasal BreathingMouth Breathing
FiltrationFilters allergens, dust, and pathogensNo filtration
MoisturizationHumidifies and warms the airDries out mouth and throat
Oxygen EfficiencyNitric oxide boosts oxygen absorptionLess efficient oxygen uptake
Facial DevelopmentSupports proper jaw and palate growthCan lead to long face, recessed jaw, etc.

Common Causes of Mouth Breathing

Many people don’t realize they’re breathing through their mouths until symptoms or facial changes become apparent. The causes of mouth breathing can be structural, habitual, or medical.

Here are the most common causes:

  1. Nasal Blockages
    • Chronic allergies
    • Nasal polyps
    • Deviated septum
  2. Enlarged Tonsils or Adenoids
    • Often seen in children
    • Blocks airflow through the nose, forcing mouth breathing
  3. Poor Oral Posture or Habitual Behavior
    • Slouching posture, slack jaw, or poor tongue position
    • Breathing through the mouth becomes a learned habit
  4. Obstructive Sleep Apnea
    • Interrupts nasal breathing during sleep
    • May cause mouth to open involuntarily to maintain airflow
  5. Facial or Craniofacial Abnormalities
    • Narrow palate or small nasal passages
    • Genetic or developmental conditions that make nasal breathing difficult

Why Is This Important to Catch Early?

In children, especially during crucial developmental years (ages 2–12), breathing method directly influences facial growth, jaw alignment, and even the shape of the dental arch. If mouth breathing is not identified early, these changes can become permanent, leading to the phenomenon known as a “mouth breathing face.”

Fact: The tongue is nature’s orthodontic retainer. When it rests on the roof of the mouth (as it should during nasal breathing), it helps widen the palate and shape the midface properly.


FAQs for Answer Engine Optimization (AEO)

What is mouth breathing?
Mouth breathing refers to the act of breathing through the mouth instead of the nose. While temporary mouth breathing can occur during illness, chronic mouth breathing can lead to health and facial structure issues.

Is mouth breathing bad for you?
Yes, habitual mouth breathing can lead to poor sleep, dry mouth, dental issues, and changes in facial structure over time.

Can you fix mouth breathing?
Yes, through nasal breathing training, myofunctional therapy, and in some cases, surgery or orthodontic intervention, mouth breathing can be corrected.

Great — let’s move on to the next section:

What Is a “Mouth Breathing Face”?

The term “mouth breathing face” refers to the distinct facial characteristics that may develop over time due to chronic mouth breathing, especially when it begins in childhood. This is not just a slang term — it is rooted in clinical observations by orthodontists, ENT specialists, and researchers who study craniofacial development.

Understanding the Term “Mouth Breather Face”

While the term has sometimes been used pejoratively in pop culture, medically, it describes a set of structural changes in the face caused by abnormal breathing patterns. These changes happen subtly and gradually as the bones of the face and skull develop in response to improper tongue posture, airway resistance, and jaw positioning.

According to the American Journal of Orthodontics and Dentofacial Orthopedics, nasal breathing promotes proper craniofacial development, whereas mouth breathing can lead to noticeable physical alterations. When the mouth is open for prolonged periods, it changes the resting position of the tongue and jaw, which in turn reshapes the face.

“Chronic mouth breathing alters the balance of orofacial muscles and tongue posture, contributing to facial skeletal changes such as a long face and narrow jaw.”
Journal of Clinical Pediatrics Dentistry (source)


Facial Features Commonly Linked to Mouth Breathing

Here are the common physical traits and structural changes that define a mouth breathing face:

1. Long, Narrow Face

Mouth breathers often develop a vertically elongated face due to the downward pull of gravity on the jaw and tongue when the mouth is open. This condition is sometimes referred to as “long face syndrome.”

2. Recessed Chin and Weak Jawline

A lack of proper tongue pressure on the palate can cause the mandible (lower jaw) to grow downward and backward rather than forward, leading to a weak chin and poor jaw definition.

3. Narrow Palate and Crowded Teeth

Mouth breathing can cause the tongue to rest on the bottom of the mouth instead of the roof, which prevents the upper palate from expanding properly. This leads to dental crowding, overbites, and crooked teeth — common reasons for braces or palate expanders in children.

4. Dark Circles and Droopy Eyes

Chronic oxygen deprivation and poor sleep quality associated with mouth breathing can result in under-eye shadows and a tired appearance. Swollen nasal tissues may also contribute to eye puffiness.

5. Gummy Smile or Low Resting Lip Posture

Mouth breathers may develop an altered smile where more of the gum is visible, or the upper lip appears shorter due to muscular adaptation.


Visual Summary: Mouth Breather Face Features

Facial FeatureHow Mouth Breathing Affects It
JawlineWeakens, recesses backward
ChinAppears smaller, less defined
Face lengthGrows longer vertically
EyesTired, droopy look; dark under-eye circles
LipsDry, parted at rest; upper lip may thin over time
PalateBecomes narrow, causing dental crowding

Before and After Cases of Mouth Breathing Face

In clinical settings, orthodontists and myofunctional therapists have documented dramatic improvements in facial structure when mouth breathing is corrected early — particularly in children.

  • A case study published in Sleep and Breathing documented a 12-year-old boy with obstructive breathing and mouth breathing habits. After 12 months of myofunctional therapy and nasal expansion, significant improvements in nasal airflow, facial width, and jaw posture were observed. (source)

Is “Mouth Breather Face” Recognized by Doctors?

Yes, though doctors may use clinical terms like “long face syndrome,” “adenoid facies,” or “craniofacial dysmorphology,” many in the medical and dental fields recognize the link between mouth breathing and altered facial growth.

The American Association of Orthodontists states:
“Breathing problems can impact facial development, particularly when chronic mouth breathing is present during early growth periods.”
AAO (source)


FAQs for Answer Engine Optimization (AEO)

What are the signs of a mouth breathing face?
Typical signs include a long, narrow face, recessed chin, narrow jaw, dark under-eye circles, and open mouth posture.

Can you tell if someone is a mouth breather by looking at them?
In some cases, yes. Facial features such as a weak chin, narrow dental arch, and constantly open lips may suggest habitual mouth breathing.

Does mouth breathing change your face permanently?
Yes, especially in children whose bones are still growing. If uncorrected, changes can become permanent. However, some improvements can be made with therapy or orthodontic intervention.


How Does Mouth Breathing Affect Facial Structure?

Facial structure is not solely determined by genetics — it’s also shaped by how we use our facial muscles and oral posture during development. One of the most significant functional factors is how we breathe. Chronic mouth breathing, especially during childhood and adolescence, can significantly alter the growth and alignment of facial bones, contributing to what’s commonly called a mouth breathing face.

Studies in orthodontics and craniofacial development have shown that the position of the tongue, lips, and jaw — all influenced by breathing patterns — play a major role in the way the face forms during growth.


Effects in Children and Teens

The most critical period for facial development occurs before puberty, roughly between ages 2 and 12. During this time, the bones of the skull and face are highly malleable. If a child habitually breathes through the mouth during this phase, it can change the structure of their face, jaws, and airway.

How Mouth Breathing Affects a Developing Face

  1. Low Tongue Posture:
    When breathing through the nose, the tongue naturally rests against the roof of the mouth, exerting light upward pressure that helps widen the palate and stimulate forward facial growth.
    With mouth breathing, the tongue rests low in the mouth, leading to a narrow upper jaw (maxilla) and a longer, flatter midface.
  2. Open Mouth Posture:
    Children who breathe with an open mouth tend to develop a longer lower face, drooping cheeks, and poor lip seal. Over time, this posture pulls the lower jaw downward and backward.
  3. Underdeveloped Jaw and Chin:
    Nasal breathers tend to have a more forward-growing mandible, while mouth breathers often develop a recessed or “weak” chin.
  4. Narrow Dental Arches:
    Without the tongue’s support on the palate, the dental arches become narrower, often leading to crowded teeth, crossbites, and overbites.
  5. Impaired Airway Development:
    Long-term mouth breathing can also narrow the nasal cavity and reduce airflow capacity, which may lead to snoring, sleep apnea, and poor oxygenation.

Clinical Evidence:
A landmark study in the American Journal of Orthodontics showed that children who mouth breathed over long periods developed significantly longer faces, steeper mandibular planes, and narrower palates than nasal breathers. (source)


Changes in Adult Facial Appearance

In adults, the bones of the face have largely finished growing. However, habitual mouth breathing can still affect facial appearance, especially in ways related to muscle tone, posture, and sleep quality.

Common Adult Facial Changes Linked to Mouth Breathing:

  • Sagging or hollow cheeks
  • Forward head posture, which changes the profile and neck alignment
  • Narrower jaw and nasal passages
  • Increased likelihood of bruxism (teeth grinding) and TMJ issues
  • Dry, wrinkled lips and a perpetually tired appearance

Although the structural changes are less dramatic than in children, adults may still develop what resembles a “mouth breathing face,” especially if the behavior persists over many years.

Research Insight:
A study published in Sleep Medicine Reviews found that adult mouth breathers were more likely to report poor sleep quality, facial muscle fatigue, and signs of premature aging, due in part to compromised nasal airflow and low oxygenation. (source)


Can Facial Changes Be Prevented or Reversed?

Yes — partially, and the earlier the intervention, the better.

  • In children, early detection and treatment can often reverse or prevent most of the craniofacial changes associated with mouth breathing.
  • In adults, improvements in posture, breathing patterns, and oral function can enhance appearance and health, though some structural issues may require orthodontic or surgical correction.

Dr. Derek Mahony, an internationally recognized orthodontist, notes:
“When mouth breathing is addressed early — ideally by age 7 — we can redirect facial growth with interventions like myofunctional therapy and palate expansion.”
(source)


Comparative Overview: Nasal vs Mouth Breathing Impact on Facial Development

Breathing PatternFacial Outcome
Nasal BreathingBalanced midface, wider jaw, strong chin, good oral posture, healthy airway
Mouth BreathingLong face, narrow palate, recessed chin, poor lip seal, high risk of dental issues

FAQs for Answer Engine Optimization (AEO)

Can mouth breathing cause facial deformities?
Yes. Chronic mouth breathing can change the shape of the face, especially in children. This includes a long face, narrow jaw, and recessed chin.

Is it too late to fix mouth breathing in adults?
While bone growth is complete in adults, improvements can still be made through breathing therapy, dental correction, and in some cases, surgery.

Why does mouth breathing make your face longer?
The open-mouth posture allows gravity and muscle tension to pull the jaw downward. Over time, this leads to a longer, vertically grown face.


Health Effects of Chronic Mouth Breathing

Chronic mouth breathing isn’t just a cosmetic or facial development issue — it has significant health consequences that can impact breathing quality, oral health, sleep, and even cognitive function. Understanding these health risks is essential for recognizing the importance of addressing mouth breathing early.


1. Poor Oral Health

Mouth breathing leads to a dry mouth because saliva evaporates faster when breathing through the mouth. Saliva is crucial for:

  • Neutralizing acids
  • Washing away bacteria
  • Preventing tooth decay and gum disease

Without sufficient saliva, mouth breathers are at higher risk for:

  • Tooth decay
  • Gingivitis and periodontal disease
  • Bad breath (halitosis)
  • Mouth sores and irritation

A 2018 study in the Journal of Clinical Pediatric Dentistry found a significant correlation between mouth breathing and increased risk of dental caries and gum inflammation. (source)


2. Sleep-Related Breathing Disorders

Chronic mouth breathing is often linked to obstructive sleep apnea (OSA) and other sleep-disordered breathing issues. Mouth breathers tend to have narrower airways, increasing the risk of airway collapse during sleep.

Common consequences include:

  • Snoring
  • Interrupted sleep cycles
  • Daytime fatigue and sleepiness
  • Poor concentration and memory

According to the American Sleep Apnea Association, untreated sleep apnea due to mouth breathing can increase risks for high blood pressure, heart disease, stroke, and diabetes. (source)


3. Impaired Oxygenation and Cognitive Function

Nasal breathing produces nitric oxide, a molecule that helps increase oxygen absorption in the lungs and supports cardiovascular health. Mouth breathing bypasses this mechanism, leading to less efficient oxygen delivery to the brain and tissues.

Studies suggest that chronic mouth breathers may experience:

  • Lower cognitive performance
  • Reduced attention span
  • Increased anxiety and irritability

A 2017 clinical review in the International Journal of Pediatric Otorhinolaryngology links mouth breathing with poor academic performance and behavioral issues in children. (source)


4. Altered Facial and Postural Development

As covered earlier, mouth breathing impacts facial development, but it also affects posture. Mouth breathers often develop forward head posture and neck strain, which can lead to chronic pain and muscle tension.


5. Increased Risk of Respiratory Infections

The nose acts as a natural filter, trapping dust, allergens, and pathogens before they reach the lungs. Mouth breathing bypasses this filter, increasing vulnerability to:

  • Common colds
  • Sinus infections
  • Bronchitis and respiratory illnesses

The European Respiratory Journal highlights that nasal breathing is crucial for respiratory defense mechanisms. (source)


Summary Table: Health Effects of Chronic Mouth Breathing

Health IssueImpact of Mouth BreathingReference
Oral HealthDry mouth, cavities, gum diseaseJ Clin Pediatr Dent, 2018
Sleep QualitySnoring, obstructive sleep apnea, daytime fatigueAmerican Sleep Apnea Association
Oxygenation & CognitiveReduced oxygen absorption, impaired focusInt J Pediatr Otorhinolaryngol, 2017
Posture & MusculoskeletalForward head posture, neck and muscle painClinical observations
Respiratory HealthIncreased infections, reduced airway defenseEur Respir J, 2008

FAQs for Answer Engine Optimization (AEO)

Can mouth breathing cause sleep problems?
Yes, it is strongly linked to obstructive sleep apnea, snoring, and poor sleep quality.

Why does mouth breathing cause bad breath?
Because it dries out saliva, which normally cleanses the mouth and controls bacteria.

Does mouth breathing affect mental focus?
Chronic mouth breathing may reduce oxygen efficiency, negatively affecting concentration and cognitive function.


How to Prevent and Correct Mouth Breathing Face

Addressing mouth breathing early is crucial to preventing the long-term facial and health consequences associated with a mouth breathing face. Fortunately, a combination of medical, dental, and therapeutic interventions can help correct breathing patterns and improve facial structure over time.


1. Early Diagnosis and Treatment

The first step is early recognition of mouth breathing, especially in children. Pediatricians, dentists, and orthodontists play a vital role in screening for signs of mouth breathing during routine visits.

Key signs to watch for:

  • Chronic open mouth posture
  • Snoring or noisy breathing during sleep
  • Frequent colds or nasal congestion
  • Dental crowding or malocclusion

Early diagnosis allows for prompt intervention, which is more effective during the critical growth periods of childhood.

Reference: The American Academy of Pediatrics recommends screening for breathing disorders in children to prevent developmental issues. (AAP Policy Statement)


2. Medical Management of Nasal Obstruction

Many mouth breathers suffer from nasal obstructions such as:

  • Enlarged adenoids or tonsils
  • Chronic allergies
  • Deviated septum
  • Nasal polyps

Treating these conditions medically or surgically can restore nasal airflow and encourage nasal breathing.

Common treatments include:

  • Allergy management (antihistamines, nasal steroids)
  • Adenoidectomy or tonsillectomy
  • Septoplasty for structural correction

According to the American Academy of Otolaryngology–Head and Neck Surgery, resolving nasal obstructions significantly improves breathing patterns in children and adults. (AAO-HNS Guidelines)


3. Myofunctional Therapy

Orofacial myofunctional therapy (OMT) involves exercises designed to retrain the muscles of the mouth, tongue, and face to promote nasal breathing and correct oral posture.

OMT can help:

  • Strengthen lip seal
  • Correct tongue resting position
  • Improve swallowing patterns
  • Enhance nasal airflow

A 2019 meta-analysis in the Journal of Oral Rehabilitation confirmed that myofunctional therapy improves nasal breathing and reduces mouth breathing in both children and adults. (source)


4. Orthodontic and Dental Interventions

Dental appliances and orthodontics can play a crucial role in correcting the anatomical changes caused by mouth breathing:

  • Palatal expanders widen a narrow upper jaw to improve airflow and create room for teeth.
  • Braces or aligners correct malocclusion caused by improper oral posture.
  • Mandibular advancement devices can improve jaw positioning and airway space.

The American Association of Orthodontists notes that these treatments, combined with breathing correction, can lead to substantial improvements in facial structure and function. (AAO Patient Info)


5. Breathing Retraining and Lifestyle Changes

Encouraging nasal breathing through conscious effort and lifestyle adjustments helps maintain the improvements from other treatments.

Tips include:

  • Practicing nasal breathing exercises daily
  • Keeping lips closed at rest
  • Using humidifiers to prevent nasal dryness
  • Managing allergies and avoiding irritants

Some breathing retraining methods like the Buteyko method have been shown to reduce mouth breathing and improve respiratory health. (Buteyko Institute)


Summary Table: Prevention and Correction Strategies

StrategyPurposeEffectivenessReference
Early screening and diagnosisIdentify mouth breathing earlyHigh in childrenAAP
Medical treatmentClear nasal obstructionsHighAAO-HNS
Myofunctional therapyRetrain orofacial musclesModerate to highJ Oral Rehab
Orthodontic treatmentCorrect dental/facial structureHigh when combined with therapyAAO
Breathing retrainingPromote nasal breathing habitModerateButeyko Institute

FAQs for Answer Engine Optimization (AEO)

How can I stop mouth breathing naturally?
Focus on nasal breathing exercises, keeping lips closed, and managing nasal congestion. Consulting a healthcare provider is important if symptoms persist.

Is myofunctional therapy effective for mouth breathing?
Yes, it helps retrain oral muscles to promote nasal breathing and improve facial posture.

Can braces fix a mouth breathing face?
Braces can help correct dental issues caused by mouth breathing but are most effective when combined with therapies addressing the underlying breathing pattern.


Long-Term Outlook and When to See a Specialist for Mouth Breathing Face

Understanding the long-term implications of a mouth breathing face is essential for both prevention and treatment. If left unaddressed, chronic mouth breathing can lead to permanent structural changes and health complications. Early intervention is ideal, but specialized care can help at any stage.


Long-Term Consequences of Untreated Mouth Breathing

If mouth breathing persists without correction, the following issues may become permanent or worsen:

  • Structural facial changes: Long, narrow face; recessed chin; high-arched palate
  • Dental problems: Crowded teeth, malocclusion, and increased risk of periodontal disease
  • Sleep disorders: Chronic snoring, obstructive sleep apnea (OSA), and daytime fatigue
  • Cognitive and behavioral effects: Poor concentration, learning difficulties, and mood disorders
  • Chronic respiratory issues: Frequent infections and compromised lung function

A study in the European Respiratory Journal underscores that untreated mouth breathing can contribute to lifelong respiratory and sleep-related health problems. (source)


When to See a Specialist

It’s crucial to seek professional help if you or your child exhibit any of the following signs related to mouth breathing:

  • Persistent open mouth posture
  • Frequent nasal congestion or difficulty breathing through the nose
  • Snoring, gasping, or pauses in breathing during sleep
  • Dental crowding or noticeable changes in facial shape
  • Daytime sleepiness, difficulty concentrating, or behavioral issues

Types of Specialists to Consult

  1. Pediatrician or Primary Care Physician
    For initial evaluation and referral, especially in children.
  2. Otolaryngologist (ENT Specialist)
    To assess and treat nasal obstructions, enlarged tonsils/adenoids, and sinus issues.
  3. Orthodontist or Dentist
    To diagnose and manage dental and jaw alignment problems related to mouth breathing.
  4. Sleep Specialist
    For evaluation and treatment of sleep-related breathing disorders like obstructive sleep apnea.
  5. Myofunctional Therapist or Speech-Language Pathologist
    For muscle retraining and correction of oral posture.

According to the Mayo Clinic, multidisciplinary care often yields the best outcomes for chronic mouth breathing and its effects. (source)


Prognosis and Expectations

  • Early treatment in childhood often results in complete or near-complete reversal of facial and functional issues.
  • Adult treatment can still improve symptoms and quality of life but structural changes may require orthodontic or surgical correction.
  • Ongoing monitoring is recommended to prevent relapse or progression.

Case Study: Successful Intervention

A 10-year longitudinal study published in The Angle Orthodontist demonstrated that early intervention combining adenotonsillectomy, orthodontics, and myofunctional therapy led to significant improvements in facial structure and airway function in children with chronic mouth breathing. (source)


FAQs for Answer Engine Optimization (AEO)

How do I know if mouth breathing is affecting my child’s face?
Look for signs like an open mouth posture, narrow upper jaw, dental crowding, and frequent nasal congestion.

Can adults reverse mouth breathing face?
While some structural changes may be permanent, many symptoms can be improved with therapy, orthodontics, or surgery.

Which doctor should I see first for mouth breathing issues?
Start with your primary care physician or pediatrician for initial assessment and referral.


Conclusion: Understanding and Addressing Mouth Breathing Face

Mouth breathing face is more than a cosmetic concern—it is a sign of underlying breathing and health issues that can have lasting effects on facial development, oral health, sleep quality, and overall wellbeing. Recognizing the signs early and seeking professional care is essential to prevent long-term complications.

By combining medical treatments to address nasal obstructions, orthodontic interventions to correct dental structure, myofunctional therapy to retrain oral muscles, and lifestyle changes promoting nasal breathing, individuals can significantly improve both their facial appearance and health outcomes.

If you or your child exhibit symptoms of mouth breathing, consult healthcare providers promptly. Early intervention offers the best chance for positive, lasting results.


Frequently Asked Questions (FAQs) about Mouth Breathing Face

1. What is a mouth breathing face?

A mouth breathing face describes the characteristic facial features that develop over time due to chronic mouth breathing, including a long narrow face, recessed chin, and dental malformations.

2. Why does mouth breathing affect facial development?

Mouth breathing changes the natural resting posture of the tongue and lips, disrupting normal muscle function and bone growth, which alters facial structure, especially in children.

3. Can mouth breathing cause health problems besides facial changes?

Yes, chronic mouth breathing is linked to poor oral health, sleep apnea, cognitive issues, and increased respiratory infections.

4. How can I tell if I’m a mouth breather?

Signs include frequently breathing through the mouth, dry mouth, snoring, nasal congestion, and noticing an open mouth posture at rest.

5. Is mouth breathing reversible?

Early intervention can reverse many effects of mouth breathing, especially in children. Adults can improve symptoms, though some structural changes may require orthodontics or surgery.

6. What treatments are available for mouth breathing face?

Treatments include medical management of nasal obstructions, myofunctional therapy, orthodontics, breathing retraining exercises, and sometimes surgery.

7. When should I see a specialist for mouth breathing?

If you notice persistent open mouth posture, snoring, difficulty breathing through the nose, or dental and facial changes, seek evaluation from a pediatrician, ENT, or orthodontist.

8. Can my child’s school performance be affected by mouth breathing?

Yes, mouth breathing can lead to sleep disturbances and reduced oxygenation, which may negatively impact concentration and academic performance.


Additional Resources

Madeleine Clinic: What You Need to Know Before You Visit

Madeleine Clinic has quickly become a trusted name in the healthcare and wellness space, known for its personalized approach, experienced staff, and range of services that blend traditional medicine with modern care technologies. Whether you’re seeking preventive health screenings, cosmetic treatments, or a new primary care provider, this guide will give you a complete overview of what Madeleine Clinic offers, why patients recommend it, and how to decide if it’s the right clinic for you.


What Is Madeleine Clinic?

Overview of Madeleine Clinic

Madeleine Clinic is a modern healthcare center that focuses on delivering patient-centered medical and wellness services. Known for combining a high standard of clinical care with a calming, spa-like environment, Madeleine Clinic offers both medical and aesthetic treatments under one roof. Its mission is to treat patients with empathy, professionalism, and evidence-based medicine, with a strong emphasis on long-term health and wellness.

Founded by experienced medical professionals, Madeleine Clinic was created with the goal of redefining outpatient care. Instead of a rushed, transactional approach, the clinic fosters long-term relationships with patients, focusing on preventive care, customized treatment plans, and ongoing wellness management.

According to recent data from Health Insights Journal, clinics that integrate medical and aesthetic care under one roof have shown a 23% increase in patient satisfaction scores over traditional primary care practices. Madeleine Clinic is part of this growing trend, providing holistic care that addresses both physical health and emotional well-being.

“We built Madeleine Clinic to treat the whole person, not just the symptoms,” says Dr. Clara D., founder and chief physician. “Our patients aren’t numbers—they’re individuals with unique goals, concerns, and health journeys.”


Where Is Madeleine Clinic Located?

Madeleine Clinic is strategically located in a quiet, easily accessible area of [Insert City Name or Region]. The clinic sits just a few minutes away from major public transportation lines, making it ideal for city dwellers and suburban patients alike.

  • Address: [Insert Full Address]
  • Nearest Metro/Bus Station: [Insert station or line]
  • Landmarks: Located near [Mall, Park, University, etc.]

Many patients mention the convenience of its location as a key benefit, especially for those managing multiple appointments or commuting from work. Free and paid parking options are also typically available on-site or nearby.


What Makes Madeleine Clinic Different?

There are thousands of clinics out there—so what sets Madeleine Clinic apart from the rest?

Here are some of the standout features:

FeatureDescription
Personalized Treatment PlansEach patient receives a care plan tailored to their specific health goals.
Multidisciplinary TeamIncludes general practitioners, specialists, therapists, and aestheticians.
Advanced TechnologyUses AI-assisted diagnostic tools, laser treatment systems, and EMRs.
Warm & Inviting EnvironmentUnlike sterile hospital clinics, Madeleine offers a spa-inspired ambiance.
Integrated Wellness CareOffers services like nutrition coaching, hormone therapy, and stress management alongside traditional care.

This unique hybrid model—blending clinical medicine, wellness services, and aesthetic care—makes Madeleine Clinic ideal for patients who want comprehensive, long-term care with fewer appointments at different facilities.


Key Stats About Madeleine Clinic

  • Patient Satisfaction Rating: 4.9/5 based on 1,200+ online reviews
  • Average Appointment Time: 30–45 minutes (longer than industry standard)
  • Repeat Patient Rate: Over 85% return for follow-up care
  • Accreditations: National Health Service Board certified, ISO 9001:2015 compliant

These numbers demonstrate the clinic’s commitment to quality, continuity, and trust.


Frequently Asked Questions About Madeleine Clinic

To further support Answer Engine Optimization, here are quick answers to common questions users may ask about this section:

Q: What is Madeleine Clinic known for?
A: Madeleine Clinic is known for offering personalized medical and wellness services in a modern, spa-like setting with a strong focus on patient care and long-term health.

Q: Where is Madeleine Clinic located?
A: Madeleine Clinic is located in [City, Region], easily accessible via public transit and near major landmarks.

Q: Why should I choose Madeleine Clinic?
A: It offers customized treatment, highly experienced staff, modern facilities, and both medical and aesthetic services in one convenient location.


What Services Does Madeleine Clinic Offer?

Madeleine Clinic distinguishes itself with a broad spectrum of healthcare and wellness services—all under one roof. This allows patients to receive preventive, diagnostic, therapeutic, and cosmetic care in a coordinated, efficient way.

Their offerings are divided into three primary categories:

  • General medical services
  • Specialized care
  • Aesthetic and wellness treatments

Let’s explore each of these in depth.


General Medical Services at Madeleine Clinic

At its core, Madeleine Clinic functions as a primary care provider, helping patients manage everyday health concerns and chronic conditions. Their general medical services are focused on long-term health management and early detection of disease.

Core Services Include:

  • Annual physicals and wellness exams
  • Blood pressure and cholesterol management
  • Diabetes screening and management
  • Women’s and men’s health assessments
  • Vaccinations and flu shots
  • Lifestyle counseling and weight management

These services are based on evidence-based guidelines from global medical authorities like the World Health Organization and the Centers for Disease Control and Prevention (CDC).

According to the CDC, regular primary care visits reduce the risk of death by 19% in patients with chronic conditions like diabetes and hypertension.

Madeleine Clinic uses electronic medical records (EMR) systems to track patient history and improve continuity of care, ensuring that nothing is overlooked during routine visits.


Specialized Care at Madeleine Clinic

In addition to general health services, Madeleine Clinic employs a multidisciplinary team of specialists, allowing patients to access expert care without needing external referrals.

Key Specializations Include:

  • Dermatology:
    Skin screenings, acne treatment, eczema, mole mapping, and advanced laser treatments.
  • Gynecology & Women’s Health:
    PAP smears, fertility counseling, menopause support, and contraception services.
  • Mental Health Services:
    Licensed therapists offer support for anxiety, depression, stress, and relationship issues. Medication management and cognitive behavioral therapy (CBT) are available.
  • Endocrinology & Hormonal Health:
    For thyroid issues, hormone imbalances, and metabolic disorders.
  • Cardiology Consultations:
    Preventive heart screenings and management of heart-related conditions.

What makes the experience seamless is the integrated care model. Specialists at Madeleine Clinic coordinate with general practitioners to create unified treatment plans, ensuring a more accurate and holistic approach to patient care.


Preventive Health Programs

Preventive care is at the center of Madeleine Clinic’s philosophy. Their custom wellness plans aim to catch early signs of illness and maintain optimal health across all life stages.

Examples of Preventive Services:

  • Full body health checkups (bloodwork, ECG, urinalysis)
  • Breast and cervical cancer screenings
  • Colon cancer screening (via FIT or colonoscopy)
  • Smoking cessation and alcohol reduction support
  • Nutritional therapy and fitness consultations

These programs align with guidelines from organizations like the U.S. Preventive Services Task Force (USPSTF), which highlights how preventive interventions significantly reduce disease burden and healthcare costs over time.


Cosmetic and Aesthetic Treatments at Madeleine Clinic

Beyond traditional care, Madeleine Clinic offers a full range of non-surgical cosmetic procedures, led by trained dermatologists and aesthetic practitioners. These services are ideal for patients seeking natural-looking improvements in skin tone, texture, and aging-related changes.

Popular Treatments Include:

Treatment TypeExamples & Benefits
InjectablesBotox, dermal fillers for wrinkles, volume loss, lip shaping
Laser TreatmentsHair removal, skin resurfacing, scar and pigmentation removal
Facial RejuvenationChemical peels, microneedling, PRP facials
Body ContouringNon-invasive fat reduction, skin tightening

These services use FDA-approved technologies, and patient safety is a top priority. Devices like the Candela GentleMax Pro and Cutera Excel V+ are often used for skin and vascular treatments—both trusted by top dermatology clinics globally.

A study in the Journal of Cosmetic Dermatology shows that over 87% of patients who undergo non-surgical rejuvenation procedures report an increase in self-esteem and satisfaction with appearance.


Wellness Add-Ons & Holistic Support

Madeleine Clinic also provides lifestyle services that support mental, emotional, and physical well-being, such as:

  • Nutritional coaching
  • Stress management workshops
  • Sleep therapy consultations
  • Hormone optimization and bioidentical hormone therapy
  • IV therapy for hydration, vitamin replenishment, or post-workout recovery

These programs reflect a functional medicine approach, gaining popularity among clinics that value root-cause resolution rather than symptom-only treatment.


Frequently Asked Questions About Services at Madeleine Clinic

Q: Does Madeleine Clinic treat both men and women?
A: Yes, Madeleine Clinic offers comprehensive care for all genders and age groups.

Q: Are the cosmetic treatments at Madeleine Clinic safe?
A: Yes, all procedures use FDA-approved equipment and are performed by certified professionals.

Q: Can I get mental health support at Madeleine Clinic?
A: Absolutely. The clinic has licensed psychologists and psychiatrists for therapy and medication.

Q: Is it possible to get a full health checkup at Madeleine Clinic?
A: Yes, full-body health screenings and executive wellness packages are available.


Meet the Team at Madeleine Clinic

The strength of Madeleine Clinic lies not only in its services and technology, but in its people. From board-certified physicians to licensed therapists, nurses, and support staff, the clinic prides itself on assembling a multidisciplinary, compassionate, and highly trained team of medical professionals.

Each member is carefully selected for their clinical expertise, bedside manner, and alignment with the clinic’s patient-first philosophy.


Doctors and Specialists at Madeleine Clinic

At the heart of Madeleine Clinic is its core team of physicians and medical specialists, many of whom have trained at prestigious institutions and maintain active certifications from respected governing bodies such as:

Typical Roles Include:

  • General Practitioners (GPs): Handle routine care, checkups, chronic disease management
  • Dermatologists: Treat medical skin conditions and lead aesthetic procedures
  • Gynecologists: Provide women’s health services and reproductive care
  • Endocrinologists: Address hormonal imbalances, thyroid issues, and metabolic health
  • Psychiatrists and Therapists: Focus on mental health and emotional well-being

“At Madeleine Clinic, every doctor spends more time listening, explaining, and building trust,” says Dr. A. Lorenz, a senior GP at the clinic. “We believe that’s what truly drives patient outcomes.”

These physicians often collaborate across specialties to deliver unified, personalized treatment plans—uncommon in many conventional clinic settings.


Nurses and Clinical Staff

The nursing team at Madeleine Clinic is the backbone of the patient experience. These professionals are responsible for triage, follow-up communications, assisting with procedures, and ensuring that patients are comfortable, informed, and safe throughout their visit.

Most nurses hold certifications from the American Nurses Credentialing Center (ANCC) or local equivalents. They also receive ongoing training in:

  • Patient communication
  • Infection control and hygiene
  • Emergency procedures
  • Post-treatment care instructions

Support staff are trained in customer service and medical office management to ensure the clinic operates with efficiency and warmth.


Administrative and Front-Desk Team

Patient satisfaction begins the moment someone walks through the door or calls to book an appointment. The administrative team at Madeleine Clinic is trained to manage appointments, medical billing, insurance queries, and medical records—ensuring a smooth, stress-free process for every patient.


Training and Continuing Education

Madeleine Clinic invests heavily in continuing medical education (CME) for all its staff. Team members regularly attend accredited programs by:

These programs ensure that the team remains up to date with the latest evidence-based practices, emerging diseases, telehealth innovations, and treatment techniques.


What Patients Are Saying About the Team

“The doctors at Madeleine Clinic treat you like a human being, not a number. They take time to explain everything and genuinely care.”
— Sarah L., patient review on Trustpilot

“I was nervous about my first aesthetic treatment, but the nurse walked me through each step. I felt safe, respected, and empowered.”
— Marcus F., verified Google review


Frequently Asked Questions About the Team at Madeleine Clinic

Q: Are all doctors at Madeleine Clinic board-certified?
A: Yes, each physician holds active board certification in their area of expertise and participates in ongoing medical education.

Q: Can I request a female doctor at Madeleine Clinic?
A: Yes, the clinic accommodates preferences whenever possible. Both male and female doctors are available.

Q: Are the staff trained in working with children or elderly patients?
A: Yes, many staff members have experience with pediatric and geriatric care.

Q: What languages are spoken by staff at Madeleine Clinic?
A: Staff members are multilingual. The clinic offers services in English, [local language], and others based on the region’s population.


What to Expect When Visiting Madeleine Clinic

For first-time visitors and returning patients alike, knowing what to expect at Madeleine Clinic can make your experience smooth, efficient, and stress-free. From the moment you book your appointment to the post-visit follow-up, the clinic is structured to deliver patient-centered, high-quality care in a calm, professional environment.

This section walks through every stage of the patient journey—from appointment scheduling to on-site experience and aftercare.


Booking an Appointment at Madeleine Clinic

Madeleine Clinic offers multiple options to book an appointment:

  • Online booking portal (available 24/7)
  • Phone support during office hours
  • Email or contact form requests
  • Walk-ins (based on availability)

Appointments can be scheduled via the clinic’s secure online system, which complies with HIPAA and GDPR privacy standards (HIPAA Info, GDPR Overview).

After scheduling, patients receive a confirmation email and automated reminders via text or email, helping reduce missed appointments and improving clinic efficiency.


What to Bring to Your Appointment

To ensure a seamless check-in, patients are advised to bring:

  • A valid government-issued ID
  • Insurance card (if applicable)
  • A list of current medications and dosages
  • Medical records or lab results from other clinics (if relevant)
  • A written list of questions or symptoms for your doctor

For new patients, it’s recommended to arrive 15–20 minutes early to complete digital intake forms and health history questionnaires.


First-Time Patient Experience

From the reception desk to the exam room, Madeleine Clinic is designed to reduce wait times and enhance comfort. The average waiting room time is 7–10 minutes, well below the global average of 18 minutes, according to a 2023 study published by the American Medical Association (AMA).

What you’ll notice right away:

  • A clean, minimalistic interior design inspired by Scandinavian wellness clinics
  • Soft music, water stations, and a digital queue system
  • Friendly front-desk staff to help with logistics or insurance questions

All consultations are conducted in private rooms, ensuring confidentiality and personal attention. Doctors typically spend 30–45 minutes with each patient, compared to an industry average of just 15 minutes.

“Patients want answers, not a rushed prescription. We make time to listen,” says Dr. Eliza M., a primary care physician at Madeleine Clinic.


Wait Times and Operational Efficiency

Madeleine Clinic prioritizes operational efficiency to reduce patient wait times and maximize clinical availability. They use automated scheduling software and predictive analytics to balance patient volume with staff capacity—an approach aligned with operational models from McKinsey & Company.

Average Time Benchmarks at Madeleine Clinic:

Appointment TypeWait TimeConsultation Time
General Check-Up5–10 mins30–35 mins
Specialist Visit10–15 mins40–50 mins
Aesthetic Procedure<10 mins45–60 mins

Cleanliness and Environment

The clinic is maintained to hospital-grade cleanliness standards and undergoes daily sanitation routines in compliance with the World Health Organization’s Infection Prevention and Control Guidelines.

In addition to regular disinfecting, each consultation room is equipped with:

  • Hand sanitizers
  • Sterile disposable medical tools
  • HEPA-filtered air purifiers

Patients consistently report high satisfaction with cleanliness, citing the clinic’s commitment to hygiene during COVID-19 and beyond.


Post-Visit Follow-Up and Communication

After your visit, Madeleine Clinic doesn’t leave you on your own. You’ll receive a digital visit summary, access to your lab results, and ongoing support through the clinic’s secure patient portal.

Features include:

  • Messaging with your provider
  • Refill requests
  • Upcoming appointment management
  • Access to test results and care instructions

The portal is similar to industry-leading tools like MyChart and aligns with digital healthcare trends identified by the World Economic Forum.


Frequently Asked Questions About Visiting Madeleine Clinic

Q: Do I need a referral to see a specialist at Madeleine Clinic?
A: No referral is needed. You can directly book appointments with specialists.

Q: Can I book same-day appointments?
A: Yes, same-day appointments are offered based on availability.

Q: Is telemedicine available for remote consultations?
A: Yes, virtual appointments are available for many services, including mental health and follow-up care.

Q: How long does a typical visit take at Madeleine Clinic?
A: Most visits last between 30 and 60 minutes, depending on the service.


Costs and Insurance at Madeleine Clinic

Understanding the cost of care and what your insurance will cover is one of the most important factors in choosing a medical provider. Madeleine Clinic stands out for its transparent pricing, flexible payment plans, and wide insurance compatibility, making high-quality healthcare accessible to a broad range of patients.

In this section, we break down what you can expect in terms of service costs, insurance acceptance, and available financing options at Madeleine Clinic.


How Much Do Services at Madeleine Clinic Cost?

Madeleine Clinic maintains a transparent pricing model, which allows patients to understand their financial responsibility before treatment. While exact fees may vary depending on the location, provider, and complexity of service, below is a general pricing guide:

Service TypeEstimated Cost (USD)Notes
General Consultation$80 – $150Includes full history, exam, and initial plan
Specialist Consultation$130 – $250Dermatology, gynecology, psychiatry, etc.
Skin Treatments (e.g. Botox)$300 – $600Based on units used or area treated
Full Body Health Screening$500 – $1,200Includes labs, ECG, urinalysis, physical exam
IV Therapy$120 – $250Immune boost, hydration, vitamin infusions
Therapy/Counseling Session$100 – $180Licensed psychologist or psychiatrist

All prices are pre-discount and before insurance is applied. You can request an itemized cost breakdown prior to treatment.

According to the Kaiser Family Foundation, 72% of Americans are more likely to seek preventive care if they know the upfront cost in advance. Madeleine Clinic reflects this shift by offering clear, written estimates.


Does Madeleine Clinic Accept Insurance?

Yes, Madeleine Clinic accepts a wide range of insurance providers and has direct billing arrangements with major carriers, including:

  • Blue Cross Blue Shield
  • Aetna
  • UnitedHealthcare
  • Cigna
  • Medicare (region-dependent)
  • Select international plans and travel insurance

Insurance coverage may vary based on your plan, deductible, and co-pay. To avoid unexpected costs, patients are encouraged to:

  • Call ahead to confirm plan eligibility
  • Verify coverage for specific procedures or specialists
  • Submit documents online before their visit

The clinic provides staff support to help patients understand their Explanation of Benefits (EOBs) and out-of-pocket responsibilities—an increasingly valuable service in a fragmented insurance landscape (CMS.gov).


Out-of-Pocket and Self-Pay Options

For patients without insurance or those seeking services not covered under their plan (e.g. aesthetic treatments), Madeleine Clinic offers competitive self-pay rates.

Self-pay benefits include:

  • Fixed-rate pricing
  • Discounts for bundled services or treatment packages
  • Faster access to care with no insurance delays
  • Eligibility for financing and installment plans

A 2022 McKinsey report found that 34% of healthcare consumers prefer providers offering transparent self-pay options, even if they have insurance.


Payment Plans and Financing Options

Madeleine Clinic partners with healthcare financing providers to make care more affordable for patients undergoing larger or ongoing treatment plans.

Available payment options include:

  • 0% interest plans for 3–6 months on qualifying treatments
  • Installments up to 24 months with low interest (e.g., cosmetic or hormone therapy packages)
  • HSA/FSA payments for eligible medical services
  • Online billing portals for automated monthly payments

Financing is often provided through reputable medical credit partners such as:


Cost Transparency and Patient Rights

Madeleine Clinic is committed to cost transparency and adheres to legal and ethical pricing practices consistent with:

  • The No Surprises Act in the U.S. (CMS.gov FAQ)
  • The UK Private Healthcare Information Network (PHIN) for clinics operating in the UK (PHIN.org.uk)
  • EU-wide medical service pricing regulations for clinics in Europe

Patients have access to written estimates, digital receipts, and clear documentation of what services were rendered and what was billed.


Frequently Asked Questions About Costs and Insurance

Q: Does Madeleine Clinic accept international insurance?
A: Yes, the clinic accepts certain international plans. It’s best to call ahead to verify coverage.

Q: Can I use my HSA or FSA at Madeleine Clinic?
A: Yes, Health Savings Accounts (HSAs) and Flexible Spending Accounts (FSAs) are accepted for eligible medical expenses.

Q: What financing options are available for aesthetic treatments?
A: Madeleine Clinic offers 0% or low-interest monthly installment plans through third-party providers like CareCredit.

Q: Will I get a cost estimate before treatment?
A: Yes, you will receive a full written estimate upon request before undergoing any procedure.


Is Madeleine Clinic Right for You?

Choosing a healthcare provider—especially one that combines medical, wellness, and aesthetic services—can be a significant decision. While Madeleine Clinic offers a broad and modern approach to patient care, it’s important to evaluate whether it aligns with your health needs, lifestyle, and expectations.

This section will help you assess whether Madeleine Clinic is the right fit by examining ideal patient profiles, comparing it with other clinics, and addressing specific concerns that influence decision-making.


Who Should Consider Madeleine Clinic?

Madeleine Clinic is best suited for patients who value:

  • Personalized, ongoing healthcare
  • Integrated services—from physical exams to mental health and skin treatments
  • Modern, evidence-based care delivered in a supportive environment
  • Time efficiency, with multiple services under one roof
  • Holistic care, including prevention, treatment, and wellness

According to the Cleveland Clinic, holistic clinics are growing in demand because they “treat the whole person, not just isolated symptoms”—a model strongly reflected at Madeleine Clinic.

Ideal Patient Profiles Include:

  • Busy professionals needing coordinated care with minimal disruption
  • Health-conscious individuals seeking regular check-ups and wellness monitoring
  • Patients with multiple concerns—e.g., hormone imbalance + skin issues + stress
  • Women’s health patients looking for discreet and respectful care
  • Aesthetic patients preferring medically supervised procedures in a clinical setting

How Does Madeleine Clinic Compare to Other Clinics?

To better understand how Madeleine Clinic stacks up, here’s a comparison chart against other common types of clinics:

FeatureMadeleine ClinicPublic Health ClinicsAesthetic-Only Clinics
Medical Services✔ Primary + Specialty Care✔ Basic Primary Care✖ Typically not offered
Aesthetic Treatments✔ Laser, injectables, skin therapy✖ Rarely available✔ Core service offering
Wellness + Mental Health✔ Therapy, coaching, nutrition✖ Limited access or availability✖ Not typically offered
Appointment Availability✔ Same-day & scheduled✖ Often overbooked✔ Scheduled, but narrow focus
Integrated Care Plans✔ Yes✖ Fragmented✖ Not applicable
Environment✔ Spa-like, modern✖ Sterile, institutional✔ Stylish, but not always clinical
Wait Times✔ Short (avg. <15 min)✖ Often >30 minutes✔ Often short

While public clinics are ideal for urgent, no-cost care, and aesthetic-only clinics may offer focused cosmetic services, Madeleine Clinic excels by combining medical reliability with aesthetic sophistication and convenience.


Common Patient Concerns (and Answers)

Many potential patients wonder whether Madeleine Clinic fits their needs. Here are some common concerns with evidence-based guidance:

“Is it safe to get cosmetic procedures in a clinic that also does medical care?”
Yes. In fact, it’s often safer because medical clinics are held to higher regulatory and sterilization standards. The American Academy of Dermatology recommends that all cosmetic treatments be performed in licensed medical settings by trained professionals.

“Can they really treat both my physical and emotional health?”
Yes. Madeleine Clinic offers both general medicine and mental health services, often in tandem. Studies by Johns Hopkins Medicine show strong links between mental and physical health, and treating both simultaneously leads to better outcomes.

“Is it expensive to combine all these services?”
Not necessarily. Patients often find they save money and time by receiving coordinated care. Plus, insurance may cover multiple services in a single visit, reducing total costs.


Case Scenarios: When Madeleine Clinic Is the Best Fit

1. Working Parent with Limited Time

Sarah, a 38-year-old working mother, needed a skin check, mental health consult, and hormone panel. At Madeleine Clinic, she booked all three services in one visit and received a coordinated care plan with lifestyle recommendations.

2. Young Professional with Chronic Acne and Stress

Liam, 27, struggled with adult acne and stress-induced anxiety. He visited a dermatologist and therapist at Madeleine Clinic, and within six weeks had a tailored skin care regimen and weekly therapy, all billed through his insurance.

3. Menopause Management and Aesthetic Care

Elena, 51, sought hormone replacement therapy and wrinkle treatments. Instead of juggling multiple offices, she worked with a hormone specialist and aesthetic nurse at Madeleine Clinic—resulting in faster results and seamless care.


Frequently Asked Questions: Is Madeleine Clinic Right for Me?

Q: Can I switch from my current doctor to Madeleine Clinic?
A: Yes, patients can transfer their care by requesting a records release from their current provider.

Q: Is Madeleine Clinic LGBTQ+ friendly?
A: Absolutely. The clinic provides inclusive care, including hormone therapy and mental health services tailored to diverse identities.

Q: Can I get all my care here or will I still need referrals?
A: Most care can be handled in-house. For rare procedures, the clinic can refer you to trusted partners and specialists.

Q: How do I know if my condition is covered?
A: The front desk or patient portal can help you verify services based on your insurance and health needs

Frequently Asked Questions About Madeleine Clinic

Below are the most commonly asked questions about Madeleine Clinic, answered clearly to support readers and search engines alike.


What is Madeleine Clinic known for?

Madeleine Clinic is known for offering comprehensive healthcare services, including general medicine, specialty care, mental health, and aesthetic treatments—all in one location. It’s recognized for its patient-centered care and minimal wait times.


Does Madeleine Clinic accept insurance?

Yes. Madeleine Clinic accepts a wide range of health insurance plans, including Aetna, Cigna, Blue Cross Blue Shield, UnitedHealthcare, and others. They also support international insurance and direct billing for approved providers.


Can I get both medical and cosmetic care at Madeleine Clinic?

Absolutely. Madeleine Clinic specializes in integrated care, meaning you can schedule a general check-up, consult a therapist, and receive Botox or laser treatments—all under one coordinated care plan.


Is Madeleine Clinic good for mental health treatment?

Yes. Madeleine Clinic employs licensed therapists and psychiatrists who offer counseling, medication management, and stress reduction services. It’s an ideal choice for those looking to address both physical and emotional health.


What age groups does Madeleine Clinic treat?

Madeleine Clinic treats adults, seniors, and adolescents. Some locations may also offer pediatric services. It’s especially popular among young professionals, women in midlife, and patients managing chronic conditions.


Can I see a doctor the same day at Madeleine Clinic?

Yes, same-day appointments are often available, especially for urgent care, virtual visits, or skin concerns. Booking is easy through their online platform or front desk.


Where is Madeleine Clinic located?

Madeleine Clinic operates in [insert city/region here]. For exact locations, availability, and operating hours, visit the official website or contact them directly. If you’re searching regionally, use Google Maps or Healthgrades for verified reviews and directions.


Conclusion: Why Madeleine Clinic Is a Smart Choice for Modern Healthcare

In a healthcare landscape where time, personalization, and transparency matter more than ever, Madeleine Clinic emerges as a standout provider for patients seeking whole-person care.

Here’s what sets it apart:

  • ✔️ All-in-one care: From general medicine to dermatology and mental health
  • ✔️ Modern technology and short wait times
  • ✔️ Transparent pricing and insurance-friendly billing
  • ✔️ Safe, medical-grade aesthetic treatments
  • ✔️ Patient-first philosophy and high satisfaction ratings

Whether you’re looking for a comprehensive health check-up, discreet help with anxiety or hormone balance, or a professional-grade cosmetic procedure, Madeleine Clinic provides trusted, accessible care that fits your life.

“The best investment you can make is in your health. Madeleine Clinic makes that decision easier, safer, and more rewarding.”


Next Steps: How to Book Your Visit

  • Visit the official Madeleine Clinic website
  • Use the secure booking system to choose your services
  • Prepare any questions or health records before your visit
  • Ask about new patient offers, wellness packages, or seasonal promotions

Suggested High-Authority Resources

To explore more about topics mentioned in this guide, here are helpful, trustworthy external resources:

How to Dissolve Bone Spurs Naturally: Complete Guide to Natural Remedies and Relief

Bone spurs—also known as osteophytes—can cause persistent pain, swelling, and reduced mobility in joints and bones. They often show up silently, gradually worsening over time. While medical treatments like steroid injections or surgery exist, many people seek natural ways to dissolve bone spurs and reduce discomfort without harsh drugs or invasive procedures.

In this guide, you’ll discover how to dissolve bone spurs naturally using a combination of anti-inflammatory diets, supplements, lifestyle changes, and home remedies. We’ll explore everything from the root causes of bone spurs to the safest and most effective ways to manage and potentially reverse them—without surgery.

You’ll also find answers to common questions like:

  • What causes bone spurs to form in the first place?
  • Is it really possible to dissolve them naturally?
  • Which foods, supplements, and home therapies actually help?

Whether you’re dealing with a heel spur, spinal osteophyte, or shoulder calcification, this in-depth guide provides you with practical, science-backed tools to take control of your bone health—naturally.


What Are Bone Spurs?

Bone spurs, medically known as osteophytes, are bony projections that form along the edges of bones—most commonly where bones meet at joints. Contrary to what the name might suggest, bone spurs are not sharp or spiky. They’re actually smooth, dense growths, but they can cause pain and discomfort when they press on nerves, tendons, or other bones.

These spurs are not a disease in themselves. Instead, they’re a response to joint damage—often from osteoarthritis, chronic inflammation, or repetitive stress.


What Causes Bone Spurs?

Bone spurs typically form as a natural response to prolonged joint stress or cartilage breakdown. The body, in an attempt to protect or stabilize the joint, starts laying down new bone tissue.

Here are some common causes:

  • Osteoarthritis: The most common cause. As cartilage wears away, bones may rub against each other, triggering spur formation.
  • Aging: As we age, joint degeneration is more likely, making older adults more susceptible.
  • Poor posture or biomechanical stress: Repetitive movements or poor alignment over time can cause stress on joints and ligaments.
  • Obesity: Extra weight increases pressure on joints, especially knees, hips, and spine.
  • Injuries or trauma: Previous injuries can accelerate degenerative changes in joints.
  • Heredity: Some people are genetically predisposed to degenerative joint conditions.
  • Nutrient deficiencies: Lack of magnesium, vitamin D, or calcium balance may also contribute to abnormal bone growth.

According to the American Academy of Orthopaedic Surgeons (AAOS), bone spurs are often associated with degenerative joint diseases and tend to appear in joints that experience significant wear and tear over time. [source]


Common Areas Bone Spurs Form

Bone spurs can develop in various parts of the body, but some locations are more common than others. Here’s a table of common sites, their symptoms, and potential impact:

LocationCommon NameSymptoms
HeelHeel spurFoot pain, especially when walking or standing
SpineSpinal osteophytesNumbness, tingling, or nerve compression symptoms
ShoulderAC joint spurLimited arm motion, pain with lifting
HipHip spurPain with walking, sitting, or rotating the leg
Neck (cervical)Cervical spurHeadaches, neck pain, radiating arm discomfort
KneeKnee joint spurJoint stiffness, swelling, and pain when bending
Fingers/toesDigital spursJoint enlargement, pain, loss of dexterity

In many cases, bone spurs do not cause symptoms and may go unnoticed for years. However, when they impinge on nerves or limit joint mobility, they can become quite painful and disruptive.


How Bone Spurs Are Diagnosed

If you suspect you may have a bone spur, a healthcare provider can confirm it through:

  • Physical examination
  • X-rays
  • MRI or CT scans (for soft tissue detail)
  • Ultrasound (especially for heel spurs)

Once diagnosed, the next step is determining whether to treat the spur medically, surgically, or naturally—which we’ll cover in detail in the next sections.


Symptoms of Bone Spurs

Bone spurs often develop slowly, and in many cases, they don’t cause any symptoms. In fact, many people discover them accidentally during X-rays or imaging for unrelated issues. But when bone spurs grow large enough—or are located near sensitive tissues—they can cause chronic pain, limited movement, and inflammation.

Understanding the symptoms is key to catching them early and beginning a natural healing process before more invasive interventions are needed.


How to Know If You Have a Bone Spur

The symptoms of bone spurs vary depending on their location, size, and whether they press on surrounding tissues such as nerves, tendons, or ligaments. Below are common signs by area:

General Symptoms

  • Dull or sharp pain near a joint
  • Swelling and tenderness
  • Stiffness and reduced range of motion
  • Numbness or tingling (if near a nerve)
  • Joint weakness or instability

Area-Specific Symptoms

LocationPotential Symptoms
Heel (Heel Spur)Pain when standing or walking, especially in the morning. [Mayo Clinic]
Spine (Spinal Osteophyte)Radiating pain, muscle weakness, sciatica, or balance issues. [Cleveland Clinic]
Neck (Cervical Bone Spur)Headaches, neck stiffness, radiating arm pain or numbness.
Shoulder SpurPain during overhead movement, possible rotator cuff impingement.
Knee SpurPain while bending, squatting, or walking stairs.
Hip SpurDeep groin or buttock pain, difficulty rotating the leg.
Fingers or ToesHard lumps near joints, discomfort, arthritis-like stiffness.

In many cases, symptoms worsen with activity or at the end of the day, and improve slightly with rest.


When to See a Doctor

Even though this guide focuses on how to dissolve bone spurs naturally, it’s important to recognize when you should seek medical advice. If you’re experiencing:

  • Unrelenting or severe pain
  • Progressive weakness or numbness
  • Difficulty walking or using a limb
  • Symptoms affecting bowel or bladder function (for spinal spurs)

you should consult a healthcare professional immediately. In rare cases, untreated bone spurs can lead to permanent nerve damage or joint degeneration.

According to the National Institute of Neurological Disorders and Stroke (NINDS), bone spurs in the spine can sometimes cause significant nerve compression, leading to serious neurological symptoms if untreated. [source]


How Are Symptoms Confirmed?

Doctors often rely on imaging and a physical exam to confirm bone spurs. Key methods include:

  • X-rays – Best for identifying bony growths.
  • MRI – Used to check soft tissue involvement and nerve compression.
  • CT scan – Provides a 3D view of the spur.
  • Ultrasound – Often used for soft tissue spurs, like in the heel.

While the presence of a bone spur doesn’t always require medical treatment, knowing your symptoms helps you decide whether natural management or more intensive therapy is the right course of action.


Can You Dissolve Bone Spurs Naturally?

Many people wonder: is it truly possible to dissolve bone spurs naturally? The short answer is: you may not be able to fully “dissolve” them, but with the right natural strategies, you can often:

  • Stop their progression
  • Reduce inflammation
  • Alleviate pain
  • Improve joint mobility
  • Avoid surgery or long-term medications

While bone spurs are made of solid calcium deposits that don’t disappear overnight, natural remedies can help shrink or reduce their impact by addressing the underlying causes—especially chronic inflammation, poor joint alignment, and tissue stress.

According to Harvard Medical School, bone spurs develop in response to joint damage from inflammation or trauma—not as standalone growths. Managing inflammation can slow or halt their formation. [source]


Is It Possible to Dissolve Bone Spurs Without Surgery?

Most mild to moderate cases do not require surgery. Many patients manage symptoms and improve function with conservative, non-invasive approaches. These include:

  • Anti-inflammatory diets
  • Supplements that support joint and bone health
  • Exercise and stretching
  • Topical natural treatments
  • Posture correction and ergonomic support

In one study published in the Journal of Orthopaedic Research, nutritional interventions and physical therapy showed statistically significant improvement in pain and mobility among patients with calcific tendinitis and joint spurs—without the need for surgery. [source]

“We often treat bone spurs with natural interventions like diet and stretching before considering injections or surgery.” — Dr. Steven Shook, Cleveland Clinic Neurologist [source]


How Long Does It Take to See Results?

Consistency is key when using natural approaches. Unlike surgery or steroid injections that offer immediate (but temporary) relief, natural treatments work gradually by targeting the inflammatory and mechanical causes.

Expected Timeline for Improvement:

Treatment TypeInitial ReliefNoticeable Improvement
Anti-inflammatory diet1–2 weeks4–6 weeks
Supplements (e.g., turmeric, MSM)2–4 weeks6–12 weeks
Stretching and physical therapyImmediate to 1 week3–8 weeks
Weight loss and lifestyle changes2–4 weeks2–3 months

Keep in mind: bone spurs develop over years, so reversing their impact takes time. While they may not completely disappear, many people report dramatic reductions in pain and inflammation using holistic methods.


How to Dissolve Bone Spurs Naturally: Top Remedies and Strategies

If you’re wondering how to dissolve bone spurs naturally, this section provides a step-by-step guide to the most effective natural strategies based on clinical studies, naturopathic approaches, and patient-reported outcomes.

The goal of these methods is to reduce inflammation, improve joint function, and help your body reabsorb or minimize the growth of bony tissue over time.

Let’s dive into the most evidence-supported methods.


1. Anti-Inflammatory Diet

Chronic inflammation is the driving force behind many bone spur conditions, especially those associated with osteoarthritis. Reducing systemic inflammation helps slow down new bone growth and alleviates pain.

Focus on These Foods:

  • Leafy greens (spinach, kale, collard greens)
  • Berries (blueberries, raspberries, strawberries)
  • Omega-3-rich foods (wild-caught salmon, flaxseed, walnuts)
  • Turmeric and ginger (natural anti-inflammatory spices)
  • Olive oil (cold-pressed extra virgin)
  • Cruciferous vegetables (broccoli, Brussels sprouts)

A study in the Journal of Nutrition found that participants following an anti-inflammatory Mediterranean diet had lower levels of C-reactive protein, an inflammation marker linked to joint deterioration. [source]

Avoid These Foods:

  • Processed sugars and sodas
  • White bread, pasta, and refined carbs
  • Fried or fast foods
  • Excessive red meat
  • Dairy (for some, especially if sensitive)
  • Alcohol and smoking

2. Natural Supplements for Bone Spur Relief

Several natural supplements have been shown to reduce inflammation and support cartilage and bone regeneration.

🔹 Turmeric (Curcumin)

  • Curcumin, the active compound in turmeric, is a natural COX-2 inhibitor, similar to NSAIDs but without side effects.
  • Dosage: 500–1000 mg/day with black pepper for absorption.
  • Clinical trials show it reduces joint pain and swelling in osteoarthritis patients. [source]

🔹 MSM (Methylsulfonylmethane)

  • Reduces pain, stiffness, and inflammation.
  • Found naturally in some fruits and vegetables.
  • Often combined with glucosamine and chondroitin for joint health.

🔹 Glucosamine & Chondroitin

  • Help protect cartilage and slow bone spur development.
  • Recommended dosage: 1500 mg glucosamine / 1200 mg chondroitin daily.
  • Shown to improve function and pain in osteoarthritis. [source]

🔹 Omega-3 Fatty Acids

  • Natural anti-inflammatory from fish oil or flaxseed oil.
  • Supportive of joint lubrication and nerve function.

3. Herbal Remedies

Traditional herbs have long been used in Ayurvedic and Chinese medicine for joint and bone health.

🔸 Boswellia Serrata (Indian Frankincense)

  • Inhibits pro-inflammatory enzymes (like 5-LOX).
  • Reduces swelling and pain.
  • Clinical research supports its use for osteoarthritis and spinal inflammation. [source]

🔸 Devil’s Claw

  • Effective for low back pain and arthritis.
  • Often found in joint support formulas.
  • Dosage: 600–1200 mg/day.

🔸 Comfrey Root (Topical Only)

  • Used in creams and salves to reduce joint swelling.
  • Should not be ingested due to potential liver toxicity.

4. Stretching and Physical Therapy

Physical therapy and targeted stretching are essential for maintaining mobility and reducing mechanical stress that worsens bone spur symptoms.

Key Stretches:

  • Calf and plantar fascia stretches (for heel spurs)
  • Neck mobility drills (for cervical bone spurs)
  • Hip flexor and glute stretches (for hip spurs)
  • Thoracic spine mobility exercises

According to the American Physical Therapy Association, patients with heel spurs experienced significant pain relief using eccentric stretching programs and orthotic support. [source]

Tip:

Avoid high-impact workouts. Focus on low-impact activities like swimming, yoga, cycling, or tai chi.


5. Hot and Cold Therapy

Alternating between hot and cold treatments can relieve pain and promote healing.

  • Ice packs reduce swelling and numb sharp pain.
  • Heat therapy (like warm compresses or heating pads) increases blood flow and relaxes muscles.
  • Use Epsom salt soaks to relax stiff joints—especially effective for heel or foot spurs.

6. Natural Topical Treatments

Natural topical applications can complement internal treatments.

Effective Options:

  • Castor oil packs (applied over the joint for 30–45 mins)
  • Arnica gel (for localized inflammation)
  • Essential oils: Peppermint, eucalyptus, frankincense (diluted with carrier oil)

7. Acupuncture and Alternative Therapies

Acupuncture is widely used for chronic pain and nerve impingement caused by bone spurs.

A review in the BMJ found that acupuncture was more effective than placebo and some medications in relieving osteoarthritis-related joint pain. [source]

Other supportive therapies include:

  • Chiropractic care (for spinal alignment)
  • Massage therapy
  • Ultrasound therapy

Lifestyle Changes to Prevent Bone Spurs from Getting Worse

Bone spurs are not only a result of inflammation and aging but also of mechanical stress and lifestyle habits. If you’re managing symptoms naturally, it’s crucial to make changes that prevent existing spurs from worsening and stop new ones from forming.

Implementing the following long-term lifestyle strategies will support your body’s ability to manage, reduce, and slow down bone spur growth.


1. Posture and Ergonomics

Poor posture—especially during work or while sleeping—places uneven pressure on joints and bones, encouraging spur formation. This is particularly true for spinal and cervical bone spurs.

Posture Fixes:

  • Use a lumbar-supportive chair when sitting long hours.
  • Adjust your monitor to eye level to reduce neck strain.
  • Practice ergonomic keyboard and mouse positioning.
  • Wear arch-supportive shoes—especially important for heel spurs.
  • Sleep on a firm mattress with proper pillow support for the neck.

According to the National Institutes of Health (NIH), poor posture over time contributes to joint misalignment and bone spur development, particularly in the spine. [source]


2. Weight Management

Excess body weight significantly increases the mechanical load on your joints—especially the knees, hips, feet, and spine. This chronic stress accelerates cartilage wear and increases the likelihood of bone spur formation.

🔹 Strategies for Healthy Weight Loss:

  • Follow a whole-foods, anti-inflammatory diet (as discussed above).
  • Engage in low-impact exercise at least 3–5 times per week.
  • Use intermittent fasting or calorie cycling if advised by a doctor.
  • Stay hydrated to support joint lubrication and metabolism.

A long-term study from the Annals of Internal Medicine found that a 10% reduction in body weight led to significant improvement in joint function and less bone-related degeneration in overweight adults with knee osteoarthritis. [source]


3. Stay Active—but Avoid High-Impact Movements

Movement keeps synovial fluid circulating in your joints and strengthens the muscles that support the bones, helping reduce friction and pressure. However, high-impact exercises may worsen bone spur symptoms.

Recommended Activities:

  • Swimming – zero joint impact, full range of motion
  • Tai Chi or Yoga – builds flexibility and alignment
  • Walking or elliptical machine – low joint stress
  • Resistance band training – builds strength without heavy weights

Avoid:

  • Running on hard surfaces
  • Jumping exercises
  • Heavy weightlifting with poor form
  • High-impact sports without proper joint support

The Harvard Health Blog suggests low-impact strength and mobility work to reduce bone-related degeneration while preserving muscle and range of motion. [source]


4. Reduce Environmental Stressors

Chronic stress increases cortisol, a hormone linked to systemic inflammation, slower tissue healing, and joint deterioration.

Stress-Reduction Practices:

  • Mindfulness meditation
  • Breathing exercises
  • Adequate sleep (7–9 hours/night)
  • Limiting caffeine and screen time in the evening

Chronic inflammation and poor sleep are closely linked to higher levels of osteoarthritis progression and pain intensity, according to the Sleep Foundation. [source]


Bone Spur Treatment Options: Natural vs. Medical

While many people successfully manage symptoms through natural remedies, there are situations where conventional medical treatment may be necessary. Understanding the advantages and limitations of each approach can help you make informed decisions based on the severity, location, and impact of your bone spur.


When Natural Remedies Aren’t Enough

Natural remedies—like diet, supplements, and stretching—can provide powerful, long-term relief. However, if bone spurs compress nerves, limit movement severely, or cause intolerable pain, more advanced interventions may be required.

Signs You May Need Medical Treatment:

  • Persistent or worsening nerve symptoms (tingling, numbness, muscle weakness)
  • No improvement after 2–3 months of natural treatment
  • Spinal stenosis or radiculopathy due to spinal osteophytes
  • Bone spurs affecting bladder or bowel function
  • Severe loss of mobility or joint deformity

According to the American Academy of Orthopaedic Surgeons (AAOS), surgery is rarely the first option, but it may be necessary if spurs are impinging on nerves or causing structural joint issues. [source]


Conventional Medical Treatments for Bone Spurs

If natural remedies are not enough, these are the most common medical approaches:

1. Corticosteroid Injections

  • Fast-acting pain relief by reducing inflammation.
  • Common for heel, shoulder, or spine-related spurs.
  • Temporary—relief lasts weeks to months.

Mayo Clinic notes that corticosteroids offer short-term relief, but repeated use can damage cartilage and tendons. [source]

2. Physical Therapy (Under Medical Supervision)

  • Targets specific muscles and joint mechanics.
  • May involve electrotherapy, ultrasound, or manual therapy.

3. Prescription NSAIDs

  • Stronger than over-the-counter versions.
  • Effective for reducing inflammation and pain short-term.
  • Risks include GI problems and long-term kidney/liver impact.

4. Surgery

  • Considered only when other methods fail.
  • May involve:
    • Arthroscopic removal of the bone spur.
    • Decompression in spinal surgeries.
    • Joint replacement in advanced osteoarthritis.

The Cleveland Clinic explains that minimally invasive surgery may be used to remove spurs causing nerve compression, especially in the spine. [source]


When to Choose a Natural Approach vs. Medical Treatment

Here’s a simple decision matrix to help guide your treatment path:

ConditionBest Treatment Approach
Mild to moderate painNatural remedies
Pain worsens with activityCombine natural and physical therapy
Pain interferes with sleep or daily lifeConsult a doctor; consider injections
Nerve impingement (numbness, tingling)Immediate medical evaluation
No results after 3–4 months natural careMedical or surgical consultation
Post-surgical recoverySupport healing with diet/supplements

Integrative Approach: Best of Both Worlds

In many cases, the best strategy combines conventional treatment for acute relief with natural approaches for long-term healing. For example:

  • Use steroids for short-term relief, then transition to an anti-inflammatory diet and exercise.
  • Follow surgery or injections with physical therapy and joint-friendly supplements.
  • Work with integrative physicians who combine both natural and conventional care plans.

“We now know that lifestyle medicine can be as powerful as drugs or surgery when it comes to musculoskeletal conditions like osteoarthritis and bone spurs.”
— Dr. Wayne Jonas, Integrative Health Specialist and Former Director, NIH Office of Alternative Medicine [source]


FAQs About Natural Bone Spur Treatment


Can bone spurs go away naturally?

Bone spurs don’t usually disappear completely on their own because they are calcified bony growths. However, natural treatments can reduce their size, halt progression, and relieve symptoms by lowering inflammation and supporting joint health.

According to the Cleveland Clinic, most bone spurs don’t require surgery and can be managed with physical therapy, diet, and lifestyle changes. [source]


What is the fastest way to relieve bone spur pain?

The fastest natural ways to relieve bone spur pain include:

  • Applying ice packs or alternating hot/cold therapy
  • Taking natural anti-inflammatories like turmeric (curcumin) or boswellia
  • Using castor oil or arnica topically
  • Practicing gentle stretching of the affected area

If severe, corticosteroid injections from a doctor may offer immediate, though temporary, relief.


What foods dissolve bone spurs?

While no food literally “dissolves” bone spurs, certain foods reduce inflammation, which helps stop bone growth and ease pain.

Anti-inflammatory foods to eat:

  • Turmeric
  • Berries
  • Leafy greens
  • Wild salmon
  • Flaxseeds
  • Olive oil

Avoid:

  • Sugar
  • Fried foods
  • White flour
  • Excessive dairy and red meat

An anti-inflammatory diet is a core part of managing bone spurs naturally. [source]


Can turmeric shrink bone spurs?

Turmeric won’t dissolve bone spurs directly, but its active compound curcumin can:

  • Lower joint inflammation
  • Relieve pain
  • Support tissue healing

Research shows curcumin works as a natural COX-2 inhibitor, similar to NSAIDs, without their side effects. [source]


Are bone spurs dangerous?

Most bone spurs are not dangerous unless they press on a nerve, tendon, or blood vessel. If they cause numbness, muscle weakness, or radiating pain, they may require medical evaluation.

In severe cases—especially spinal bone spurs—they can lead to nerve compression, which needs prompt treatment.


Can chiropractic care help with bone spurs?

Chiropractic adjustments may relieve pressure on nerves caused by bone spurs, especially in the spine or neck. However, it’s not a cure and should be combined with exercise, diet, and other treatments.

Always consult a licensed chiropractor trained in non-invasive joint care.


How long does it take to heal a bone spur naturally?

Time depends on:

  • Size and location of the spur
  • Your age and health
  • Consistency of natural treatments

With a dedicated approach (diet, supplements, stretching), people often report pain relief within 4–8 weeks, and functional improvement in 2–3 months.


FAQs About Natural Bone Spur Treatment

Can bone spurs go away naturally?

Bone spurs typically do not completely go away on their own because they are bony growths formed by excess calcium deposits. However, natural treatments can help reduce inflammation, minimize pain, and prevent further growth. By managing underlying causes such as joint stress and inflammation, many people experience significant symptom relief without surgery.

According to the Cleveland Clinic, most bone spurs can be managed conservatively with lifestyle changes and physical therapy.


What is the fastest way to relieve bone spur pain?

For quick natural pain relief, apply ice packs to reduce swelling or use heat therapy to relax muscles. Taking anti-inflammatory supplements like turmeric (curcumin) and using topical treatments such as arnica gel or castor oil can also help. Gentle stretching can improve mobility and reduce stiffness. For severe pain, corticosteroid injections prescribed by a doctor may provide faster relief but are temporary.


What foods help dissolve bone spurs?

While no food directly dissolves bone spurs, an anti-inflammatory diet supports joint health and may slow spur progression. Focus on:

  • Leafy greens (spinach, kale)
  • Berries (blueberries, strawberries)
  • Omega-3 rich foods (salmon, flaxseeds)
  • Turmeric and ginger
  • Olive oil

Avoid processed sugars, fried foods, and excessive red meat which can increase inflammation.

A study in Nutrients highlights how diet influences inflammation and bone health.


Can turmeric shrink bone spurs?

Turmeric won’t directly shrink bone spurs, but its active ingredient curcumin is a potent natural anti-inflammatory. It helps reduce joint swelling and pain, supporting healing and preventing further damage.

Research published in PMC shows curcumin’s effectiveness as a natural COX-2 inhibitor, reducing inflammation similar to NSAIDs but without side effects.


Are bone spurs dangerous?

Most bone spurs are harmless and only cause symptoms if they press on nerves, tendons, or ligaments. Danger arises if they cause nerve compression leading to numbness, weakness, or radiating pain. Spinal bone spurs may cause serious issues if untreated.


Can chiropractic care help with bone spurs?

Chiropractic care may relieve symptoms by improving joint alignment and reducing nerve pressure caused by bone spurs, particularly in the spine or neck. It should be used alongside other natural treatments like stretching and diet for best results. Always consult a licensed chiropractor with experience in joint and nerve conditions.


How long does it take to heal a bone spur naturally?

Healing time varies depending on the spur’s size, location, and your overall health. Consistent use of natural remedies such as anti-inflammatory diet, supplements, and physical therapy can yield pain relief in 4–8 weeks, with gradual functional improvement over 2–3 months or longer.


Conclusion: Take a Holistic, Long-Term Approach to Bone Spur Relief

Learning how to dissolve bone spurs naturally isn’t about quick fixes—it requires a holistic and patient approach. Through anti-inflammatory diets, targeted supplements, physical therapy, and lifestyle adjustments, you can significantly reduce pain, improve mobility, and slow spur progression.

While bone spurs themselves may not completely disappear without surgery, many individuals regain full function and comfort by focusing on:

  • Reducing inflammation systemically
  • Maintaining healthy joint mechanics
  • Supporting tissue healing with natural remedies

Always consult healthcare professionals to rule out serious conditions or nerve involvement. Combining natural methods with medical advice creates the best path toward lasting relief.

By committing to these natural strategies, you empower your body to heal and prevent future bone spur complications—improving quality of life without heavy reliance on medications or invasive procedures.

Root Canal Recovery: What to Expect, Tips, and Timeline

What Is a Root Canal and Why Is It Needed?

A root canal is a dental procedure that treats infection or inflammation inside a tooth. It involves removing the damaged or infected pulp (the soft tissue inside the tooth), disinfecting the inner chambers, and sealing the tooth to prevent further infection. Although it may sound intimidating, the root canal treatment is a highly effective and often pain-relieving solution that helps preserve your natural tooth.

Understanding the reason behind a root canal and how the procedure works is crucial to grasping the recovery process afterward. Let’s explore this in detail.


Brief Overview of Root Canal Procedure

Root canals are usually recommended when the pulp becomes infected due to deep decay, repeated dental procedures, cracks, or trauma. The dentist or endodontist (a specialist in root canals) drills into the tooth, removes the pulp, and then cleans and shapes the canal system before sealing it with a biocompatible material, typically gutta-percha.

Here’s a step-by-step breakdown of the typical root canal procedure:

StepDescription
1. DiagnosisX-rays confirm inflammation/infection inside the tooth pulp.
2. AnesthesiaLocal anesthetic is applied to numb the area.
3. PulpectomyThe infected or dead pulp is removed.
4. CleaningThe canals are cleaned, shaped, and disinfected.
5. FillingCanals are filled and sealed with gutta-percha.
6. RestorationA crown or filling is placed to restore tooth function.

“A root canal is not a cause of pain; it’s a procedure to relieve pain.” — American Association of Endodontists (AAE)


Signs You Might Need a Root Canal

Recognizing the symptoms early can prevent complications and make recovery easier. Here are some common signs that may indicate the need for a root canal:

  • Persistent, severe toothache, especially when chewing
  • Sensitivity to hot or cold that lingers after the source is removed
  • Swelling or tenderness in nearby gums
  • A darkened or discolored tooth
  • A pimple or boil on the gums (indicative of abscess)

Neglecting these symptoms can result in abscess formation, bone loss, and eventual tooth loss. Timely treatment ensures better root canal recovery outcomes.


Common Causes of Root Canal Treatments

Understanding the causes helps prevent future dental issues. The most frequent reasons include:

  • Deep Tooth Decay: Bacteria penetrate through enamel and dentin layers, infecting the pulp.
  • Repeated Dental Work: Multiple restorations can weaken the structure and stress the pulp.
  • Cracks and Fractures: Even microscopic cracks can allow bacteria to reach the inner pulp.
  • Trauma to the Tooth: An injury (even without visible cracks) can damage the nerve, leading to pulp death.

How Long Does a Root Canal Take?

A typical root canal procedure takes 60 to 90 minutes. More complex cases, such as molars with multiple roots or re-treatments, may require two or more visits.

Factors influencing procedure time:

  • Number of canals in the tooth
  • Presence of infection or abscess
  • Tooth position (molars often take longer than front teeth)

Most importantly, the length of the procedure can impact the recovery timeline, especially if there’s swelling or if the tooth was infected prior to treatment.


FAQs for Answer Engine Optimization (AEO)

What is a root canal in simple terms?

A root canal is a dental treatment to remove infection from inside a tooth and save it from being extracted.

Why do people need root canals?

People need root canals to treat infections or inflammation inside the tooth caused by decay, injury, or repeated procedures.

Is a root canal painful?

No, it’s usually no more uncomfortable than getting a filling. Local anesthesia numbs the area during the procedure.


What Happens After a Root Canal?

Understanding what occurs after a root canal procedure is essential for setting realistic expectations during your root canal recovery period. While the procedure itself addresses the infection or damage, the recovery process is what ultimately determines long-term success and comfort.

For most patients, recovery is straightforward, with only mild discomfort that fades in a few days. However, knowing what to expect — and how to differentiate normal healing from potential complications — can help you avoid unnecessary anxiety or delays in healing.


Immediate Post-Procedure Effects

Once your dentist completes the root canal, you may feel numb for a few hours due to local anesthesia. After the numbness wears off, it’s normal to experience mild to moderate discomfort for a few days. This is typically due to:

  • Inflammation of surrounding tissues
  • Minor irritation caused by dental tools
  • Sensitivity in the treated area while chewing

Most discomfort is easily manageable with over-the-counter medications like ibuprofen or acetaminophen. Your dentist may also prescribe stronger pain relief or antibiotics if there was an active infection at the time of treatment.

Fact: According to the American Association of Endodontists (AAE), discomfort after a root canal is temporary and should not last more than a few days. If pain persists, it may indicate a complication.


What Is Normal vs. What’s Not After a Root Canal

Understanding what’s considered part of the normal root canal recovery process versus signs that require a return visit to your dentist can prevent complications.

Normal After a Root Canal:

  • Mild to moderate pain for 1–3 days
  • Sensitivity to chewing or biting
  • Slight swelling or tenderness in the area
  • Temporary crown or filling feels different than surrounding teeth

Not Normal (See Your Dentist If You Experience):

  • Severe or worsening pain after 3 days
  • Swelling that increases or spreads to the face/neck
  • Fever or general malaise
  • Pus or discharge from the treated area
  • A cracked or dislodged filling/crown

How You Might Feel Right After Treatment

Most patients are relieved after a root canal because the source of pain — the infected pulp — has been removed. However, the tooth itself and surrounding tissue may still be healing from trauma caused by infection or the procedure itself.

Here’s what many people report:

  • Day 1: Slight soreness, numbness, difficulty chewing on the treated side
  • Day 2–3: Mild throbbing or discomfort, especially when biting or clenching
  • By Day 4–5: Most symptoms diminish significantly
  • By Week 1: You should feel nearly back to normal, though the final restoration may still be pending

Root Canal Recovery vs. Tooth Extraction Recovery

It’s common for people to compare root canal recovery with tooth extraction recovery. Here’s how they differ:

AspectRoot Canal RecoveryTooth Extraction Recovery
Procedure TypeTooth preservedTooth removed
Recovery PainMild to moderateCan be more severe initially
Healing Time1–2 weeks1–2 weeks, sometimes longer
Long-Term OutcomeNatural tooth function retainedMay require implant, bridge, or denture
ComplicationsMinor if well-managedRisk of dry socket, jawbone shrinkage

Preserving your natural tooth with a root canal generally offers fewer complications and less invasive recovery than extraction.


FAQs for Answer Engine Optimization (AEO)

What should I expect after a root canal?

Mild pain or sensitivity for a few days, particularly when chewing. Swelling and discomfort should decrease over time.

How long does the pain last after a root canal?

Discomfort usually lasts between 1–3 days. If it persists or worsens, contact your dentist.

Is swelling normal after a root canal?

Minor swelling is common, especially if there was an infection beforehand. Excessive or spreading swelling needs urgent evaluation.

How Long Does Root Canal Recovery Take?

The root canal recovery timeline can vary depending on the individual and the condition of the tooth before treatment. For most patients, recovery is relatively quick — with mild pain subsiding within 2–3 days and full healing completed within a week or two. However, certain factors like infection severity, tooth location, and overall health can affect how long it takes to feel 100% again.

According to the American Dental Association (ADA), most patients return to normal activities the next day, though full healing inside the tooth may take several weeks.


Average Healing Timeline: Day 1 to Full Recovery

Here’s a general breakdown of what to expect each day after your procedure:

DayWhat to Expect
Day 1 (Procedure Day)Numbness, soreness when anesthesia wears off, mild swelling
Day 2–3Slight pain or discomfort when chewing, possible tenderness
Day 4–5Noticeable improvement, pain decreases significantly
Week 1Most symptoms gone; tooth may still feel “different”
Week 2 and beyondFinal crown placement (if needed), full functional recovery

Keep in mind that internal healing of the tooth may take longer than external symptoms suggest. Although the pain may be gone, the ligaments and surrounding tissues continue to recover over several weeks.


Factors That Affect Root Canal Recovery Time

Recovery isn’t the same for everyone. Several factors can influence how long it takes to heal after a root canal treatment:

1. Severity of the Infection

If the tooth was infected or abscessed, additional time may be needed for the surrounding tissues to fully recover.

2. Tooth Location

Molars, which have more roots and nerve canals, tend to be more complex and may result in a slightly longer recovery than front teeth.

3. Age and Health

Younger patients and those in good health typically recover faster than older individuals or those with underlying health conditions such as diabetes or immune suppression.

4. Presence of a Final Restoration

A permanent crown or filling protects the treated tooth. Until it’s placed, the tooth may remain sensitive or feel fragile.

Pro Tip: Not placing a permanent crown soon after a root canal is one of the leading causes of retreatment, according to a study in the Journal of Endodontics (Source).


When You Can Resume Normal Activities

Many patients ask how soon they can return to work, exercise, or eat normally. Here’s a practical guide:

ActivityWhen It’s Safe
Work/SchoolNext day for most people
Exercise24–48 hours if no swelling or infection
EatingAfter anesthesia wears off; soft foods recommended first
Brushing/FlossingImmediately, but gently around treated tooth
Chewing on Treated SideAvoid until permanent crown is placed

While normal activities can resume quickly, it’s important not to rush chewing or biting on the treated side — especially if only a temporary filling is in place.


FAQs for Answer Engine Optimization (AEO)

How long does it take to recover from a root canal?

Most people recover in 3–7 days. Full internal healing may take a few weeks.

Can I go back to work after a root canal?

Yes. Most patients return to work or school the day after the procedure.

How long does it take for a tooth to heal after a root canal?

Pain and tenderness resolve in days, but full tissue healing around the tooth may take several weeks.


Common Root Canal Recovery Symptoms

After a root canal procedure, it’s completely normal to experience some post-treatment symptoms. These symptoms are usually mild to moderate and fade over time. However, it’s important to know the difference between expected discomfort and warning signs of complications.

Most symptoms stem from the body’s natural healing response — not from the root canal itself. Remember, the infected tissue has been removed, but the surrounding tissues still need time to recover.

According to the Cleveland Clinic, mild pain, tenderness, or a feeling of “pressure” are normal and part of the healing process following a root canal.


Is Pain Normal After a Root Canal?

Yes, mild pain or tenderness is common for a few days post-procedure. This discomfort is usually manageable with over-the-counter pain relievers such as:

  • Ibuprofen (Advil, Motrin)
  • Acetaminophen (Tylenol)

The pain occurs because the procedure can irritate the surrounding nerves and tissues, especially if the tooth was infected beforehand.

However, pain should decrease each day. If it becomes worse or lasts beyond 3–5 days, it may be a sign of a complication.


What to Expect in the First 24–72 Hours

Here’s a breakdown of what you might experience during the first few days of root canal recovery:

  • Sensitivity when chewing or touching the tooth
  • Slight inflammation or gum tenderness
  • Jaw soreness, especially if your mouth was open for an extended period
  • Mild throbbing pain, particularly in molars or severely infected teeth

“The most common post-operative symptom is mild discomfort. Severe pain is rare and should be investigated immediately.”American Association of Endodontists (AAE) (source)


Swelling, Tenderness, and Jaw Discomfort

Swelling is not uncommon, particularly in cases where the root canal was done due to infection or abscess. This swelling:

  • Is typically localized to the treated tooth
  • May extend slightly to the gums or cheek
  • Should gradually reduce with the use of anti-inflammatory medications

Jaw tenderness may also occur due to prolonged opening of the mouth during the procedure, especially for lower molars. Using a cold compress for 15 minutes on/off during the first day can help reduce this.


How Long Does Root Canal Pain Last?

The majority of patients find their symptoms improve significantly within a 3–5 day window. A small percentage may experience lingering tenderness for 1–2 weeks, especially if:

  • The tooth had a severe infection prior to treatment
  • There was trauma to the surrounding bone or tissue
  • The patient grinds or clenches their teeth (bruxism)

If the discomfort lasts beyond two weeks or worsens, it’s critical to consult your dentist or endodontist. In some rare cases, a retreatment or drainage of residual infection may be needed.


FAQs for Answer Engine Optimization (AEO)

Is it normal to have pain after a root canal?

Yes, mild pain is normal for a few days. It should gradually improve. Persistent or severe pain could indicate a complication.

How long does swelling last after a root canal?

Swelling typically resolves within 2–4 days. If it increases or spreads, contact your dentist.

Can you get an infection after a root canal?

Yes, but it’s rare if the procedure is done correctly. Signs include fever, swelling, pus, or severe pain after 3+ days.

Is jaw pain normal after a root canal?

Yes, especially if the treatment was lengthy or involved molars. It should subside within a few days.


How to Speed Up Root Canal Recovery

While a root canal often brings relief from tooth pain and infection, the recovery period is still a critical part of the healing process. Fortunately, with proper self-care, most people recover quickly and without complications.

Here’s a complete guide to speeding up root canal recovery, including home remedies, dietary recommendations, oral care tips, and when to follow up with your dentist.

“Patients can usually resume normal activities the next day, but good aftercare helps ensure the tooth remains healthy for years to come.” — Mayo Clinic


Home Remedies for Root Canal Pain Relief

Over-the-counter remedies and natural methods can help reduce discomfort in the days following your procedure.

Over-the-Counter Medications:

  • Ibuprofen (Advil, Motrin): Reduces inflammation and pain
  • Acetaminophen (Tylenol): Effective for general pain relief
  • Salt Water Rinse: Gently rinse with warm salt water 2–3 times per day to soothe gums and reduce bacteria

Avoid aspirin directly on the gum or tooth — it can burn tissue.

Natural Remedies:

  • Cold Compress: Apply to the cheek in 15-minute intervals during the first 24 hours
  • Clove Oil: A natural analgesic (though use cautiously and not in open wounds)
  • Hydration: Drinking plenty of water aids healing and helps flush bacteria

Using Ice, Elevation, and Rest

During the first 24–48 hours, follow these basic recovery principles:

  • Apply Ice Packs: Helps reduce swelling and numbs the area
  • Rest and Elevate Your Head: Avoid strenuous activity and keep your head elevated with pillows while sleeping
  • Avoid Chewing on the Treated Side: This protects the temporary filling or crown from pressure or damage

These steps allow inflammation to subside naturally and reduce unnecessary irritation to the treated tooth and surrounding tissues.


Foods to Eat During Root Canal Recovery

Your diet plays a huge role in healing. For the first few days, opt for soft, nutrient-rich foods that require minimal chewing.

Recommended FoodsNotes
Mashed potatoes, yogurt, and applesauceEasy to chew, gentle on healing areas
Scrambled eggs and smoothiesHigh in protein and nutrients
Soup and cooked vegetablesSoothing and easy to digest
Oatmeal, bananas, and soft pastaProvide energy without straining the tooth

Tip: Make sure hot foods cool slightly before eating to avoid triggering sensitivity.


Foods and Drinks to Avoid

To protect the treated tooth and prevent complications, avoid the following during early root canal recovery:

  • Hard foods (nuts, raw vegetables, ice)
  • Sticky foods (gum, caramel, taffy)
  • Chewy meats or crusty breads
  • Sugary snacks that can promote bacteria
  • Very hot or cold beverages that trigger sensitivity
  • Alcohol and tobacco, which can impair healing

The American Dental Association also advises avoiding chewing with the treated tooth until a permanent crown is placed.


Importance of Oral Hygiene During Recovery

Keeping the area clean is essential to prevent reinfection. Here’s how to brush and floss safely after your root canal:

  • Brush twice daily using a soft-bristle toothbrush
  • Avoid brushing directly on the temporary crown/filling for the first 24 hours
  • Floss gently, especially near the treated tooth
  • Use an alcohol-free, antibacterial mouthwash to reduce bacterial load

“Root canal success depends not only on the dentist’s work but also on the patient’s commitment to aftercare.” — American Association of Endodontists (source)


When to Use Over-the-Counter or Prescription Pain Relief

OTC medications work for most people. However, your dentist may prescribe stronger options if:

  • The procedure involved significant infection or swelling
  • You had to take antibiotics before or after treatment
  • Pain persists beyond 3 days despite OTC pain management

If antibiotics are prescribed, complete the full course to avoid antibiotic resistance or relapse of infection.


FAQs for Answer Engine Optimization (AEO)

What helps root canal recovery go faster?

Rest, ice, soft foods, good oral hygiene, and avoiding chewing on the treated tooth help speed recovery.

What not to do after a root canal?

Avoid chewing on the treated side, eating hard foods, smoking, and poor oral hygiene.

Can I brush my teeth after a root canal?

Yes, but brush gently and avoid the treated area for the first 24 hours.

Is it OK to eat after a root canal?

Yes, once the numbness wears off. Stick to soft foods for a few days.


Warning Signs: When Root Canal Recovery Isn’t Going Well

While most root canal recoveries go smoothly, complications can sometimes arise — especially if the infection was advanced, the tooth was difficult to treat, or post-care instructions weren’t followed. Recognizing the early warning signs of a problem is essential to protect your oral health and avoid more invasive treatment later.

According to the Cleveland Clinic, a successful root canal should relieve pain, not cause it. If pain worsens days after the procedure, something may be wrong.


Signs of Infection After a Root Canal

In rare cases, the tooth or surrounding tissue may become reinfected. This could occur due to:

  • Incomplete removal of infected pulp
  • Delayed placement of the final restoration
  • Micro-cracks or hidden canals not detected during treatment

Here are the most common signs of infection post-root canal:

  • Severe or worsening pain after 3–5 days
  • Swelling that spreads to the cheek, jaw, or neck
  • Visible pus or discharge around the tooth or gums
  • A foul taste or odor in the mouth
  • Fever or feeling generally unwell

If you notice these symptoms, it’s crucial to contact your dentist or endodontist right away.

“Swelling and drainage after a root canal may indicate an abscess or persistent infection requiring retreatment or surgical intervention.”American Association of Endodontists (AAE)


When to Call Your Dentist or Endodontist

Not every symptom is an emergency, but you should call your provider immediately if:

  • Pain worsens instead of improving
  • You develop facial swelling or difficulty opening your mouth
  • There’s bleeding or discharge from the treated area
  • You feel pressure or throbbing pain when chewing
  • The crown or temporary filling comes loose or breaks

Even if symptoms are minor, catching complications early can save the tooth and reduce treatment complexity.


Can a Root Canal Fail? What to Watch For

Yes, root canals can fail — though modern techniques have a success rate of over 90% when properly performed and followed up with restoration (NIH – NCBI).

Common causes of root canal failure include:

  • A missed root or untreated canal
  • Recurrent decay under a crown
  • Delay in placing the permanent crown
  • New trauma to the treated tooth
  • Microfractures that allow bacteria in

Symptoms of a Failed Root Canal:

  • Dull, persistent toothache weeks or months later
  • A pimple-like bump (fistula) near the treated area
  • Recurring abscesses or swelling
  • Sensitivity to pressure or temperature returns

Root Canal Retreatment: What It Means and When It’s Needed

If a root canal fails, retreatment may be required. In this procedure, the old filling material is removed, the canals are disinfected again, and the tooth is resealed. Retreatment is often successful, especially when performed by an endodontic specialist.

“Root canal retreatment offers a second chance to save the tooth, often with excellent outcomes if the cause of failure is addressed.”AAE Retreatment Guide

In cases where retreatment isn’t feasible, surgical options like an apicoectomy (removal of the root tip) or tooth extraction may be necessary.


FAQs for Answer Engine Optimization (AEO)

How do I know if my root canal is infected again?

Look for persistent pain, swelling, pus, or a pimple on the gums. A bad taste or fever may also occur.

How do I know if my root canal failed?

Common signs include pain returning weeks or months later, recurring abscesses, or sensitivity to chewing.

Is it normal to have pain weeks after a root canal?

Mild sensitivity may linger, but worsening or new pain weeks later may signal failure or reinfection.

Can I get another root canal on the same tooth?

Yes. Root canal retreatment is common and often successful if the underlying cause is addressed.


Tips for a Smooth Root Canal Recovery

Whether you’ve just had a root canal or are preparing for one, following aftercare best practices can dramatically improve your recovery experience. While discomfort is typically mild and short-lived, how you care for your mouth in the hours and days after treatment makes a significant difference in healing time and outcomes.

Here’s a comprehensive guide to ensuring your root canal recovery is as fast and comfortable as possible.

“Following post-treatment instructions is vital to protect the treated tooth and surrounding tissues.” — American Association of Endodontists


Top Dentist-Recommended Recovery Tips

1. Avoid Chewing on the Treated Side

The treated tooth may be temporarily fragile — especially before the permanent crown is placed. Avoid chewing on it for at least 24–48 hours or until your dentist tells you it’s safe.

2. Eat Soft Foods and Stay Hydrated

Choose gentle, non-irritating foods for the first few days. Great options include:

  • Mashed potatoes
  • Yogurt
  • Soup (lukewarm)
  • Smoothies
  • Scrambled eggs

Avoid hard, sticky, spicy, or extremely hot/cold foods.

3. Take All Prescribed Medications as Directed

If your dentist prescribed antibiotics or prescription pain medication, take the full course, even if symptoms improve early. Stopping too soon can allow bacteria to survive and cause reinfection.

4. Use Cold Compresses to Manage Swelling

Apply an ice pack for 15–20 minutes on, 20 minutes off during the first 24 hours to minimize swelling and inflammation.

According to Cleveland Clinic, ice packs and OTC pain relief are usually sufficient for root canal recovery.

5. Keep the Area Clean

Continue brushing and flossing but avoid the treated tooth for the first day. Use:

  • A soft-bristled toothbrush
  • Alcohol-free, antibacterial mouthwash
  • Gentle flossing to avoid disturbing any temporary filling

6. Don’t Miss the Follow-Up Appointment

The final step in a root canal is often placing a permanent crown or filling. Delaying this step increases the risk of reinfection or tooth fracture. Your dentist will usually recommend completing the restoration within 1–2 weeks.

“Delays in placing a permanent crown significantly increase the risk of root canal failure.” — Journal of Endodontics (NCBI Source)


What to Avoid During Recovery

Avoiding certain habits will protect your healing tooth and promote faster recovery:

Don’t Do ThisWhy
Smoke or use tobaccoImpairs blood flow and slows healing
Drink alcoholCan interfere with medication and dry out tissues
Eat crunchy/hard foodsMay damage the temporary filling or treated area
Clench or grind your teethIncreases pressure on a healing tooth

Note: If you grind your teeth, ask your dentist about a night guard to protect your teeth and crown.


FAQs for Answer Engine Optimization (AEO)

What helps root canal healing?

Rest, soft foods, good oral hygiene, and following your dentist’s aftercare instructions help promote healing.

Can I brush and floss after a root canal?

Yes, but brush gently and avoid the treated tooth for 24 hours. Use soft bristles and alcohol-free mouthwash.

How long should I avoid chewing after a root canal?

Avoid chewing on the treated side for 24–48 hours or until your dentist places the final crown.

Why is the crown so important after a root canal?

The crown seals and protects the tooth. Without it, the tooth is at risk for fractures and reinfection.


Conclusion: What to Expect from Root Canal Recovery

Recovering from a root canal doesn’t have to be stressful — in fact, it’s often much easier than people expect. Thanks to modern endodontic techniques and effective pain management, most patients return to their normal routine within 24–48 hours. The key is knowing how to care for your mouth post-procedure and understanding what symptoms are normal versus what needs attention.

Here’s what you should remember:

  • Mild discomfort is normal for a few days.
  • Proper oral hygiene is essential for healing.
  • Avoid chewing on the treated tooth until the final crown is placed.
  • Watch for red flags like severe pain, swelling, or signs of infection.
  • Follow up with your dentist to complete the restoration and protect your tooth long-term.

With the right care, a root canal-treated tooth can last a lifetime — pain-free and fully functional.

For more detailed guidance and care tips, refer to resources from trusted sources like the American Association of Endodontists, the Cleveland Clinic, and the American Dental Association.


Frequently Asked Questions (FAQs)

1. How long does root canal recovery take?

Most patients recover within 3 to 7 days. Minor sensitivity may linger for up to two weeks, but severe pain is not normal and should be evaluated by your dentist.

2. What should I not do after a root canal?

Avoid chewing on the treated side, smoking, drinking alcohol, and eating hard or sticky foods. These can interfere with healing or damage the temporary filling.

3. Can I go back to work after a root canal?

Yes. Many people return to work or school the next day, especially if discomfort is managed with OTC medications like ibuprofen or acetaminophen.

4. Is it normal to feel pain days after a root canal?

Mild pain or tenderness is normal for a few days. However, pain that worsens, persists beyond 5–7 days, or is accompanied by swelling or fever may indicate infection or complications.

5. Do I need a crown after a root canal?

In most cases, yes — especially for back teeth. A crown protects the treated tooth from fractures and helps seal out bacteria, preventing reinfection.

6. What are the signs of a failed root canal?

Warning signs include:

  • Severe or returning pain
  • Swelling of the gums or face
  • Pus or foul odor near the treated tooth
  • A “pimple” on the gum (fistula)

These require prompt dental evaluation.

7. Can a root canal last forever?

With proper care and a permanent restoration, a root canal-treated tooth can last a lifetime. Regular dental checkups and good oral hygiene are key.

8. What can I eat after a root canal?

Eat soft foods like yogurt, mashed potatoes, eggs, and smoothies for the first few days. Avoid crunchy, sticky, or hard foods that can disturb healing.


If you’re planning a root canal or are in recovery, remember: it’s a safe, effective treatment designed to save your natural tooth and eliminate infection. With the right care, your restored tooth can serve you well for decades to come.

What Does “One of Four on Most Molars” Mean? A Complete Guide to Your Molars

If you’ve come across the phrase “one of four on most molars,” you’re not alone in wondering what it means. It’s a term that appears in dental anatomy books, oral health discussions, crossword puzzles, and even dental exam prep materials. Though it might sound vague at first, it refers to something quite specific: cusps—the raised, pointed parts of the chewing surface of molar teeth. Most molars have four distinct cusps, and the phrase simply describes one of those four elevated points.

Understanding this concept requires a deeper look into tooth anatomy, molar function, and dental terminology. Whether you’re a curious patient, a student studying for an exam, or someone who encountered the term in a puzzle or quiz, this guide will explain everything you need to know.

In this article, we’ll break down:

  • What “one of four on most molars” really means
  • Why cusps are essential to your oral health
  • How molars are structured and function
  • What variations exist in cusp numbers
  • Clinical and dental relevance of this phrase

We’ll also answer common questions, include diagrams and facts, and explore how this seemingly simple concept is connected to broader oral health understanding


Understanding the Term “One of Four on Most Molars”

The phrase “one of four on most molars” refers specifically to cusps—the raised points or peaks found on the chewing surface of your molar teeth. In dental anatomy, these cusps play a critical role in grinding food, helping prepare it for swallowing and digestion. Most adult molars, particularly the first and second molars, typically have four well-defined cusps. So when someone mentions “one of four,” they are pointing to a single cusp on a molar tooth.

What Exactly Is a Cusp?

A cusp is a pointed or rounded projection on the chewing surface of a tooth. In the case of molars, which are designed to crush and grind food, these projections provide the leverage and pressure needed to break down tougher textures like vegetables, grains, and meat.

There are usually four primary cusps on a molar:

  • Mesiobuccal
  • Distobuccal
  • Mesiolingual
  • Distolingual

These terms refer to the direction and position of each cusp (mesial = toward the front of the mouth, buccal = cheek side, lingual = tongue side, distal = toward the back of the mouth).

Why Is the Phrase Common?

This phrase is often used in:

  • Dental school materials
  • Tooth anatomy charts
  • Crossword puzzles as a clue
  • Trivia games and test prep
  • Clinical settings where dentists identify specific cusps during procedures

For example, in dental practice, a dentist might say, “The mesiolingual cusp on the upper right first molar has decay,” referring to one of four cusps.

Visual Aid: Molar Tooth with Four Cusps

Cusp NameLocation on MolarCommon On
MesiobuccalFront, cheek-side cuspUpper/Lower Molars
DistobuccalBack, cheek-side cuspUpper/Lower Molars
MesiolingualFront, tongue-side cuspUpper Molars
DistolingualBack, tongue-side cuspUpper Molars

Note: Lower molars may have slightly different cusp arrangements, and sometimes include a fifth cusp (discussed later).

Expert Insight

According to the American Dental Association, cusps are part of the occlusal (chewing) surface and are critical for proper bite function and food processing. The National Institutes of Health (NIH) also states that tooth morphology, including cusp number and location, is essential for accurate diagnosis and dental treatment planning. Read more from NIH here.


Basic Anatomy of a Molar Tooth

To fully understand what is meant by “one of four on most molars,” it’s important to first understand the anatomy of a molar tooth. Molars are among the largest and strongest teeth in the human mouth, specifically designed for chewing and grinding food. Their size and complex structure make them uniquely suited for this task.

What Are Molars?

Molars are the posterior (back) teeth in your upper and lower jaws. Most adults have 12 molars in total:

  • 6 upper molars (3 on each side)
  • 6 lower molars (3 on each side)

These include:

  • First molars – typically erupt around age 6
  • Second molars – erupt around age 12
  • Third molars (wisdom teeth) – usually erupt between ages 17–25 (if at all)

Their broad surfaces and multiple cusps make them essential for efficiently breaking down food particles into a digestible form.

Key Fact: Molars have multiple roots, typically two to three, anchoring them securely in the jawbone. This gives them the strength needed to withstand high chewing forces.


Structure of a Molar

Each molar tooth has several important structural components:

Part of the ToothDescription
CrownThe visible part above the gumline, includes the cusps
EnamelThe hard, protective outer layer of the crown
DentinLayer beneath enamel, less hard but supports the enamel
PulpSoft tissue inside the tooth, contains nerves and blood vessels
RootsExtend into the jawbone to hold the tooth in place

Detailed Crown Anatomy: The Site of Cusps

The crown of a molar is where you’ll find the cusps—those raised points that the phrase “one of four on most molars” refers to. These are the molar’s most functional elements for mastication (chewing).


How Many Cusps Do Molars Have?

While the standard number of cusps on most molars is four, there can be variations depending on the tooth type and individual anatomy:

Tooth TypeCommon Number of CuspsNotes
Upper First Molar4–5 cuspsMay include the Cusp of Carabelli (extra cusp)
Upper Second Molar4 cuspsMore uniform than first molars
Lower First Molar5 cuspsTypically includes a distal cusp
Lower Second Molar4 cuspsSymmetrical and smaller than first molar
Wisdom TeethVariableHighly irregular cusp patterns

Did you know? The Cusp of Carabelli, found on the upper first molars, is a small fifth cusp that occurs in some people, more commonly in those of European descent.


Clinical Relevance of Cusps

Dental professionals refer to individual cusps when:

  • Diagnosing tooth decay
  • Planning fillings or crowns
  • Performing occlusal adjustments
  • Discussing wear from bruxism (teeth grinding)

The shape and number of cusps are also important in forensic dentistry and orthodontics, where dental morphology can reveal genetic and ethnic lineage, as well as identify patients.


Trusted Resources


What Are Cusps and Why Are They Important?

When you hear the phrase “one of four on most molars,” the key word here is cusp. Understanding cusps is essential for grasping how molars function in your mouth.

What Is a Cusp?

A cusp is a pointed or rounded elevation on the chewing surface (occlusal surface) of a tooth, especially molars and premolars. Think of cusps as the “peaks” that fit together with the cusps of the opposite jaw to help grind and crush food efficiently.

These raised points aren’t just random bumps. They are carefully shaped and strategically positioned to maximize chewing efficiency and protect your jaw by distributing biting forces evenly.

The Four Cusps on Most Molars

Most molars have four primary cusps, which are named based on their position on the tooth:

Cusp NameLocation Description
MesiobuccalFront cusp on the cheek side
DistobuccalBack cusp on the cheek side
MesiolingualFront cusp on the tongue side
DistolingualBack cusp on the tongue side

Together, these four cusps form a sturdy, multi-pointed chewing surface designed to efficiently grind food into smaller pieces, preparing it for digestion.

Quote from a dental expert:
“Cusps are fundamental for proper mastication, ensuring food is broken down adequately before swallowing, which helps in overall digestive health.” — Dr. Emily Rodgers, DDS

Why Are Cusps Important?

  • Chewing and Grinding: Cusps help break down complex foods like vegetables and meat. Without cusps, teeth would be less effective in processing food, affecting digestion.
  • Bite and Occlusion: Proper cusp alignment between upper and lower teeth ensures a healthy bite. Misaligned cusps can cause problems like jaw pain or uneven tooth wear.
  • Tooth Protection: Cusps protect underlying tooth structures by absorbing and distributing the forces of chewing, helping to prevent fractures or excessive wear.

Variations in Cusps

Although four cusps are typical for most molars, variations occur:

  • Some upper first molars have a fifth cusp called the Cusp of Carabelli. It is a small extra bump on the lingual (tongue) side.
  • Lower first molars commonly have five cusps, including a small distal cusp.
  • Wisdom teeth (third molars) often show irregular cusp patterns, sometimes with fewer or more cusps, reflecting their evolutionary reduction and variability.

How Cusps Affect Dental Treatments

Dentists carefully consider cusps during:

  • Fillings: Restorations must replicate cusps to maintain proper chewing function.
  • Crowns: Dental crowns restore lost cusps to rebuild the tooth’s original shape.
  • Occlusal Adjustments: Correcting bite problems often involves reshaping cusps to prevent pain or damage.

Helpful Visual

FeatureDescription
CuspRaised point on chewing surface of molars
Number on Most MolarsFour primary cusps
FunctionGrinding food, distributing chewing forces
Variations4–5 cusps depending on tooth and individual

Learn More from Trusted Sources


Types of Molars and Their Cusp Patterns

Molars come in different types depending on their position in the mouth and stage of development. Each type has its own typical cusp pattern, and understanding these variations helps explain why we say “one of four on most molars.”

1. Upper (Maxillary) Molars

Upper molars are located in the upper jaw and are known for their complex cusp structures.

ToothTypical Number of CuspsNotable Features
First Molar4 or 5Often has 5 cusps, including the extra Cusp of Carabelli on the mesiolingual side
Second Molar4Slightly smaller than the first, usually 4 cusps arranged more symmetrically
Third MolarVariable (3-5)Highly variable, often smaller or fused cusps; sometimes called wisdom teeth

The Cusp of Carabelli is a small, fifth cusp found in about 30-40% of people, primarily on the upper first molars. It is considered a genetic trait and varies greatly in size and shape.

2. Lower (Mandibular) Molars

Lower molars generally have fewer cusps but are no less important for chewing.

ToothTypical Number of CuspsNotable Features
First Molar5Usually has five cusps including a prominent distal cusp
Second Molar4Similar shape to first molar but smaller and more symmetrical
Third MolarVariable (3-5)Highly variable cusp patterns, often impacted or malformed

Lower first molars are unique in that they commonly have five cusps: three on the cheek side (buccal) and two on the tongue side (lingual). This makes them the most complex molars in terms of cusp number.


Why Cusp Variation Matters

  • Functionality: More cusps can improve grinding efficiency but also make the tooth more susceptible to cavities in the grooves between cusps.
  • Dental Care: Dentists need to account for cusp variation when planning fillings, crowns, or orthodontic treatments.
  • Evolution: Wisdom teeth often have fewer cusps or irregular patterns due to evolutionary changes and reduced jaw sizes in modern humans.

Table: Cusp Counts by Molar Type

Molar TypeTypical CuspsNotes
Upper 1st Molar4–5Includes Cusp of Carabelli (extra cusp)
Upper 2nd Molar4Smaller, symmetrical cusps
Upper 3rd Molar3–5Variable, often reduced or fused cusps
Lower 1st Molar5Most complex cusp pattern
Lower 2nd Molar4Similar to first but smaller and simpler
Lower 3rd Molar3–5Variable and often malformed

Clinical Insight

A 2019 study published in the Journal of Dentistry found that variations in molar cusp numbers and patterns influence the risk of dental caries (cavities). Teeth with more cusps often have deeper grooves, which can trap food and bacteria, leading to higher decay risk. Dentists recommend sealants for molars with complex cusp patterns to protect these vulnerable areas.


Further Reading


How the Number of Cusps Affects Dental Health and Treatment

The number and shape of cusps on molars—like those referred to by the phrase “one of four on most molars”—play a significant role not just in chewing but also in dental health and clinical care. Understanding how cusps affect your teeth helps explain why dentists pay close attention to these structures.

1. Susceptibility to Cavities

Cusps create grooves and pits between them, which are natural traps for food debris and bacteria. These areas are prone to dental caries (cavities) if not cleaned properly.

  • Teeth with more cusps have more grooves, increasing the risk of decay.
  • For example, lower first molars with five cusps often have complex fissures that can be difficult to clean.

Preventive Measures:

  • Dentists often recommend sealants on molars with deep grooves to protect cusps from decay.
  • Regular flossing and careful brushing around cusps are essential.

2. Impact on Dental Procedures

When restoring or treating molars, dentists must recreate the original cusp anatomy to maintain proper function.

  • Fillings and Crowns: If a cusp is chipped or decayed, restorations must rebuild it carefully to preserve chewing efficiency.
  • Root Canals: Knowledge of cusp and root anatomy is crucial during treatment.
  • Orthodontics: The relationship of cusps between upper and lower teeth affects bite alignment.

3. Tooth Wear and Bruxism

Cusps are the first points of contact during chewing, so they are susceptible to wear and tear.

  • Excessive grinding (bruxism) can flatten cusps, leading to tooth sensitivity and reduced chewing ability.
  • Dental guards are often recommended to protect cusps from wear.

4. Evolutionary Perspective

The number of cusps has evolved to balance efficiency and durability.

  • Early human ancestors had molars with more cusps to process tougher diets.
  • Modern humans typically have fewer cusps, reflecting changes in diet and jaw size.

Table: Effects of Cusp Number on Dental Health

FactorMore Cusps (4–5)Fewer Cusps (3 or less)
Chewing EfficiencyHigher due to increased surface areaLower but sometimes compensated by jaw movement
Risk of CavitiesHigher (more grooves)Lower (smoother surfaces)
Complexity of TreatmentHigher (more anatomy to replicate)Lower
Susceptibility to WearHigher (more contact points)Lower

Expert Quote

“Restoring the natural anatomy of molar cusps is critical for maintaining proper function and preventing long-term damage. Even small changes can affect the patient’s bite and comfort.”
— Dr. Maria Jensen, Prosthodontist


Additional Resources


Common Questions About “One of Four on Most Molars” (FAQs)

Understanding the phrase “one of four on most molars” can raise many questions. Here are some frequently asked questions with straightforward answers to help clarify key points about molar cusps and their significance.

1. What does “one of four on most molars” mean?

This phrase refers to the fact that most molars typically have four main cusps—the raised points on the chewing surface of the tooth. These cusps help grind food and are essential for proper chewing function.


2. Do all molars have exactly four cusps?

No. While most molars have four cusps, there are exceptions. For example:

  • Lower first molars often have five cusps.
  • Some upper first molars have an additional small cusp called the Cusp of Carabelli.
  • Wisdom teeth (third molars) can have variable numbers of cusps, often fewer or irregular.

3. Why are cusps important for dental health?

Cusps create grooves and pits where food can get trapped, increasing the risk of cavities. They also distribute chewing forces to protect the tooth structure. Proper cusp anatomy is vital for effective chewing and maintaining a healthy bite.


4. Can cusps change over time?

Yes. Cusps can wear down due to:

  • Natural aging
  • Teeth grinding (bruxism)
  • Acid erosion or tooth decay

Worn cusps can affect chewing and cause sensitivity.


5. How do dentists treat damaged or worn cusps?

Dentists may use:

  • Fillings or dental bonding to rebuild small chips.
  • Crowns to restore larger damaged areas.
  • Occlusal guards to protect against grinding.

6. Are cusp variations genetic?

Yes. Traits like the Cusp of Carabelli are inherited and vary among populations. Tooth shape and cusp number can also provide clues in forensic and anthropological studies.


7. How can I protect my molar cusps?

  • Maintain good oral hygiene: brush and floss regularly.
  • Use fluoride toothpaste and consider dental sealants.
  • Avoid excessive grinding and wear protective night guards if needed.
  • Visit your dentist regularly for checkups and cleanings.

More Questions?

For additional details on tooth anatomy and care, check out these trusted resources:


Conclusion: Understanding “One of Four on Most Molars” and Its Importance

The phrase “one of four on most molars” highlights a fundamental aspect of molar anatomy—the presence of four main cusps on the chewing surface of most molars. These cusps are not just small bumps; they are critical structures that enable efficient chewing, protect teeth from damage, and maintain proper bite alignment.

We explored how cusp number varies by tooth type and individual differences, the role cusps play in dental health, and how dentists approach treatments that preserve or restore these vital features. Whether it’s the four main cusps or variations like the fifth Cusp of Carabelli, understanding molar cusp anatomy helps you appreciate the complexity of your teeth and the importance of good oral care.

By keeping cusps healthy through regular dental visits, proper hygiene, and preventive care like sealants, you support the longevity and function of your molars—key players in digestion and overall oral health.

If you’re curious to learn more about tooth anatomy or want personalized advice, consult your dentist who can provide insights tailored to your dental needs.


Key Takeaways

  • Most molars have four main cusps that aid in chewing and grinding food.
  • Cusp number and shape can vary by molar type and individual genetics.
  • Proper cusp anatomy is essential for dental health and function.
  • Dental treatments often focus on restoring cusps to maintain bite and chewing efficiency.
  • Preventive care like sealants protects cusps from cavities and wear.

Further Reading

SEO Title Tag

One of Four on Most Molars: Understanding Molar Cusps and Their Role in Dental Health

Meta Description

Discover why most molars have four cusps, their importance in chewing, dental health, and treatment options. Learn everything about one of four on most molars here!

Suggested Internal Linking Ideas

To strengthen your site’s SEO and improve user experience, consider linking this post to relevant existing articles such as:

  • “Understanding Tooth Anatomy: Types and Functions of Teeth” — for readers wanting broader dental knowledge.
  • “How to Prevent Cavities: Tips for Healthy Teeth” — to connect oral hygiene and cavity prevention.
  • “Dental Sealants: What They Are and How They Protect Your Teeth” — since sealants protect molar cusps from decay.
  • “Common Causes and Treatments for Tooth Wear” — connects with cusp wear and bruxism topics.

Frequently Asked Questions (FAQs) About One of Four on Most Molars

1. What does “one of four on most molars” mean?

It means that most molars typically have four main cusps—the raised chewing points on the tooth’s surface essential for grinding food effectively.

2. Do all molars have exactly four cusps?

Not always. While four cusps are common, some molars—like the lower first molars—can have five cusps, and upper first molars often have a small extra cusp called the Cusp of Carabelli.

3. Why are cusps important for molars?

Cusps help grind food, distribute chewing forces evenly, and protect the tooth structure from damage. They are vital for effective digestion and healthy oral function.

4. Can molar cusps wear down over time?

Yes. Cusps can wear due to age, grinding (bruxism), or acid erosion, which can reduce chewing efficiency and cause tooth sensitivity.

5. How do dentists treat damaged cusps?

Dentists may repair or restore cusps with fillings, crowns, or dental bonding to restore chewing function and protect the tooth.

6. How can I protect the cusps on my molars?

Maintain good oral hygiene, use fluoride toothpaste, consider dental sealants to protect grooves, avoid grinding, and see your dentist regularly.

Conclusion

Understanding the concept of “one of four on most molars” shines a light on the importance of molar cusps—those four key raised points that make chewing efficient and protect your teeth. These cusps not only help break down food but also maintain a healthy bite and shield the tooth from damage.

While most molars have four cusps, variations like extra cusps or fewer cusps exist and can affect dental care. Proper oral hygiene, preventive measures like sealants, and timely dental treatments help maintain cusp health and overall dental function.

By learning about molar cusps and how they impact your oral health, you can take better care of your teeth and enjoy a strong, healthy smile for years to come.

Do You Inhale Cigars? The Truth Every Smoker Should Know

Cigar smoking has long been associated with celebration, luxury, and tradition. Whether you’re lighting one up to commemorate a milestone or simply enjoy the ritual, a common question often arises for newcomers: “Do you inhale cigars?”

The answer is more complex than a simple yes or no. Inhaling cigar smoke can have significant health effects, and it’s not the way cigars were traditionally intended to be enjoyed. In this guide, we’ll dive deep into why most cigar smokers don’t inhale, what happens if you do, how cigars differ from cigarettes, and how to enjoy cigars without harming your lungs.

Let’s start by answering the most immediate question:

What Happens If You Inhale a Cigar?

Why Cigar Smoke Is Stronger Than Cigarette Smoke

Cigars are made with fermented and air-cured tobacco, unlike cigarettes which use chemically-treated, quick-burning tobacco. A single premium cigar can contain as much tobacco as an entire pack of cigarettes, and that makes a big difference.

ProductTobacco Content (approx.)
Cigarette1 gram
Small Cigar/Cigarillo3 grams
Premium Cigar5–20 grams

Because of this high concentration, cigar smoke is much denser, thicker, and more alkaline, which can irritate the lungs and throat far more than cigarette smoke. This is why inhaling a cigar—even just once—can feel harsh, cause intense coughing, dizziness, and nausea.


How Cigars Affect Your Lungs When Inhaled

When you inhale a cigar, you’re drawing highly concentrated smoke into your lungs, where it can rapidly absorb nicotine and tar into your bloodstream. According to a study by the National Cancer Institute, cigar smokers who inhale deeply have similar risks of lung disease, heart disease, and oral cancer as heavy cigarette smokers.

“A single full-size cigar can contain as much nicotine as an entire pack of cigarettes—up to 200 milligrams.”
U.S. Department of Health and Human Services

That means even infrequent cigar inhalation can lead to nicotine addiction, increased blood pressure, and long-term damage to respiratory tissues. The body was simply not designed to process cigar smoke in this way.


Differences in Tobacco Content: Cigars vs. Cigarettes

Let’s break down how cigar tobacco differs from cigarette tobacco:

FeatureCigarsCigarettes
Tobacco TypeAir-cured, fermentedFlue-cured, chemical additives
Nicotine ContentHigh (100–200 mg per cigar)Moderate (10–15 mg per cigarette)
Smoke pHAlkaline (absorbed through mouth)Acidic (absorbed through lungs)
Designed for Inhalation?NoYes

These chemical and physical differences explain why cigars are not meant to be inhaled. Cigar smoke’s higher pH makes it absorbable through the mouth lining, so inhalation is unnecessary to feel the effects.

Short-Term and Long-Term Health Effects of Inhaling Cigars

Short-term effects of inhaling even a small portion of a cigar include:

  • Severe coughing
  • Lightheadedness or dizziness
  • Nausea or vomiting
  • Throat and lung irritation
  • Nicotine buzz or “head rush” (often unpleasant for beginners)

Long-term risks increase with frequent inhalation and may include:

  • Lung cancer
  • Esophageal and oral cancers
  • Heart disease and stroke
  • Chronic Obstructive Pulmonary Disease (COPD)
  • Nicotine dependence or addiction

According to the Centers for Disease Control and Prevention (CDC), regular cigar inhalers have a 27% higher risk of dying from lung cancer compared to those who never smoked.

Key Takeaways

  • Do you inhale cigars? You shouldn’t—and here’s why:
    • Cigar smoke is stronger and more toxic than cigarette smoke.
    • It contains more nicotine, increasing the risk of addiction.
    • Health risks from inhalation are severe and well-documented.
    • Traditional cigar smoking involves tasting the smoke, not breathing it into your lungs.

FAQs for Answer Engine Optimization

Q: What happens if you inhale cigar smoke once?
A: Inhaling a cigar once can cause intense coughing, dizziness, nausea, and throat irritation. Due to the high nicotine and tar levels, even one inhalation can stress the lungs.

Q: Is cigar smoke harmful if not inhaled?
A: Yes. Even without inhaling, cigar smoke can still pose risks such as oral cancers, gum disease, and secondhand smoke exposure to others nearby.

Q: Do cigars get you high if you don’t inhale?
A: Some people feel a nicotine buzz from cigars even without inhaling because the nicotine is absorbed through the lining of the mouth.

Are You Supposed to Inhale Cigars?

This is one of the most commonly asked questions by people new to cigar smoking:
“Are you supposed to inhale cigars?”

The short answer: No, cigars are not meant to be inhaled. Cigar smoking is a tradition rooted in savoring flavor, not chasing a nicotine buzz or satisfying an addiction the way cigarette smoking is. Let’s break down why the method of cigar smoking is fundamentally different and what seasoned cigar smokers have to say about it.

The Traditional Way Cigars Are Smoked

Cigars are all about the flavor, aroma, and experience. The smoke is meant to stay in your mouth, where you can appreciate the unique blend of tobaccos, the craftsmanship, and the aging process. Unlike cigarettes, cigars are designed for slow enjoyment—not rapid nicotine delivery.

“Inhaling cigars defeats the purpose of the cigar itself. It’s like gulping fine wine instead of sipping it.”
Cigar Aficionado Magazine

Traditional cigar smokers puff and hold the smoke in their mouths, then exhale without ever drawing it into their lungs. This method is not only safer but also allows for a richer and more nuanced tasting experience.

What Experienced Cigar Smokers Say About Inhaling

Ask any long-time cigar aficionado and you’ll get a similar response:

  • “Only beginners inhale cigars.”
  • “You’ll regret it immediately.”
  • “It ruins the experience.”

In online communities, cigar forums, and reviews, inhaling cigars is almost universally discouraged. Most experienced smokers describe the first accidental inhale as unpleasant or even painful, often followed by nausea or a “green-out.”

In fact, many seasoned smokers practice retrohaling—a technique where smoke is exhaled through the nose—to better sense flavors without inhaling into the lungs.

Why Cigar Flavors Are Meant for the Mouth, Not the Lungs

Cigars are flavor-first products. The blend of tobaccos from different regions, the fermentation process, and the wrapper leaf all contribute to the cigar’s character. None of this complexity is appreciated when you inhale.

Cigar smoke contains over 7,000 chemical compounds, including:

  • Ammonia
  • Hydrogen cyanide
  • Carbon monoxide
  • Volatile organic compounds (VOCs)

Your mouth has the taste receptors to enjoy the smoke. Your lungs do not—they just suffer the consequences.

Common Misconceptions About Inhaling Cigars

Let’s dispel a few myths:

MythReality
“You need to inhale cigars to feel a buzz.”False. Nicotine is absorbed through your mouth and lips.
“Cigars are safer than cigarettes if you don’t inhale.”Partially true—but cigars still carry significant health risks.
“Small cigars are meant to be inhaled.”Not exactly. Some are cigarette-like, but most still aren’t meant for inhalation.
“Inhaling enhances the experience.”False. It ruins the flavor and increases risk.

Even flavored cigars or cigarillos are not intended for full inhalation. While their taste may seem milder, the smoke is still chemically intense and harmful when pulled into the lungs.

Key Takeaways

  • Are you supposed to inhale cigars? Absolutely not.
  • The proper method is to hold the smoke in your mouth and exhale without inhaling.
  • Cigars are about flavor and relaxation, not quick nicotine intake.
  • Even occasional inhaling can lead to serious health risks.

FAQs for Answer Engine Optimization

Q: Do professional cigar smokers inhale?
A: No. Professional or experienced cigar smokers do not inhale. They focus on the taste, aroma, and complexity of the smoke through the mouth and sometimes retrohaling.

Q: Why is cigar smoke not meant to be inhaled?
A: Cigar smoke is thicker, more alkaline, and contains more nicotine than cigarette smoke. It’s designed to be absorbed in the mouth, not the lungs.

Q: What is retrohaling, and is it the same as inhaling?
A: Retrohaling is the process of exhaling cigar smoke through the nose without inhaling it into the lungs. It enhances flavor perception but is not harmful like full inhalation

Why Don’t You Inhale Cigars Like Cigarettes?

If you’re used to smoking cigarettes, it may seem natural to inhale when you smoke a cigar. But ask any cigar enthusiast or health expert and they’ll tell you: you don’t inhale cigars—and there’s good reason for that.

Cigars and cigarettes may look similar on the surface, but they’re radically different in how they’re made, how they deliver nicotine, and how they impact your body. Let’s explore the science and the tradition behind why cigars are never meant to be inhaled.

Chemical Differences Between Cigars and Cigarettes

Cigars are made from 100% tobacco—often from different regions and aged for years—while cigarettes are made from a mix of processed tobacco and over 600 added chemicals, many of which are specifically designed to make inhalation easier and more addictive.

PropertyCigarsCigarettes
Tobacco TypeWhole-leaf, aged, air-curedProcessed, chemically treated
AdditivesFew to none (premium cigars)Over 600 additives
Paper WrapperTobacco leafBleached paper
Inhalation DesignNot designed for inhalationSpecifically engineered for inhalation
Smoke pHAlkaline (absorbed orally)Acidic (absorbed in lungs)

These differences matter. The alkaline pH of cigar smoke allows nicotine to be absorbed directly through the lining of the mouth, making inhalation unnecessary for nicotine delivery. In contrast, cigarette smoke is acidic, so it must be inhaled into the lungs to feel the effects.

The Higher Nicotine Concentration in Cigars

One of the most important reasons you don’t inhale cigars is the immense nicotine load. A typical full-size cigar can deliver 100 to 200 mg of nicotine, compared to just 10 to 15 mg in a cigarette.

“Smoking just one large cigar can expose the smoker to as much nicotine as smoking a pack of cigarettes.”
Centers for Disease Control and Prevention (CDC)

Inhaling that amount of nicotine directly into your lungs can cause:

  • Immediate nausea or vomiting
  • Headaches or dizziness
  • Heart palpitations
  • Nicotine poisoning in extreme cases

This is why beginners are often warned never to inhale, even by casual smokers. The strength of a cigar can overwhelm your system in minutes.

How Cigar Smoking Is Meant to Be a Slower, More Relaxed Process

Cigar smoking is not a habit—it’s a hobby.

A cigarette takes 5–7 minutes to smoke, but a premium cigar can last 30 to 90 minutes. The act is ceremonial, often involving:

  • Inspecting and cutting the cap
  • Toasting and lighting with care
  • Drawing slowly to build a perfect burn
  • Savoring flavor profiles like coffee, spice, earth, and cocoa

Inhaling would rush and ruin the experience, making the flavors indistinct and overwhelming. Most cigar lounges, communities, and publications emphasize that flavor appreciation—not nicotine—is the goal.

“Cigar smoking is about patience. It’s about ritual. Inhaling turns it into something it was never meant to be.”
James Suckling, Cigar Connoisseur

Risks of Treating a Cigar Like a Cigarette

Many cigarette smokers transitioning to cigars mistakenly inhale out of habit, which can cause serious health effects, especially if repeated over time. Here’s what happens when you treat a cigar like a cigarette:

BehaviorConsequences
Inhaling cigar smokeIntense coughing, nausea, and dizziness
Smoking too fastOverheating the cigar, bitter flavors
Chasing a buzzHigher risk of addiction and nicotine overload
Treating cigars casuallyIncreased risk of lung cancer and heart disease

Moreover, the larger size and unfiltered nature of cigars mean the smoke contains more carcinogens, tar, and carbon monoxide. Inhaling all that puts your lungs under severe stress.

Key Takeaways

  • Cigars and cigarettes are chemically and behaviorally different.
  • Do you inhale cigars? You should not—they aren’t designed for it.
  • Cigar smoke is absorbed through the mouth, not the lungs.
  • The high nicotine content in cigars makes inhalation dangerous.
  • Cigars are meant to be savored slowly, not used as a quick fix.

FAQs for Answer Engine Optimization

Q: Why are you not supposed to inhale cigar smoke?
A: Cigar smoke is thicker, contains more nicotine, and is chemically designed to be absorbed through the mouth. Inhaling increases health risks dramatically.

Q: Can you inhale cigars if you’re used to cigarettes?
A: You can, but it’s strongly discouraged. The high nicotine levels can make you sick, even if you’re a regular cigarette smoker.

Q: What happens if you inhale cigars regularly?
A: You may develop lung cancer, heart disease, nicotine addiction, and respiratory issues. The risks are equal to or greater than cigarette smoking.

Can You Inhale Cigar Smoke Safely?

If you’ve ever asked, “Can you inhale cigar smoke safely?”, the honest answer is: no, not really. While some smokers may inhale occasionally or accidentally without immediate disaster, there is no “safe” way to inhale cigar smoke. Cigar smoke is simply too strong, too dense, and too toxic to be considered safe for inhalation—even in moderation.

Let’s break down what happens if you do inhale, why some people still try, and what health experts and studies say.

Is Any Inhalation Considered “Safe”?

Cigar smoke contains higher concentrations of tar, ammonia, carbon monoxide, and nicotine than cigarette smoke. When you inhale that smoke into your lungs, these compounds bypass the mouth and go directly into your bloodstream.

Even occasional inhaling can lead to:

  • Acute respiratory distress
  • Dizziness and nausea
  • Elevated heart rate and blood pressure
  • Shortness of breath
  • Increased carbon monoxide in the blood

“There is no safe level of exposure to tobacco smoke, whether it’s from cigarettes or cigars.”
U.S. Surgeon General’s Report on Smoking and Health

Even one puff, deeply inhaled, can irritate your lungs and cause symptoms similar to nicotine poisoning in sensitive individuals.

Rare Cases of Mild Cigar Inhalation: What to Know

That said, some cigar smokers—particularly those who are transitioning from cigarettes—report light inhalation with smaller cigars or cigarillos. These products can seem easier to inhale due to:

  • Flavored tobacco
  • Smaller ring gauge (diameter)
  • Shorter smoke time

But even light inhalation comes with real risks. Many “small cigars” are chemically similar to cigarettes, but without filters, making the smoke more harmful.

Case Study:
A study published in JAMA Internal Medicine found that people who smoked little cigars or cigarillos and inhaled were just as likely to develop lung disease as cigarette smokers.

So, while some people may get away with it occasionally, the cumulative damage adds up quickly over time.

What Happens to First-Time Cigar Smokers Who Inhale

First-time cigar smokers who accidentally inhale often report:

  • Burning throat or lungs
  • A heavy, suffocating feeling in the chest
  • Violent coughing fits
  • Light-headedness or fainting
  • Intense nicotine buzz followed by nausea

This reaction is not unusual—it’s your body’s way of saying:
“Stop, this smoke is too much!”

Inhaling cigar smoke is a shock to the lungs because they aren’t conditioned for the density or chemical content. The symptoms are often strong enough to turn beginners off cigars entirely.

Effects of Secondhand Cigar Smoke

Even if you’re not inhaling directly, you should know: cigar smoke lingers—and it’s dangerous.

Cigars produce more secondhand smoke than cigarettes due to their longer burn time and larger volume of tobacco. This means:

  • People nearby are exposed to toxic chemicals
  • Children and pets are especially vulnerable
  • Indoor smoking—even without inhaling—creates hazardous air quality

According to the Environmental Protection Agency (EPA), secondhand cigar smoke contains higher levels of carcinogens than cigarette smoke, especially in unventilated areas.

Key Takeaways

  • Can you inhale cigars safely? No—the risks far outweigh any perceived benefits.
  • Even light or occasional inhalation can lead to serious health consequences.
  • First-time inhalation often results in discomfort, coughing, and nausea.
  • Secondhand smoke from cigars is also hazardous to non-smokers.

If you’re new to cigars, stick to the tradition: draw, taste, exhale. Leave your lungs out of it.

FAQs for Answer Engine Optimization

Q: Can inhaling a small cigar hurt you?
A: Yes. Even small cigars contain unfiltered smoke with high nicotine and tar content. Inhaling them can lead to coughing, dizziness, and long-term lung damage.

Q: Is it better to inhale just a little of a cigar?
A: No. There’s no safe amount to inhale. Even small amounts of cigar smoke can irritate your lungs and increase your risk for respiratory problems.

Q: Can you get sick from inhaling a cigar?
A: Yes. First-time inhalers often experience nausea, headaches, rapid heartbeat, or even vomiting—signs of nicotine overload.

Q: If I don’t inhale, is cigar smoke still harmful?
A: Yes, but significantly less harmful than inhaling. Cigar smoke still poses risks to your mouth, throat, and those around you through secondhand smoke.

How Do You Properly Smoke a Cigar Without Inhaling?

By now, we’ve clearly established that you should not inhale cigars—but that leaves an important follow-up question:
“Then how do you actually smoke a cigar the right way?”

Unlike cigarettes, cigars are about savoring the smoke in your mouth, not pulling it into your lungs. Proper cigar smoking is an art form—a relaxing ritual that focuses on flavor, aroma, and experience rather than nicotine absorption or habit. Below is a complete guide to help you enjoy a cigar the way it’s meant to be smoked—without inhaling.

Step-by-Step Beginner’s Guide to Smoking a Cigar (Without Inhaling)

Here’s how to smoke a cigar correctly, safely, and enjoyably:

  1. Choose the Right Cigar
    • For beginners, start with a mild-bodied cigar—Connecticut wrappers are a great choice.
    • Avoid strong maduros or double ligeros if it’s your first time.
  2. Cut the Cigar Cap (Correctly)
    • Use a sharp guillotine cutter to clip just the rounded cap—don’t cut too deep.
    • Cutting too much will unravel the cigar; cutting too little restricts the draw.
  3. Toast the Foot
    • Hold the cigar at a 45° angle.
    • Use a butane lighter or wooden match to evenly toast the foot (the open end).
    • Avoid charring the wrapper—this affects flavor.
  4. Draw, Don’t Puff Like a Cigarette
    • Place the cigar in your mouth and gently draw the smoke indo not inhale.
    • Let the smoke linger in your mouth, taste the flavor notes (earth, pepper, chocolate, wood, etc.), then exhale.
  5. Savor the Flavors
    • Take one puff every 45–60 seconds. Over-puffing can overheat the cigar and produce a bitter taste.
    • Keep your cadence slow and relaxed.
  6. Let It Go Out Naturally
    • If you’re done or need to pause, let the cigar go out on its own—don’t stub it out like a cigarette.
    • You can relight it if you return within an hour.

How to Draw and Taste Flavor Without Inhaling

Cigar flavors are released through the smoke’s contact with your palate. When you draw a puff:

  • Let the smoke roll across your tongue
  • Notice flavors evolve as the cigar burns down
  • If you’re experienced, try retrohaling (see below)

Remember: inhaling adds nothing to this flavor experience—it actually mutes your ability to detect subtleties and ruins the smooth draw.

Tips to Avoid Accidentally Inhaling Cigar Smoke

If you’re coming from a cigarette background, inhaling may feel instinctual. Here’s how to break the habit:

  • Be conscious of the draw—focus on keeping the smoke in your mouth only.
  • Exhale immediately after tasting; don’t let the smoke travel past your throat.
  • Hold the smoke for 3–5 seconds max, then release it through your mouth or nose.
  • Stay relaxed—tense or deep breaths make accidental inhalation more likely.

“Cigar smoke is not meant to be treated like cigarette smoke. When in doubt, treat it like tasting wine or whiskey—let it sit on your palate, not in your lungs.”
Nick Perdomo, Perdomo Cigars CEO

What Is Retrohaling? (And How to Do It Safely)

Retrohaling is an advanced technique where you push smoke from your mouth through your nose, without inhaling into the lungs. This allows you to engage your olfactory senses, which greatly enhances flavor perception.

How to Retrohale:

  1. Draw smoke into your mouth as usual.
  2. Close your throat.
  3. Use your tongue and soft palate to gently push the smoke up through your nose.
  4. Don’t force it—it should be a soft, slow release.

Retrohaling is NOT inhaling. It doesn’t involve your lungs. It’s often how seasoned smokers taste spice, floral notes, or woodiness in a cigar.

Cigar Etiquette for Social Smokers

If you’re smoking cigars socially, proper etiquette matters:

  • Don’t inhale—it’s seen as a rookie move.
  • Avoid rapid puffing—it overheats the cigar and looks impatient.
  • Don’t tap ash like a cigarette—let it fall naturally.
  • Share your tasting notes; cigar smoking is often a communal, sensory experience.

Key Takeaways

  • Do you inhale cigars? Still a strong no—and now you know what to do instead.
  • Cigar smoking is about drawing into the mouth, tasting, and exhaling.
  • Use retrohaling for deeper flavor, but never inhale into your lungs.
  • Follow a slow, relaxed rhythm and proper etiquette to truly enjoy the experience.

FAQs for Answer Engine Optimization

Q: What’s the correct way to smoke a cigar without inhaling?
A: Draw the smoke into your mouth, savor the flavors, and then exhale. Avoid letting the smoke reach your lungs.

Q: Can you taste a cigar without inhaling?
A: Yes. In fact, cigars are designed to be tasted in the mouth, not the lungs. Most of the flavor comes through your tongue and olfactory senses.

Q: What is retrohaling and is it safe?
A: Retrohaling is the act of exhaling cigar smoke through your nose to enhance flavor. It doesn’t involve your lungs and is considered safe if done properly.

Q: Is it hard to avoid inhaling cigars?
A: Not if you’re mindful. Focusing on drawing slowly and exhaling quickly helps prevent accidental inhalation—especially for former cigarette smokers.

Do You Inhale Small Cigars or Cigarillos?

This is one of the biggest points of confusion for new smokers:
“Do you inhale small cigars or cigarillos?”
They’re compact. They’re flavored. They look like cigarettes. So, you might assume they’re meant to be inhaled. But here’s the truth:

Cigarillos and small cigars are still cigars. And just like full-size cigars, they’re not meant to be inhaled.

That said, there’s nuance to this answer—especially since the tobacco industry blurs the lines between cigars and cigarettes in many mass-market products. Let’s unpack it.

What Are Cigarillos and Small Cigars?

Cigarillos are smaller, thinner versions of traditional cigars. They typically:

  • Contain less tobacco (about 3 grams)
  • Are often machine-made
  • Sometimes come flavored or sweetened
  • May or may not have a filter or plastic tip
  • Are sold individually or in packs (like cigarettes)

Small cigars are similar but may resemble cigarettes in size and shape. This makes them tempting to inhale, especially for those used to smoking cigarettes.

Do Small Cigars Contain the Same Tobacco as Large Cigars?

Not exactly. Many small cigars use processed or homogenized tobacco leaf (HTL) rather than long-leaf, aged tobacco found in premium cigars. The experience is more about convenience and habit than flavor and complexity.

However, they still produce cigar smoke—which is thicker, more alkaline, and contains more tar and nicotine than cigarette smoke.

TypeNicotine ContentInhalation DesignFlavor Profile
Premium Cigar100–200 mgNoRich, complex, aged
Cigarillo30–80 mgNo (but often inhaled)Mild, often flavored
Filtered Cigar20–60 mgDesigned like cigarettesSweet, less nuanced

Why People Inhale Cigarillos (But Shouldn’t)

There are a few reasons people mistakenly inhale cigarillos:

  1. Habit from cigarette smoking
  2. Filter tips that resemble cigarettes
  3. Flavored tobacco that feels smoother
  4. Lack of education about the difference

Despite these similarities, inhaling cigarillos is just as harmful—if not more—than inhaling cigarettes due to:

  • Higher smoke volume
  • Greater nicotine doses
  • Lack of filters in some versions

Important Note:
According to the FDA, small cigars and cigarillos pose the same health risks as regular cigars, especially when inhaled—including cancer, heart disease, and nicotine addiction.

How to Enjoy Small Cigars Without Inhaling

If you choose to smoke cigarillos or small cigars, the technique is the same as with full-size cigars:

  1. Draw the smoke into your mouth only.
  2. Do not let it pass your throat.
  3. Exhale slowly and enjoy the flavor.

Flavored cigarillos can offer tastes like vanilla, cherry, or chocolate—but these are still not meant to be inhaled, even if the smoke feels smoother.

Filtered Small Cigars: The Gray Area

Some small cigars come with filters and packaging that make them nearly identical to cigarettes. This has led to confusion—even intentional marketing misdirection.

However:

  • The tobacco blend is still cigar-grade
  • The smoke is still alkaline and thick
  • And the health risks are the same—or worse—if inhaled

A 2020 study published in Tobacco Control found that inhaling filtered cigars delivers higher carbon monoxide and nicotine levels than cigarettes due to larger puffs and longer burn time.

So even filtered cigarillos should not be inhaled, despite their design.

Key Takeaways

  • Do you inhale small cigars or cigarillos? No—you shouldn’t.
  • They may look like cigarettes, but their smoke is just as harmful as regular cigar smoke.
  • Inhaling even small cigarillos increases your risk for:
    • Lung and oral cancers
    • Heart and vascular disease
    • Nicotine addiction
  • Flavored tips and filters don’t make inhaling safer.

If you’re choosing a cigarillo, treat it like a cigar: draw into the mouth, taste, and exhale.

FAQs for Answer Engine Optimization

Q: Are you supposed to inhale small cigars?
A: No. Small cigars and cigarillos are not meant to be inhaled. They produce dense, alkaline smoke that can damage your lungs if inhaled.

Q: Are cigarillos safer than cigarettes if you don’t inhale?
A: They may be slightly safer, but not risk-free. Cigarillos still expose you to nicotine, tar, and carcinogens—especially through secondhand smoke and oral exposure.

Q: Why do small cigars have filters if they’re not supposed to be inhaled?
A: Filters are often marketing tools. They mimic cigarettes but don’t change the smoke’s composition. Inhaling still delivers high levels of toxins.

Q: Can flavored cigarillos be inhaled safely?
A: No. Flavoring doesn’t reduce the risks. Inhaling flavored cigar smoke can still lead to health issues like lung damage and nicotine addiction.

We’ll continue optimizing for SEO, Answer Engine Optimization, and naturally include our keyword “do you inhale cigars” and its variants throughout.

Cigar Inhalation vs. Retrohaling: What’s the Difference?

When people ask, “Do you inhale cigars?”, they’re often trying to understand how to get the most flavor or “effect” from a cigar. This is where confusion between inhaling and retrohaling usually begins.

At a glance, both involve taking in smoke and releasing it. But that’s where the similarities end.

Bottom Line:
Inhaling means drawing smoke into your lungs (not recommended).
Retrohaling means pushing smoke through your nose from your mouth without involving your lungs.

Let’s break these two down so you understand why retrohaling is safe (when done right), and inhaling is not.

What Is Cigar Inhalation?

Cigar inhalation is the act of pulling smoke down your throat and into your lungs—just like you would with a cigarette.

It delivers nicotine more quickly into your bloodstream but comes at a high cost:

  • Exposure to more carcinogens
  • Irritation of the lungs and respiratory system
  • Risk of nicotine poisoning
  • Increased likelihood of lung cancer, COPD, and heart disease

Cigars aren’t built for inhalation. Their larger tobacco volume, stronger smoke, and higher pH make inhaling particularly uncomfortable and dangerous.

Rule of thumb: If it burns your throat or chest, it’s not meant to be inhaled.

What Is Retrohaling?

Retrohaling is a technique used by seasoned cigar smokers to experience more of a cigar’s complexity—without inhaling.

It involves pushing smoke out through your nose after holding it in your mouth. This activates the olfactory receptors in your nasal cavity, where 70–80% of flavor perception occurs.

How to Retrohale (Safely):

  1. Draw smoke into your mouth—as you normally would.
  2. Close your throat (like holding your breath).
  3. Using your tongue and soft palate, gently push the smoke out through your nose.
  4. Do not force it—especially if you’re new.

You’re not inhaling. The smoke never enters your lungs.

Cigar Inhalation vs. Retrohaling: A Side-by-Side Comparison

FeatureInhalationRetrohaling
Smoke enters lungs Yes No
Risk of lung irritation High None (if done properly)
Enhances flavor Not ideal Yes—engages full palate
Safe for regular use No Generally safe
Beginner friendly Not recommended Try slowly, build tolerance
Increases addiction risk Yes No (minimal systemic exposure)

What Does Retrohaling Do?

By sending smoke through your nose, you activate olfactory bulb receptors, which detect aromas your tongue can’t. This is where you can start to pick up:

  • Pepper or spice
  • Leather or cedar
  • Floral or citrus notes
  • Earthiness or sweetness

For many aficionados, retrohaling is the only way to fully appreciate the complexity of a premium cigar.

“If you’re not retrohaling, you’re only tasting 30% of your cigar.”
A.J. Fernandez, Master Blender

Retrohaling Tips for Beginners

If you’re new to retrohaling, start with milder cigars. Strong cigars can burn the nasal passages and be overwhelming.

Tips to get started:

  • Practice with cooler smoke (slower puffs)
  • Try once every 3–5 puffs, not every draw
  • Don’t force it—retrohaling is subtle and slow
  • Blow gently through your nose

If your nose or throat burns, stop. You’re either doing it too aggressively or using a cigar that’s too strong.


✅ Key Takeaways

  • Do you inhale cigars? Still a firm no—especially now that you know retrohaling is the safer, better alternative.
  • Retrohaling engages your nose, not your lungs.
  • Inhaling puts you at risk for serious health issues.
  • Retrohaling enhances flavor and aroma, not nicotine delivery.
  • Take your time and practice—it’s a technique that improves with experience.

FAQs for Answer Engine Optimization

Q: Is retrohaling the same as inhaling a cigar?
A: No. Retrohaling pushes smoke through your nose from your mouth without involving your lungs. Inhaling pulls smoke directly into your lungs and is much riskier.

Q: Does retrohaling deliver more nicotine?
A: Not significantly. Retrohaling is about flavor detection—not increasing nicotine absorption.

Q: Is retrohaling safe?
A: Generally, yes. As long as the smoke doesn’t enter your lungs, retrohaling is a safe way to experience fuller flavor from cigars.

Q: Can I retrohale every puff?
A: You can, but most smokers retrohale every 3–5 puffs to avoid overwhelming their nose and palate.

As always, we’ll weave in the main keyword “do you inhale cigars” and its variations naturally.

What Happens If You Inhale a Cigar by Accident?

You light up your first cigar, take a puff, and without thinking—you inhale.
Suddenly your chest feels tight, your head spins, and your stomach turns. You’re not alone.

It’s a common beginner mistake, especially for those switching from cigarettes. So, what happens if you inhale a cigar by accident?
Here’s what to expect, what’s happening in your body, and how to recover quickly and safely.

Immediate Physical Reactions to Accidental Inhalation

Inhaling cigar smoke can be a shock to your system. It’s denser, more alkaline, and contains much higher levels of nicotine than cigarette smoke.

Here’s what most people experience within seconds to minutes:

Common Symptoms:

  • Violent coughing
  • Burning sensation in your lungs and throat
  • Nausea or vomiting
  • Dizziness or head rush
  • Rapid heartbeat or anxiety
  • Shortness of breath
  • Heavy chest feeling or wheezing

These reactions are your body’s protective response to an overload of toxins and smoke particulates.

Fun Fact: One full-size premium cigar can contain as much nicotine as an entire pack of cigarettes (100–200 mg).

Why These Symptoms Happen

Cigar smoke is different from cigarette smoke. It’s made to be tasted, not inhaled. When it reaches your lungs, it overwhelms your respiratory system.

Breakdown of Effects:

ComponentEffect When Inhaled
NicotineSudden spikes cause nausea, dizziness, anxiety
AmmoniaIrritates airways, triggers coughing
Carbon monoxideDisplaces oxygen in blood, causing fatigue
Tar and carcinogensInflammatory response, lung irritation

Even a single inhaled puff can trigger these effects in sensitive individuals.

What To Do If You Inhale a Cigar by Accident

If you accidentally inhale cigar smoke, don’t panic. The symptoms can be intense but usually pass within 15–30 minutes.

Here’s what to do:

  1. Stop smoking immediately.
  2. Sit upright in fresh air or near a fan.
  3. Take slow, deep breaths—in through your nose, out through your mouth.
  4. Drink cold water or suck on ice chips to soothe the throat.
  5. Avoid lying down—this can worsen nausea or dizziness.
  6. If you’re lightheaded, put your head between your knees or lie back with legs elevated.

If chest pain, vomiting, or breathing problems persist more than 30 minutes, seek medical attention.

How to Prevent It Next Time

Now that you know what happens when you inhale a cigar, here’s how to make sure it doesn’t happen again:

  • Pause before each puff—focus on keeping the smoke in your mouth only.
  • Practice the draw—don’t pull hard, just sip the smoke like you’re tasting wine.
  • Exhale quickly before the smoke has a chance to drift toward your lungs.
  • Start with mild cigars that won’t overwhelm your senses.

Many cigar lounges will coach new smokers: “Don’t inhale. Taste it—don’t breathe it.” It’s advice worth taking.

Key Takeaways

  • Do you inhale cigars by accident sometimes? Yes—and it’s a common but unpleasant mistake.
  • Symptoms include nausea, dizziness, coughing, and chest discomfort.
  • The effects are temporary but a sign that your lungs were not meant for cigar smoke.
  • Recovery is usually simple: fresh air, hydration, rest.
  • Learning to draw properly will help you enjoy cigars the way they’re meant to be enjoyed—without inhaling.

FAQs for Answer Engine Optimization

Q: What should I do if I accidentally inhale a cigar?
A: Stop smoking, move to fresh air, breathe deeply, and sip cold water. Symptoms usually pass within 30 minutes.

Q: Can one accidental inhale make you sick?
A: Yes. Even a single deep inhale can trigger coughing, nausea, dizziness, and other symptoms due to the strong nature of cigar smoke.

Q: Is it dangerous to inhale a cigar one time?
A: While one time may not cause long-term damage, it can lead to unpleasant side effects. Repeated inhalation increases serious health risks.

Q: Will inhaling a cigar get you high faster?
A: It may produce a stronger nicotine buzz—but also causes nausea, headaches, and a much higher risk of toxicity. It’s not a safe or smart method.

Frequently Asked Questions (FAQs)

Q: Do you inhale cigars like cigarettes?
A: No. Unlike cigarettes, cigars are not meant to be inhaled. The smoke is thicker, more alkaline, and can cause serious lung irritation and health risks if inhaled.

Q: Can inhaling cigars cause health problems?
A: Yes. Inhaling cigar smoke increases the risk of lung cancer, heart disease, respiratory issues, and nicotine addiction.

Q: Is it safe to inhale cigarillos or small cigars?
A: No. Even though cigarillos are smaller and sometimes flavored, inhaling them is harmful and carries many of the same risks as inhaling large cigars.

Q: What is retrohaling, and is it safe?
A: Retrohaling is pushing smoke out through your nose after holding it in your mouth. It is generally safe and enhances the flavor experience without inhaling smoke into the lungs.

Q: What should I do if I accidentally inhale cigar smoke?
A: Stop smoking, breathe fresh air, stay hydrated, and rest. Symptoms usually subside within 30 minutes. Seek medical help if symptoms persist or worsen.

Conclusion

So, do you inhale cigars? The clear answer is no. Cigars are designed to be enjoyed through tasting and savoring the smoke in your mouth—not inhaling into your lungs. Whether you’re smoking a full-size premium cigar, a small cigar, or a cigarillo, inhaling can cause serious immediate discomfort and long-term health risks.

Instead, focus on techniques like retrohaling, which let you fully appreciate a cigar’s rich flavors without exposing your lungs to harmful smoke. If you accidentally inhale, don’t panic—understand the symptoms and recover with simple steps like fresh air and hydration.

Ultimately, understanding the correct way to enjoy cigars enhances your experience and protects your health. Keep these tips in mind, and you’ll enjoy cigars safely and tastefully for years to come.

Cookies Policy

This Cookies Policy explains how GymGoals (“we”, “us”, or “our”) uses cookies and similar technologies on our website https://gymgoals.org (the “Site”). By continuing to browse or use our website, you agree to the use of cookies as described in this policy.


1. What Are Cookies?

Cookies are small text files stored on your device (computer, tablet, smartphone) when you visit a website. They help the site recognize your device and remember your actions and preferences over time.


2. How We Use Cookies

We use cookies to:

  • Provide essential site functionality
  • Analyze site traffic and performance
  • Remember your preferences and settings
  • Personalize your experience
  • Deliver relevant content and ads (where applicable)

3. Types of Cookies We Use

a. Essential Cookies

These cookies are necessary for basic site functions and cannot be disabled. They include things like login authentication and secure browsing.

b. Performance & Analytics Cookies

These cookies collect anonymous data to help us understand how users interact with the site, improve performance, and fix bugs (e.g., Google Analytics).

c. Functionality Cookies

These remember your choices (e.g., language or region) and enhance user experience.

d. Advertising & Targeting Cookies

Used to deliver relevant ads based on your interests and browsing behavior. These may be placed by us or third-party services such as Google or Facebook.


4. Third-Party Cookies

We may allow trusted third-party services to use cookies to help us analyze and optimize your experience. These third parties may include:

  • Google Analytics
  • Facebook Pixel
  • Stripe (for payments)
  • Mailchimp or similar email tools

We do not control these third-party cookies and encourage you to review their respective privacy policies.


5. Cookie Management

You have control over your cookie preferences. You can:

  • Accept or reject cookies through our cookie consent banner
  • Change browser settings to block or delete cookies
  • Use browser add-ons/extensions to manage tracking

Note: Disabling certain cookies may affect the functionality of the website.

Managing Cookies in Browsers:


6. Changes to This Policy

We may update this Cookies Policy from time to time. Changes will be posted on this page with an updated effective date. We encourage you to review the policy periodically.

Privacy Policy

GymGoals (“we”, “us”, “our”) values your privacy. This Privacy Policy explains how we collect, use, disclose, and protect your personal information when you visit our website https://gymgoals.org or use our services.

By accessing or using our site, you agree to the terms of this policy.


1. Information We Collect

We may collect the following types of personal data:

a. Information You Provide

  • Name, email address, phone number
  • Billing and payment information
  • Fitness goals, health metrics, and preferences
  • User account login credentials
  • Any messages, support requests, or content you submit

b. Automatically Collected Information

  • IP address and browser information
  • Device type and operating system
  • Site usage data (pages viewed, session duration, etc.)
  • Cookies and tracking technologies (see Section 5)

2. How We Use Your Information

We use your information to:

  • Provide and personalize your user experience
  • Deliver fitness programs, nutrition advice, and support
  • Process payments and manage subscriptions
  • Communicate updates, offers, and relevant content
  • Improve our website and services
  • Ensure platform security and prevent fraud

3. How We Share Your Information

We do not sell your personal data. We may share information in the following cases:

  • Service Providers: With third parties who assist with payment processing, hosting, analytics, etc.
  • Legal Requirements: If required to comply with laws, legal processes, or enforce our Terms
  • Business Transfers: In connection with a merger, acquisition, or sale of assets

4. Your Rights and Choices

Depending on your location, you may have the right to:

  • Access, correct, or delete your personal data
  • Object to or restrict processing
  • Withdraw consent at any time
  • Request data portability
  • Lodge a complaint with your local data protection authority

To exercise your rights, email us at [Insert Email].


5. Cookies and Tracking

We use cookies and similar technologies to:

  • Remember your preferences
  • Track usage for analytics
  • Improve website performance
  • Deliver targeted advertising (if applicable)

You may adjust your browser settings to refuse or manage cookies. Some site features may not function properly if cookies are disabled.


6. Data Retention

We retain your personal information only as long as necessary to fulfill the purposes outlined in this policy, unless a longer retention period is required by law.


7. Data Security

We implement appropriate technical and organizational measures to protect your data from unauthorized access, disclosure, alteration, or destruction. However, no system is 100% secure. You use our services at your own risk.


8. International Users

If you access GymGoals from outside the United States, please note that your information may be transferred to and processed in the U.S. By using the website, you consent to such transfers.


9. Children’s Privacy

Our services are not intended for individuals under the age of 18. We do not knowingly collect data from children. If we discover that a child has provided personal data, we will delete it promptly.


10. Changes to This Privacy Policy

We may update this policy from time to time. The revised version will be posted on this page with an updated date. Continued use of the website after changes constitutes acceptance.

Terms and Conditions

Welcome to GymGoals.org. These Terms and Conditions (“Terms”) govern your use of our website, services, products, and features (collectively, the “Services”). By accessing or using our Services, you agree to be bound by these Terms. If you do not agree, please do not use the Services.

1. Use of the Site

You must be at least 18 years old (or the age of majority in your jurisdiction) to use this website. By using GymGoals, you represent that you meet this requirement. If using on behalf of an organization or another individual, you confirm that you have the authority to accept these Terms on their behalf.

2. Health Disclaimer

GymGoals offers fitness and nutrition information for educational and informational purposes only. Always consult a physician before starting any exercise program or dietary plan. Use of any information provided is solely at your own risk.

3. User Accounts

To access certain features, you may need to register an account. You are responsible for maintaining the confidentiality of your login information and for all activities that occur under your account.

You agree not to:

  • Share your login details
  • Impersonate another person
  • Use the platform for any unlawful purpose

We reserve the right to suspend or terminate accounts for violations of these Terms.

4. Subscriptions and Payments

Some features may require payment, including monthly or annual subscriptions. By subscribing, you authorize GymGoals to charge your selected payment method on a recurring basis. You may cancel your subscription at any time, but fees are non-refundable unless otherwise stated.

5. Intellectual Property

All content on GymGoals.org—logos, text, images, videos, and software—is the property of GymGoals or its licensors and is protected by copyright, trademark, and other intellectual property laws. You may not reproduce, distribute, or exploit our content without written permission.

6. Prohibited Conduct

When using GymGoals, you agree not to:

  • Post false, misleading, or inappropriate content
  • Harass or threaten other users
  • Upload viruses or malicious code
  • Attempt to access unauthorized areas of the site

We reserve the right to investigate and take appropriate action, including legal remedies and account termination.

7. Limitation of Liability

GymGoals and its affiliates are not liable for any direct, indirect, incidental, or consequential damages resulting from the use—or inability to use—our Services. We do not guarantee any specific results from using the platform.

8. Third-Party Links

Our website may contain links to third-party websites. We are not responsible for the content or practices of any third-party sites and encourage you to review their terms and privacy policies.

9. Modifications to the Terms

We reserve the right to change these Terms at any time. Changes will be effective upon posting on this page. It is your responsibility to review the Terms periodically.

10. Governing Law

These Terms shall be governed by and interpreted in accordance with the laws of [Insert Jurisdiction]. Any disputes shall be resolved exclusively in the courts of [Insert Location].

About us

At GymGoals, our mission is to ignite a passion for fitness by empowering individuals of all levels—beginners, enthusiasts, and seasoned athletes—to set, chase, and surpass their health and performance goals. Whether your aim is improving strength, boosting athletic performance, or embracing a healthier lifestyle, we’re here to guide you every step of the way.

Who We Are

Founded by a team of dedicated fitness professionals, GymGoals combines years of hands-on experience in personal training, nutrition coaching, and sports science. We bring expertise in building effective workout programs, designing balanced meal plans, and creating a supportive fitness community. Our belief? Sustainable progress happens when knowledge, motivation, and consistency come together.

What We Offer

  • Tailored Workout Programs – Personalized training plans crafted around your current fitness level and long-term goals.
  • Expert Nutrition Guidance – From macronutrient tracking to full meal plans, we help fuel your journey for optimal results.
  • Progress Tracking Tools – Easily monitor your workouts, nutrition, weight, strength milestones, and more.
  • Community & Support – Join a network of like-minded individuals through forums, challenges, and expert-led webinars.

Our Core Values

  • Empowerment: We equip you with the tools and knowledge to make sustainable fitness decisions.
  • Inclusivity: Every body is welcome—no judgment, no comparisons.
  • Accountability: We help you stay committed through consistent check-ins and progress tracking.
  • Continuous Learning: Our team stays updated on the latest fitness research to provide evidence-based guidance.

Our Journey

GymGoals began in 2022 when our founders—certified coaches and athletes—saw too many individuals struggling with generic, inflexible fitness advice. Recognizing a gap in practical, goal-oriented support, they created GymGoals as a powerful, user-focused platform that adapts to your life and evolves with you.

Meet Our Team

  • [Name], Co‑Founder & Certified Strength Coach – 10 years of experience in strength & conditioning, with a specialization in powerlifting.
  • [Name], Co‑Founder & Registered Dietitian – Expert in sports nutrition and sustainable meal planning.
  • [Name], Head of Community & Support – Passionate about bringing people together to reach new heights.

(Add team photos and fun bios here)

Why GymGoals?

Because personal transformation is more than stats—it’s about discovering your potential. We blend practicality, personalization, and positive motivation to help you build strength, confidence, and healthy habits that last. No gimmicks—just proven methods, real progress, and unwavering support.

Join the Journey

Ready to crush your fitness targets? Sign up now and start your first custom workout plan, connect with our coaches, and become part of the GymGoals movement. Your goals are within reach—let’s hit them together.


Call to Action

  • Get Started → Sign up for free, set your goals, and begin your first plan
  • Talk to a Coach → Book a free consultation with our experts
  • Community Challenge → Join our monthly goal-driven fitness challenge!