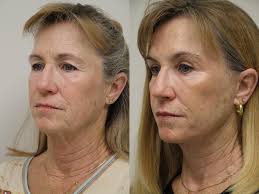
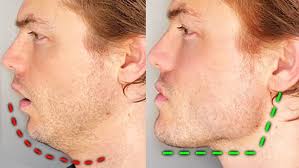
Sculptra Before and After: What to Expect, Results & Timeline

Understanding what Sculptra before and after results really look like can help you make an informed decision about this increasingly popular injectable treatment. Whether you’re considering it for facial volume loss, wrinkle smoothing, or overall rejuvenation, this guide walks you through everything you need to know — from what Sculptra is and how it works, to detailed before and after transformations, realistic timelines, safety tips, and more.


What Is Sculptra and How Does It Work?

Sculptra is a biostimulatory dermal filler made from poly-L-lactic acid (PLLA) — a biocompatible synthetic substance that stimulates your body’s natural collagen production. Unlike traditional hyaluronic acid (HA) fillers that offer instant volume, Sculptra works gradually, building volume over time by encouraging collagen regeneration from within.

What is Sculptra made of?

Sculptra’s main ingredient, poly-L-lactic acid, has been used safely in medical applications for decades — including in dissolvable stitches. Once injected deep into the dermis, PLLA microparticles act as a scaffold, triggering the skin’s natural fibroblast activity. Over weeks to months, this results in a noticeable increase in skin thickness, volume, and firmness.

How does Sculptra differ from other dermal fillers?

Here’s a quick comparison chart of Sculptra vs. popular fillers:

FeatureSculptraHyaluronic Acid Fillers (e.g. Juvederm, Restylane)
Main IngredientPoly-L-lactic acidHyaluronic Acid
Results TimelineGradual (4-12 weeks)Immediate
LongevityUp to 2 years or more6–12 months
Primary ActionStimulates collagenAdds instant volume
Best ForVolume loss, contouring, agingFine lines, lips, under-eyes
Water RetentionNoneCan cause puffiness

Unlike HA fillers that simply “fill” areas of volume loss, Sculptra restores volume by stimulating your skin to rebuild itself. This makes the results look more natural, feel more authentic, and last significantly longer.

Who is a good candidate for Sculptra?

Sculptra is ideal for individuals who:

  • Are experiencing age-related volume loss in the mid-face, temples, or jawline
  • Want subtle, natural-looking enhancement over time
  • Prefer longer-lasting results (up to 2+ years)
  • Are in generally good health and have realistic expectations
  • Are not allergic to any of Sculptra’s ingredients

Sculptra is not ideal for:

  • People looking for immediate results
  • Patients prone to keloid formation or hypertrophic scarring
  • Individuals with active skin infections or autoimmune disorders in the treatment area

“Sculptra is unique because it addresses the cause of volume loss — collagen depletion — instead of just masking the symptom.”
Dr. Ava Shamban, Dermatologist, Los Angeles

Is Sculptra FDA-approved and safe?

Yes. Sculptra was FDA-approved in 2004 for treating facial lipoatrophy (fat loss) in people with HIV. It has since been widely adopted for cosmetic use in healthy adults, with a well-established safety profile when administered by trained injectors.

According to Allergan Aesthetics, adverse events are rare, and the most common side effects include:

  • Temporary swelling or bruising
  • Mild tenderness at the injection site
  • Possible nodules (small lumps) if aftercare instructions aren’t followed

Key Takeaway:
Sculptra is not just a filler — it’s a collagen stimulator that offers a slow, natural-looking enhancement. The safety record is excellent when treatments are administered by certified professionals who follow proper dilution, injection technique, and aftercare guidelines.


Answer Engine Optimization: FAQsWhat is Sculptra and how does it work?

Q: What exactly does Sculptra do to your face?
A: Sculptra stimulates your skin to produce collagen, which gradually restores facial volume and smooths out wrinkles.

Q: Is Sculptra a permanent filler?
A: No, but results can last up to 2 years. Unlike traditional fillers, Sculptra builds long-lasting volume by boosting natural collagen.

Q: Is Sculptra better than Juvederm?
A: It depends on your goals. Sculptra is better for long-term volume and natural results; Juvederm offers immediate but shorter-lasting results.


Sculptra Before and After: Visual Results You Can Expect

When considering Sculptra before and after transformations, it’s essential to understand what results are realistic, how they progress over time, and how the treatment addresses specific facial areas. Unlike fillers that deliver immediate volume, Sculptra gradually enhances your appearance, making it one of the most natural-looking rejuvenation options available.

What does a typical Sculptra before and after look like?

Because Sculptra stimulates collagen production over several weeks, the most dramatic results are often seen 8 to 12 weeks post-treatment. Initially, you may notice slight swelling or temporary fullness from the injection fluid, which subsides within a few days. True collagen-building takes time, but the gradual change results in:

  • Firmer, more lifted skin
  • Restoration of youthful facial contours
  • Smoother wrinkles and folds
  • A refreshed, but not “done,” appearance

Here’s a general progression timeline:

Time After TreatmentVisible Results
0–7 daysSwelling subsides, initial fullness fades
2–4 weeksCollagen stimulation begins
6–8 weeksNoticeable volume return, skin tightening
10–12 weeksOptimal results appear

“The beauty of Sculptra is that no one will know you’ve had anything done — they’ll just think you look really well-rested.”
Dr. Sabrina Fabi, MD, Board-Certified Dermatologist (Source)

Sculptra before and after for cheeks, jawline, and temples

Sculptra is especially effective in areas where volume loss creates hollow or sagging features, such as:

  • Cheeks: Restores a youthful curve, corrects flattening, and lifts the mid-face
  • Jawline: Enhances definition and structure, reducing jowling
  • Temples: Fills hollows that make the face appear gaunt or aged

When these areas are treated in combination, they create a harmonized facial rejuvenation that restores balance and youthfulness without drastic changes.

Sculptra before and after for wrinkles and volume loss

Sculptra is FDA-approved for treating nasolabial folds, but many experienced injectors use it off-label to address:

  • Marionette lines
  • Chin wrinkles
  • Hollow under-eyes (indirectly via cheek support)
  • Volume loss in the lower face and jaw

Results may not be instantly visible, but they are longer-lasting and more sustainable than those from many HA fillers.

Clinical Fact:
According to a study in the Journal of Cosmetic and Laser Therapy, over 90% of patients treated with Sculptra showed improved skin texture and volume at 6 months, with effects lasting up to 25 months. (Source)

Real Sculptra before and after photos

If you’re considering this treatment, viewing real patient transformations is helpful. While we can’t show actual images in text, here’s what you’ll typically see in Sculptra before and after galleries:

  • Fuller cheeks with natural curvature
  • Tighter jawlines with improved contours
  • Softer nasolabial folds and marionette lines
  • An overall youthful glow without signs of overfilling

See real patient before-and-after photos on trusted medical sites like:

What makes Sculptra results look natural?

Unlike traditional fillers that sit under the skin and can sometimes appear puffy or displaced, Sculptra works by regenerating your body’s own collagen. This means:

  • The results develop gradually, avoiding sudden, obvious changes
  • Your face retains natural movement and expression
  • Results feel more like your own skin tissue — not a foreign substance

Important Note:
Achieving the best possible Sculptra before and after results depends heavily on your injector’s skill. Choosing a board-certified dermatologist, plastic surgeon, or experienced nurse injector is crucial for a safe, natural, and effective outcome.


Answer Engine Optimization: FAQsWhat to expect from Sculptra before and after?

Q: How soon can I see results after Sculptra?
A: Most patients start to see changes at 4–6 weeks, with full results visible around 8–12 weeks after the final session.

Q: How many sessions of Sculptra are needed?
A: Typically, 2–4 sessions spaced 4–6 weeks apart, depending on your goals and facial volume loss.

Q: Does Sculptra look natural?
A: Yes. Since it stimulates collagen rather than directly adding volume, results blend seamlessly with your natural features.

Q: Can I combine Sculptra with other treatments?
A: Yes. It’s often combined with Botox, microneedling, or HA fillers for a comprehensive rejuvenation plan.


The Sculptra Treatment Timeline: From Injection to Results

One of the most frequently asked questions about Sculptra before and after results is, “How long does it take to see results?” Unlike instant fillers, Sculptra works gradually by stimulating your skin’s own collagen production, making it a progressive treatment with long-lasting, natural-looking results.

Understanding the Sculptra timeline helps set proper expectations and gives you insight into how collagen-building works from the inside out.


What Happens During a Sculptra Appointment?

Your Sculptra journey begins with a consultation where your provider will assess your facial structure, skin quality, and aesthetic goals. Once you’re cleared for treatment, here’s what the procedure typically involves:

  1. Cleansing and numbing: Your skin is cleansed, and a topical anesthetic or lidocaine may be applied.
  2. Diluted Sculptra injection: The poly-L-lactic acid is injected in a grid-like pattern, typically into the deep dermis.
  3. Massage: After the injections, the provider massages the area to evenly distribute the product and minimize the risk of lumps.

The entire session lasts about 30–60 minutes, depending on how many areas are being treated.

According to the American Society of Plastic Surgeons (ASPS), the technique and placement of Sculptra are critical in ensuring results appear smooth and symmetrical. (Source)


When Will I See Sculptra Results?

Unlike HA fillers, Sculptra does not provide immediate, long-term volume. You may look fuller right after the injection due to the water in the solution, but that temporary fullness subsides in 2–3 days.

The real results appear gradually:

  • Weeks 2–4: The body begins its collagen-building process.
  • Weeks 6–8: Facial contours start to lift, and skin appears more elastic.
  • Weeks 10–12: Peak results typically emerge — smoother skin, restored volume, improved texture.

“Patients must understand that Sculptra is a marathon, not a sprint. But the reward is a very natural and long-lasting rejuvenation.”
Dr. Sheila Nazarian, Board-Certified Plastic Surgeon (Nazarian Plastic Surgery)


How Many Sessions Are Needed?

Most patients require a series of 2 to 4 sessions, spaced about 4 to 6 weeks apart, to achieve optimal results. The number of sessions depends on:

  • Age and degree of volume loss
  • Treatment areas (cheeks, temples, jawline, etc.)
  • Desired level of correction
  • Overall skin quality

General Guideline:

One vial of Sculptra per decade of life is a common rule. So, someone in their 40s may need 4 vials spread over 2–3 sessions.


How Long Do Sculptra Results Last?

Sculptra’s results are not only natural — they’re also impressively long-lasting. On average, improvements can be seen for up to 2 years or longer.

Several clinical trials back this longevity:

  • A 2010 study published in Dermatologic Surgery found that 80% of patients were still satisfied with their Sculptra results at 25 months post-treatment.
    (Source)
  • According to Galderma, the manufacturer of Sculptra, collagen stimulation may continue to improve the skin’s appearance even after visible changes plateau.
    (Galderma Professional Website)

Here’s a simplified breakdown:

Time PeriodWhat Happens
First 3 daysTemporary swelling subsides
Weeks 2–6Collagen production initiates
Weeks 6–12Volume gradually increases, skin smooths
Months 3–24Peak results, gradual fade begins
After 24 monthsResults taper; maintenance may be needed

Answer Engine Optimization: FAQsSculptra results timeline

Q: Can you see Sculptra results after one treatment?
A: You may notice a subtle change, but optimal results typically require multiple sessions over a few months.

Q: How many vials of Sculptra do I need?
A: A common recommendation is 1 vial per decade of age, but this varies based on facial volume loss and goals.

Q: How long does Sculptra really last?
A: With proper treatment and aftercare, results can last up to 2 years or longer.

Q: Does Sculptra work faster with massage?
A: Massage helps prevent nodules but doesn’t accelerate collagen production. Consistent care and spacing between treatments is key.


Before Your Sculptra Treatment: What to Know & Do

Preparing properly for your Sculptra treatment can enhance your experience and improve your Sculptra before and after results. Knowing what to expect, how to prepare, and understanding aftercare are essential parts of a safe and satisfying journey toward natural facial rejuvenation.


Consultation: What to Expect

Your first step should be a detailed consultation with a board-certified dermatologist, plastic surgeon, or experienced injector. During this appointment, your provider will:

  • Evaluate your facial structure and skin condition
  • Discuss your aesthetic goals and concerns
  • Explain the procedure, benefits, risks, and expected results
  • Review your medical history to rule out contraindications
  • Develop a personalized treatment plan, including the number of sessions and amount of product needed

Tip: Always ask to see real before and after photos from previous patients to set realistic expectations.

For reliable information on choosing a qualified provider, visit the American Academy of Dermatology (AAD) website:
https://www.aad.org/public/cosmetic/sculptra


Pre-Treatment Guidelines

Proper preparation helps reduce the risk of side effects and ensures smoother recovery. Your provider may advise:

  • Avoid blood thinners such as aspirin, ibuprofen, and certain supplements (e.g., fish oil, vitamin E) at least 5–7 days before treatment to minimize bruising and swelling.
  • Avoid alcohol and smoking for 24–48 hours before the procedure to promote better healing.
  • Stay hydrated and maintain a healthy diet to support skin recovery.
  • Inform your provider if you have a history of cold sores; antiviral medication may be recommended to prevent outbreaks.

The Mayo Clinic provides excellent guidance on injectable preparations and precautions:
https://www.mayoclinic.org/tests-procedures/dermal-fillers/about/pac-20385263


What to Expect on the Day of Your Sculptra Treatment

  • The treatment area will be cleansed thoroughly.
  • Your provider may apply a topical numbing cream or ice to reduce discomfort.
  • The injection process involves multiple small injections over the treatment area; expect some mild pinching or pressure.
  • The session usually lasts between 30 to 60 minutes.

Aftercare instructions will be reviewed carefully — this step is crucial for avoiding complications and maximizing your results.


Aftercare: Dos and Don’ts

Following your treatment, adhering to your provider’s aftercare plan helps optimize your Sculptra before and after outcomes and reduce side effects. Here’s a general list:

Do:

  • Gently massage the treated areas 5 minutes, 5 times a day, for 5 days, as recommended to evenly distribute the product and prevent lumps.
  • Keep your head elevated and avoid excessive bending for the first 24 hours.
  • Use gentle skincare products and avoid harsh treatments (chemical peels, laser resurfacing) for at least 1-2 weeks.
  • Protect your skin from excessive sun exposure by wearing sunscreen daily.

Don’t:

  • Don’t rub or press on the injection sites aggressively.
  • Avoid intense exercise, sauna, or hot tubs for 24-48 hours post-treatment.
  • Avoid alcohol for at least 24 hours to reduce swelling and bruising risk.
  • Don’t have additional cosmetic treatments in the same area until fully healed.

For comprehensive aftercare information from a trusted source, see the American Society for Dermatologic Surgery (ASDS):
https://www.asds.net/Skin-Health/Procedures/Sculptra


Important Considerations Before Starting Sculptra

  • Realistic Expectations: Understand that Sculptra results develop gradually and require patience.
  • Cost: Multiple sessions can add up; discuss pricing and payment plans upfront.
  • Commitment: Maintenance treatments may be needed after 1-2 years to sustain results.
  • Health Status: Inform your provider of any autoimmune conditions or allergies.

By taking these steps, you ensure a smoother treatment experience and better, more natural Sculptra before and after results.


Answer Engine Optimization: FAQsPreparing for Sculptra

Q: How should I prepare for my Sculptra appointment?
A: Avoid blood thinners and alcohol for about a week before treatment, stay hydrated, and discuss your medical history with your provider.

Q: What aftercare is needed after Sculptra?
A: Gentle massage of treated areas, avoiding strenuous activity and sun exposure, and following your provider’s instructions carefully.

Q: Can I wear makeup after Sculptra?
A: It’s best to wait at least 24 hours before applying makeup to avoid irritation or infection.


Common Side Effects and Risks of Sculptra

Understanding the potential side effects and risks of Sculptra is crucial for anyone considering this treatment. While Sculptra is generally safe when administered by a skilled professional, being informed helps you recognize normal reactions versus signs of complications, ensuring a safer experience and better Sculptra before and after outcomes.


Typical Side Effects After Sculptra Treatment

Most side effects are mild and temporary, typically resolving within a few days to weeks. Common reactions include:

  • Swelling: Mild swelling around injection sites is common and usually subsides in 2–3 days.
  • Redness: Temporary redness or irritation may occur but generally fades quickly.
  • Bruising: Due to needle insertion, bruising is possible, especially in sensitive areas.
  • Tenderness or discomfort: Some soreness or tenderness can occur but typically lasts less than a week.
  • Small bumps or nodules: Tiny lumps under the skin may form but often resolve with massage.

These side effects are a normal part of the body’s response to injections and collagen stimulation.

The American Society of Plastic Surgeons (ASPS) provides a comprehensive overview of expected side effects with dermal fillers like Sculptra:
https://www.plasticsurgery.org/cosmetic-procedures/dermal-fillers/risks


Less Common Risks and Complications

Though rare, some risks require prompt attention:

  • Persistent nodules or granulomas: In rare cases, firm lumps caused by an immune response may develop months after treatment. These may require medical intervention such as steroid injections or surgical removal.
  • Infection: Though uncommon, any injection carries a slight risk of infection if sterile technique isn’t properly followed.
  • Allergic reaction: Poly-L-lactic acid is generally well-tolerated, but allergies are possible.
  • Asymmetry or overcorrection: Improper injection technique can cause unevenness or unnatural volume.

Choosing a highly experienced and board-certified injector dramatically lowers the risk of complications.


How to Minimize Risks

  • Choose a qualified provider: Board certification and extensive experience with Sculptra reduce risks.
  • Follow pre- and post-treatment care: Adhering to your provider’s guidelines minimizes bruising, swelling, and lumps.
  • Massage the treated area: This helps distribute the product evenly and reduce nodule formation.
  • Report any unusual symptoms: Persistent pain, redness, or lumps should be evaluated immediately.

Signs You Should Contact Your Provider Immediately

If you experience any of the following, seek medical advice promptly:

  • Severe or increasing pain at the injection site
  • Signs of infection: redness spreading beyond the treatment area, warmth, fever
  • Large, hard nodules that don’t improve with massage
  • Allergic reactions: rash, swelling beyond injection sites, difficulty breathing

Early intervention can prevent more serious complications.


Answer Engine Optimization: FAQsSculptra side effects and safety

Q: Are Sculptra side effects painful?
A: Most side effects are mild and cause only minor discomfort that resolves quickly.

Q: Can Sculptra cause permanent lumps?
A: Lumps are usually temporary and respond well to massage or treatment, but persistent nodules are rare and require medical care.

Q: How safe is Sculptra?
A: Sculptra is FDA-approved and considered safe when injected by experienced professionals.

Q: What should I do if I notice unusual swelling or redness?
A: Contact your healthcare provider immediately for evaluation.


Additional Resources


Comparing Sculptra Before and After to Other Facial Rejuvenation Options

When considering facial rejuvenation, many people wonder how Sculptra before and after results compare to other treatments such as hyaluronic acid fillers, Botox, or surgical options. Understanding these differences can help you choose the best approach for your goals.


Sculptra vs. Hyaluronic Acid (HA) Fillers

FeatureSculptraHyaluronic Acid Fillers
MechanismStimulates collagen production over timeAdds immediate volume by filling space
Onset of ResultsGradual; visible over weeks to monthsImmediate
LongevityUp to 2 years or longer6 to 18 months, depending on product
Natural LookVery natural, builds your own collagenInstant volume, can look more “filled”
Treatment FrequencyMultiple sessions spaced weeks apartTypically single session with occasional touch-ups
Common UsesGlobal facial volume restoration, fine linesWrinkles, folds, lips, cheeks

According to The American Society for Aesthetic Plastic Surgery (ASAPS), patients looking for gradual, long-term rejuvenation often prefer Sculptra, while those seeking immediate correction choose HA fillers.
Source: ASAPS


Sculptra vs. Botox

  • Sculptra works by stimulating collagen to restore volume and improve skin texture.
  • Botox temporarily relaxes muscles to smooth dynamic wrinkles such as frown lines and crow’s feet.

These treatments complement each other. Botox is ideal for expression lines, while Sculptra is better suited for volume loss and structural support.

The American Academy of Dermatology (AAD) provides detailed guidance on combining treatments safely:
https://www.aad.org/public/cosmetic/treatments/botox


Sculptra vs. Surgical Facelift

AspectSculptraSurgical Facelift
InvasivenessNon-surgical, minimally invasiveSurgical, requires anesthesia
DowntimeMinimal to noneSeveral weeks
ResultsGradual, natural volume restorationImmediate, dramatic lifting
LongevityUp to 2 years or more7 to 10 years or longer
CostLower per sessionHigher initial cost
RisksMild, temporary side effectsSurgical risks including scarring

Sculptra is an excellent alternative for those not ready for surgery or wanting subtle rejuvenation. For deeper sagging or excess skin, surgery remains the gold standard.

For expert surgical information, see the American Society of Plastic Surgeons (ASPS):
https://www.plasticsurgery.org/cosmetic-procedures/facelift


Why Choose Sculptra?

  • Natural collagen stimulation offers a youthful look without “frozen” or artificial effects.
  • Long-lasting results that can be maintained with touch-ups.
  • Suitable for patients wanting gradual, subtle improvement rather than instant change.
  • Lower risk and downtime compared to surgery.

Answer Engine Optimization: FAQsSculptra compared to other treatments

Q: How is Sculptra different from regular dermal fillers?
A: Sculptra stimulates your own collagen over time, while regular fillers add immediate volume using gel-based substances.

Q: Can I use Botox and Sculptra together?
A: Yes, they address different concerns and are often combined for a comprehensive rejuvenation plan.

Q: Is Sculptra a replacement for a facelift?
A: Not exactly. Sculptra is non-surgical and best for mild to moderate volume loss; surgery is better for significant skin tightening.


Real Sculptra Before and After Case Studies & Patient Experiences

To truly understand the impact of Sculptra before and after results, examining real patient case studies and experiences provides invaluable insight. These examples highlight the gradual, natural rejuvenation Sculptra offers and help set realistic expectations.


Mid-Face Volume Restoration

Patient Profile:

  • Female, 45 years old
  • Concerned about mid-face hollowing and early signs of aging

Treatment Plan:

  • Three sessions of Sculptra spaced 4–6 weeks apart
  • Focus on cheeks and under-eye areas

Results:

  • Gradual improvement in facial fullness noticed after 6 weeks
  • Significant lift and reduction in hollow areas after 3 months
  • Natural, youthful contour without the “overdone” look

Patient Feedback:

“I loved how subtle and natural the changes were. It didn’t look like I had ‘work done’ but I definitely looked fresher and more vibrant.”


Case Study 2: Jawline Definition and Neck Rejuvenation

Patient Profile:

  • Male, 52 years old
  • Wanted a stronger jawline and improvement in neck skin laxity

Treatment Plan:

  • Two sessions of Sculptra targeting jawline and neck areas

Results:

  • Noticeable improvement in skin texture and firmness after 8 weeks
  • Enhanced jawline contour and reduced sagging by 12 weeks
  • High patient satisfaction with minimal downtime

Patient Experiences from Verified Platforms


Visual Comparison: What to Expect in Sculptra Before and After Photos

TimeframeTypical Changes Seen
Immediately AfterMild redness and swelling at injection sites
1–2 Weeks Post-TreatmentSlight improvement as collagen production begins
4–6 Weeks Post-TreatmentNoticeable volume restoration and skin tightening
3 Months and BeyondFull results with enhanced facial contours and firmness

Expert Insights

Dr. Neil Sadick, a renowned dermatologist, explains:

“Sculptra is unique because it harnesses the body’s own collagen-building ability. Patients often appreciate the natural, progressive results that can last up to two years.”

Source:
https://www.aad.org/public/cosmetic/sculptra


Answer Engine Optimization: FAQsSculptra patient results

Q: How soon will I see results after Sculptra?
A: Results appear gradually, typically noticeable after 4-6 weeks, with full effects by 3-4 months.

Q: Do Sculptra results look natural?
A: Yes, because it stimulates your body’s collagen, results are subtle and natural-looking.

Q: How long do Sculptra results last?
A: Results can last up to 2 years or more with maintenance treatments.


Frequently Asked Questions About Sculptra Before and After

To help you make an informed decision, here are some of the most common questions about Sculptra before and after results, answered clearly and based on trusted medical sources.


1. How long does it take to see Sculptra results?

Sculptra works gradually by stimulating your body’s collagen production. Initial improvements can be seen within 4 to 6 weeks after treatment. Full results usually develop over 3 to 6 months, as collagen builds up and skin volume improves naturally.

“Unlike traditional fillers that provide immediate volume, Sculptra’s gradual effect results in a more natural and long-lasting rejuvenation.”
— American Academy of Dermatology

Learn more: AAD – Sculptra


2. How long do Sculptra results last?

Results typically last up to 2 years or longer, depending on the individual’s metabolism, age, lifestyle, and the number of treatment sessions completed. Periodic maintenance sessions help sustain the collagen-building effect.

Read further: Mayo Clinic – Dermal Fillers


3. Is Sculptra safe?

Yes. Sculptra is FDA-approved for cosmetic use and has a strong safety record when administered by qualified, experienced injectors. Side effects are usually mild and temporary.

More info: FDA – Dermal Fillers


4. How many treatment sessions of Sculptra are needed?

Most patients require 2 to 3 sessions spaced 4 to 6 weeks apart to achieve optimal results. Your provider will tailor the treatment plan based on your facial volume loss and aesthetic goals.


5. What should I expect during the treatment?

Sculptra involves multiple small injections per session and typically lasts 30 to 60 minutes. A topical anesthetic or ice may be applied to minimize discomfort.


6. Can Sculptra be combined with other treatments?

Yes. Sculptra complements other cosmetic procedures such as Botox, hyaluronic acid fillers, laser treatments, and skin resurfacing. Combination therapy can address multiple signs of aging effectively.

See recommendations: American Society for Dermatologic Surgery


7. Are there any risks or side effects?

Common side effects include mild swelling, bruising, redness, and tenderness at injection sites. Rarely, small nodules can form but are typically manageable. Serious complications are uncommon with proper technique.


8. How much does Sculptra cost?

Costs vary depending on geographic location, provider expertise, and the number of vials used. On average, each vial ranges from $700 to $1,000, and most patients need 2 to 3 vials per treatment session.


Answer Engine Optimization: Additional FAQs

Q: What areas can Sculptra treat?
A: Sculptra is FDA-approved for facial volume loss, commonly treating cheeks, temples, jawline, and chin.

Q: Can I wear makeup after Sculptra?
A: It is generally recommended to avoid makeup for 24 hours post-treatment to reduce infection risk.

Q: Does Sculptra cause allergic reactions?
A: Allergic reactions are rare since Sculptra is biocompatible and biodegradable.


Additional High Authority Resources


Conclusion: What to Expect from Sculptra Before and After Results

Sculptra offers a unique, long-lasting approach to facial rejuvenation by stimulating your body’s natural collagen production. The Sculptra before and after journey is characterized by gradual, natural improvements that restore youthful volume, enhance skin texture, and improve facial contours without the immediate “filled” look of traditional dermal fillers.

Key Takeaways

  • Natural Collagen Stimulation: Unlike conventional fillers that add volume instantly, Sculptra gradually rebuilds lost collagen for a soft, natural appearance that evolves over several months.
  • Long-Lasting Results: Most patients enjoy results lasting up to 2 years or more, making it a cost-effective option for facial rejuvenation.
  • Multiple Treatment Sessions: Optimal results require 2 to 3 treatment sessions spaced about a month apart, with visible improvements starting as early as 4 to 6 weeks.
  • Mild and Temporary Side Effects: Common side effects include swelling, bruising, and tenderness, which typically resolve within a few days to weeks.
  • Safe When Performed by Experts: Choosing a board-certified provider with extensive experience is essential to minimize risks and achieve the best results.
  • Complementary to Other Treatments: Sculptra pairs well with Botox, hyaluronic acid fillers, and other skin treatments to address multiple signs of aging.

Final Thoughts

If you seek a subtle yet effective way to restore youthful volume and skin firmness without surgery or immediate filler effects, Sculptra is a compelling choice. Reviewing Sculptra before and after photos and reading real patient testimonials can help you set realistic expectations and feel confident in your decision.

For the safest and most satisfying results, always consult with a qualified injector who can design a personalized treatment plan tailored to your unique needs.


Additional Resources

Lip Filler Before and After: What to Expect and How to Prepare

What Are Lip Fillers?

Lip fillers have become one of the most popular cosmetic treatments worldwide, offering a non-surgical way to enhance the shape, volume, and definition of the lips. But before diving into the details of lip filler before and after results, it’s important to understand exactly what lip fillers are and how they work.

Lip fillers are injectable substances designed to add volume and shape to your lips. Most commonly, they are made from hyaluronic acid (HA), a naturally occurring substance in the body that attracts and holds water. This gives lips a plump, hydrated look. Popular HA fillers include brands like Juvederm and Restylane, which are FDA-approved and widely used due to their safety and effectiveness.

Types of Lip Fillers

There are several types of lip fillers, but they mainly fall into two categories:

  • Temporary Fillers: Made from hyaluronic acid, these fillers typically last between 6 to 12 months. They are the most common choice because they can be adjusted over time or reversed if needed.
  • Permanent Fillers: Made from substances like silicone or other synthetic materials, permanent fillers last longer but come with higher risks such as lumps, asymmetry, or long-term complications.

Most cosmetic professionals recommend temporary fillers for first-time patients to ensure a natural, safe, and customizable result.

How Do Lip Fillers Work?

When injected, the filler adds volume to specific areas of the lips—whether that’s the lip body, the cupid’s bow, or the corners of the mouth. The HA in the filler binds with water molecules, instantly creating a fuller appearance. The injection technique and amount used are crucial in achieving natural-looking lips that complement your facial features.


Why Understanding Lip Fillers Matters Before Your Procedure

Knowing the different types of fillers and how they interact with your body helps set realistic expectations. The right filler choice can affect your lip filler before and after outcomes dramatically, influencing how natural the results look and how long they last.


Summary Table: Common Lip Fillers

Filler BrandCompositionDurationCommon UsesReversibility
JuvedermHyaluronic Acid6-12 monthsVolume, contour, hydrationYes (with hyaluronidase)
RestylaneHyaluronic Acid6-12 monthsFine lines, lip definitionYes
RadiesseCalcium Hydroxylapatite12-18 monthsFacial volume, not common for lipsNo
SiliconeSynthetic materialPermanentRarely used due to risksNo

Lip Filler Before and After – What to Expect

If you’re considering lip fillers, understanding the lip filler before and after experience is key to feeling confident and prepared. This section breaks down what happens before, during, and after the procedure, so you know exactly what to expect.

What Happens Before Getting Lip Fillers?

Before your treatment, a thorough consultation with a qualified injector is essential. During this appointment, you’ll discuss your goals, medical history, and any allergies or medications that could affect the procedure. Your injector will evaluate your natural lip shape and facial proportions to recommend the best treatment plan.

Most providers will advise you to avoid certain medications and supplements that can increase bleeding or bruising, such as aspirin, ibuprofen, fish oil, and alcohol, for at least a week before your appointment. This helps reduce the risk of swelling and bruising after the injections.

It’s also important to have realistic expectations. You might want fuller lips, but subtle enhancement often looks more natural and ages better over time. Some injectors use digital imaging or temporary fillers to preview the potential results.

Trusted resource: The American Society of Plastic Surgeons offers detailed guidance on preparing for cosmetic injectables: plasticsurgery.org – Dermal Fillers


What to Expect During the Procedure

The actual lip filler procedure is relatively quick, typically taking about 15 to 30 minutes. Here’s what usually happens:

  • The injector cleans the treatment area.
  • A topical numbing cream or local anesthetic may be applied to reduce discomfort.
  • Using a fine needle or cannula, the filler is carefully injected into predetermined areas of the lips.
  • The injector may massage the lips gently to evenly distribute the product.

Patients often report mild discomfort, described as pinching or stinging, but this usually subsides quickly. The procedure’s brevity makes it easy to fit into a lunch break or afternoon appointment.

Authoritative source: Mayo Clinic explains the procedure and what patients can expect during lip filler injections: mayoclinic.org – Lip Augmentation


Lip Filler Aftercare and Recovery

The recovery period after lip fillers is generally short but requires some attention to maximize results and minimize side effects.

  • Swelling and bruising are the most common side effects and typically peak within the first 24-48 hours.
  • Avoid strenuous exercise, excessive heat (like saunas), and alcohol for at least 24 hours to reduce swelling.
  • Keep your head elevated while sleeping to help decrease swelling.
  • Avoid touching or massaging your lips excessively during the first few days, unless instructed by your provider.
  • You can usually resume normal activities and apply makeup the next day, but be gentle around the treated area.

Swelling may make your lips appear larger than the final result immediately after the procedure. Most swelling subsides within one week, revealing the true lip filler before and after transformation.

Reliable reference: WebMD offers practical aftercare tips and explains the typical recovery timeline for lip fillers: webmd.com – Lip Injections


Summary of What to Expect

StageDescriptionDuration
ConsultationDiscuss goals, assess lips, medical history30-60 minutes
ProcedureInjection with numbing, minimal discomfort15-30 minutes
Immediate AftercareSwelling, mild bruising, follow care advice24-48 hours peak
Final ResultsSwelling reduces, lips settle into shape7-14 days

Lip Filler Before and After Photos: Realistic Expectations and Examples

One of the most common questions people have about lip fillers is, “What do lip filler before and after results really look like?” Understanding the visual transformation helps set realistic expectations and ensures satisfaction with the final outcome.

Realistic Expectations for Lip Filler Before and After Results

Immediately after getting lip fillers, it’s normal for your lips to look swollen and slightly uneven due to the injection trauma and fluid retention. Swelling usually peaks within the first two days and then gradually subsides. The final results—natural-looking, fuller lips with enhanced shape and definition—typically appear after about 7 to 14 days.

It’s important to remember that every person’s lips respond differently to fillers depending on factors like:

  • The type and amount of filler used
  • Injection technique
  • Individual anatomy and skin elasticity
  • Metabolism and lifestyle habits

Achieving a natural, balanced look is usually the goal. Overfilling can cause an unnatural “duck lip” appearance, which experienced injectors avoid by carefully tailoring treatment.


Before and After Gallery Examples

Visual examples are invaluable for understanding what to expect. Many reputable clinics provide galleries showcasing lip filler before and after photos for different filler brands and enhancement goals. These images help you:

  • Compare subtle vs. dramatic lip enhancements
  • See how fillers define the lip border and improve symmetry
  • Observe the impact of filler on different lip shapes and sizes

Here are some authoritative galleries worth reviewing:


Interpreting Lip Filler Before and After Results

When reviewing photos, focus on the following aspects to evaluate quality and realism:

  • Symmetry: Both sides of the lips should appear balanced.
  • Volume: Notice how the lips are fuller but not overly large.
  • Shape: Look for enhanced definition along the cupid’s bow and lip border.
  • Proportion: The upper and lower lips should complement each other and fit the face harmoniously.

Case Study: Subtle vs. Dramatic Lip Filler Results

A 2022 study published in the Journal of Cosmetic Dermatology analyzed patient satisfaction with different filler volumes. It found that:

  • Patients receiving subtle enhancements (less than 1 ml of filler) reported higher satisfaction with natural appearance and longer-lasting results.
  • More dramatic volume increases sometimes resulted in increased swelling and bruising but were preferred by those seeking a bold look.

This highlights the importance of personalizing lip filler treatments to match your desired look.

Source: Journal of Cosmetic Dermatology, 2022


Common Lip Filler Questions: Answers You Need Before and After Treatment

When researching lip filler before and after experiences, many questions arise. This section addresses the most frequently asked questions to help you make informed decisions.

How Long Do Lip Fillers Last?

The longevity of lip fillers varies based on the type of filler, individual metabolism, and lifestyle factors such as sun exposure and smoking. Most hyaluronic acid-based fillers, like Juvederm and Restylane, typically last between 6 to 12 months. After this period, the filler gradually breaks down and is absorbed by the body.

If you want to maintain your enhanced look, touch-up treatments are usually recommended every 6 to 12 months.

High-authority source: The American Society of Plastic Surgeons explains filler longevity and factors that affect results:
plasticsurgery.org – Dermal Fillers


How Much Do Lip Fillers Cost?

The cost of lip fillers depends on the amount of product used (measured in syringes), the provider’s expertise, and geographic location. On average, one syringe ranges from $500 to $800 in the U.S. Most patients require 1 to 2 syringes for noticeable results.

While price is important, choosing a qualified and experienced injector should be the priority to ensure safety and natural-looking lip filler before and after outcomes.

Trusted reference: Healthline breaks down typical costs and what to expect:
healthline.com/health/cosmetic-lip-injections-cost


Are Lip Fillers Safe?

When administered by a licensed and experienced professional, lip fillers are considered safe. However, like any medical procedure, there are risks, including:

  • Temporary swelling, bruising, and redness
  • Allergic reactions (rare)
  • Infection (rare)
  • Lumpiness or asymmetry (usually correctable)

To minimize risks, ensure your injector uses FDA-approved products and sterile techniques.

Reliable source: Mayo Clinic’s safety guidelines for lip augmentation:
mayoclinic.org/tests-procedures/lip-augmentation/about/pac-20384622


Can Lip Fillers Be Reversed?

One major advantage of hyaluronic acid fillers is that they can be reversed if needed. The enzyme hyaluronidase can be injected to dissolve the filler safely, usually within 24-48 hours. This is useful if you experience an adverse reaction or are unhappy with the results.

Reversibility provides peace of mind for first-timers concerned about permanent changes.


Do Lip Fillers Hurt?

Most patients experience only mild discomfort during the procedure. Numbing creams or local anesthetics are typically applied beforehand to reduce pain. Some fillers also contain lidocaine, a local anesthetic, to improve comfort.

The sensation is often described as a quick pinch or sting, lasting only a few seconds per injection site.


What Should I Avoid After Getting Lip Fillers?

Post-treatment care is crucial for optimal results. Avoid the following for at least 24-48 hours after your appointment:

  • Strenuous exercise
  • Alcohol consumption
  • Excessive heat exposure (e.g., saunas, hot showers)
  • Touching or massaging the lips excessively

Following these guidelines helps reduce swelling and bruising.


FAQs for Answer Engine Optimization (AEO)

Q1: How long until I see the final lip filler before and after results?
Most swelling subsides within 7-14 days, revealing the final look.

Q2: Can I get lip fillers if I have allergies?
Consult your provider beforehand; HA fillers have a low allergy risk.

Q3: Are lip fillers permanent?
No, most fillers are temporary and last 6-12 months.


Lip Filler Results by Goals and Face Types: Tailoring Your Look

When considering lip filler before and after outcomes, one size definitely does not fit all. The best results come from customizing treatments based on your facial features and personal goals.

How Different Goals Affect Lip Filler Results

People seek lip fillers for various reasons. Here are common goals and how they shape the procedure and results:

  • Natural Enhancement: Adding subtle volume and hydration to lips without drastic size change. Ideal for first-timers seeking a youthful look.
  • Increased Fullness: Creating noticeably plumper lips for a more glamorous appearance.
  • Improved Symmetry: Correcting uneven lips to balance both sides.
  • Definition and Contour: Enhancing the cupid’s bow and lip borders for sharper, well-defined lips.
  • Correcting Aging Signs: Smoothing fine lines around lips and restoring lost volume due to aging.

Your injector will tailor injection sites, filler type, and amount to match your specific goal, ensuring a harmonious result with your overall facial aesthetics.


Lip Filler Results for Different Face Shapes

Facial shape plays a critical role in how lip fillers are designed to maintain balance and proportion. Here’s a brief guide:

Face ShapeLip Filler FocusDesired Outcome
OvalBalanced volume upper and lower lipsSoft, natural enhancement
RoundSlightly more volume in the upper lipAdds definition, elongates face
SquareSoften jawline with fuller lips, focus on cupid’s bowFeminizes and balances angular features
HeartEnhance lower lip volumeBalances upper lip’s natural fullness
LongAvoid over-elongating lips, emphasize widthCreates fullness without lengthening

Experienced injectors consider these facial dynamics to create lip filler before and after results that look flattering and natural.


Case Study: Customized Lip Filler for Different Goals

A 2023 clinical review in Dermatologic Surgery showed that patients who received personalized treatment plans reported significantly higher satisfaction and longer-lasting results than those who opted for standard “one-size-fits-all” procedures.

The study emphasized how facial symmetry analysis and patient goal setting before injections are critical for optimal outcomes.

Source: Dermatologic Surgery Journal, 2023


Tips for Discussing Your Goals With Your Injector

To get the best lip filler before and after results, be clear about your goals:

  • Bring photos of looks you like.
  • Share what you want to improve or avoid.
  • Discuss any previous treatments or concerns.
  • Trust your injector’s expertise on what suits your face best.

Authoritative Resources on Customized Lip Filler Treatments


Risks, Side Effects, and How to Avoid Them in Lip Filler Before and After

Understanding the potential risks and side effects of lip fillers is essential for anyone considering this popular cosmetic procedure. While lip filler before and after transformations are often impressive and satisfying, being aware of possible complications helps you make safer choices and better care for your results.

Common Side Effects After Lip Fillers

Most side effects from lip fillers are mild and temporary. These include:

  • Swelling: Nearly all patients experience some degree of swelling immediately after treatment. This usually peaks within 24-48 hours and then subsides.
  • Bruising: Injection sites can bruise, especially if you are prone to bruising or take blood-thinning medications.
  • Redness and Tenderness: Mild redness and sensitivity around the lips are normal and typically resolve within a few days.
  • Lumps or Bumps: Small lumps may form but often resolve with gentle massage or naturally over time.

Serious Risks to Watch For

Though rare, more serious complications can occur, including:

  • Infection: As with any injection, there is a risk of infection if sterile techniques aren’t followed.
  • Allergic Reaction: Extremely rare with hyaluronic acid fillers but possible.
  • Vascular Occlusion: This occurs if filler is accidentally injected into a blood vessel, potentially leading to tissue damage. This is a medical emergency requiring immediate treatment.
  • Asymmetry or Overfilling: Uneven lips or excessive volume may require correction or filler dissolution.

How to Minimize Risks and Side Effects

To ensure the safest lip filler before and after experience, follow these key recommendations:

  1. Choose a Licensed, Experienced Injector: Research credentials and reviews. Board-certified dermatologists or plastic surgeons typically have the most training.
  2. Discuss Your Medical History: Inform your provider about allergies, medications, and previous cosmetic treatments.
  3. Avoid Blood Thinners Before Treatment: Stop aspirin, ibuprofen, fish oil, and alcohol at least one week before to reduce bruising risk.
  4. Follow Aftercare Instructions Carefully: Avoid heat, exercise, and excessive lip touching post-procedure.
  5. Ask About the Product: Make sure only FDA-approved fillers are used.
  6. Know the Warning Signs: Severe pain, sudden vision changes, or skin discoloration require immediate medical attention.

Expert Guidelines and Safety Information

  • The U.S. Food and Drug Administration (FDA) provides important safety information about dermal fillers, emphasizing the need for qualified providers:
    FDA – Dermal Fillers
  • The American Society of Plastic Surgeons (ASPS) offers patient education on risks, safety tips, and how to select providers:
    ASPS – Dermal Fillers Safety
  • The American Academy of Dermatology (AAD) highlights signs of complications and treatment options:
    AAD – Dermal Fillers and Safety

Summary Table: Side Effects and Risk Management

Side Effect / RiskFrequencyPrevention / Management
SwellingVery commonIce packs, elevation, follow aftercare
BruisingCommonAvoid blood thinners, gentle care
Redness and TendernessCommonUsually resolves within days
Lumps or BumpsOccasionalMassage or hyaluronidase if persistent
InfectionRareSterile technique, early antibiotics
Allergic ReactionVery rareAllergy history screening
Vascular OcclusionVery rareChoose experienced injector; urgent treatment

Choosing the Right Provider for Lip Filler Treatments: Ensuring Safe and Beautiful Results

Selecting the right injector is one of the most important decisions when considering lip filler before and after treatments. A skilled, experienced provider not only enhances your chances of achieving natural, flattering results but also minimizes risks and complications.

Why Choosing the Right Provider Matters

Lip fillers are medical procedures that require precise technique, deep anatomical knowledge, and an artistic eye. An inexperienced or unqualified injector can cause:

  • Overfilled, unnatural lips
  • Asymmetry and lumps
  • Serious complications like vascular occlusion
  • Infection due to poor hygiene practices

Research shows that patients treated by board-certified dermatologists or plastic surgeons report higher satisfaction and fewer adverse events.


Credentials to Look For in a Lip Filler Provider

  • Board Certification: Ensure your provider is board-certified in dermatology, plastic surgery, or facial plastic surgery.
  • Training in Injectable Techniques: Specialized training and years of experience with lip filler injections are critical.
  • Reputation and Reviews: Look for positive patient reviews, before and after photos, and testimonials.
  • Transparency: A trustworthy provider will discuss risks, realistic results, product options, and pricing clearly.
  • Facility Accreditation: Treatments should be performed in a medically accredited clinic or office.

How to Verify Your Injector’s Credentials

  1. Check Official Medical Boards: Use websites like the American Board of Medical Specialties (ABMS) to verify certification.
    certificationmatters.org
  2. Professional Societies: Membership in reputable organizations such as the American Society for Dermatologic Surgery (ASDS) or the American Society of Plastic Surgeons (ASPS) indicates a commitment to ongoing education and ethical practice.
  3. Consult Before Booking: Schedule a consultation to discuss your goals, ask about experience, and review before and after photos.

Questions to Ask During Your Consultation

  • How many lip filler procedures have you performed?
  • What brands and types of fillers do you use?
  • Can I see before and after photos of your patients?
  • What are the potential risks and how do you handle complications?
  • What is your protocol if I’m unhappy with the results?
  • How do you ensure a natural look tailored to my face?

Authoritative Resources on Choosing a Provider


Choosing the right provider ensures your lip filler before and after journey is safe, satisfying, and enhances your natural beauty.


Aftercare Tips to Maximize Your Lip Filler Before and After Results

Proper aftercare plays a crucial role in ensuring the best possible outcome from your lip filler before and after treatment. Following the recommended guidelines helps reduce side effects like swelling and bruising, speeds up healing, and maintains the longevity of your results.

Immediate Aftercare Steps

  1. Apply Ice Packs: Use cold compresses intermittently for the first 24 hours to minimize swelling and discomfort.
  2. Avoid Touching or Massaging: Resist the urge to rub or press your lips excessively, which can displace the filler.
  3. Keep Your Head Elevated: Sleeping with your head slightly raised can help reduce swelling.
  4. Stay Hydrated: Drinking plenty of water supports skin health and healing.

Activities to Avoid Post-Treatment

To protect your new lip filler results, avoid these for at least 24-48 hours after your appointment:

  • Strenuous Exercise: Increased blood flow can worsen swelling and bruising.
  • Alcohol and Blood Thinners: These can increase bruising risk.
  • Exposure to Heat: Saunas, hot tubs, and sunbathing can increase swelling.
  • Excessive Facial Movements: Minimize wide mouth opening or lip movements when possible.

Long-Term Care Tips

  • Use Sunscreen: Protect your lips from UV damage to maintain skin quality.
  • Avoid Smoking: Smoking can accelerate filler breakdown and damage skin.
  • Regular Hydration and Moisturizing: Keep lips hydrated with quality lip balms.
  • Schedule Follow-Ups: Regular touch-ups every 6 to 12 months help maintain volume and shape.

What to Do If You Experience Side Effects

  • Mild swelling or bruising: Usually resolves within 7-14 days.
  • Persistent lumps or unevenness: Contact your provider for evaluation; sometimes gentle massage or hyaluronidase is needed.
  • Signs of infection or vascular occlusion: Seek immediate medical attention if you notice severe pain, color changes, or vision problems.

Expert Aftercare Guidelines from Trusted Sources


Summary Table: Aftercare Dos and Don’ts

Aftercare ActionDosDon’ts
Ice ApplicationApply cold packs intermittentlyAvoid direct ice contact on skin
Activity LevelRest and keep head elevatedAvoid strenuous exercise
Medication and SubstancesStay hydrated, avoid blood thinnersDon’t consume alcohol immediately
Lip MovementSpeak gently and minimize wide mouth openingAvoid excessive lip movements
Sun ExposureUse lip balm with SPFAvoid prolonged sun/heat exposure

Following these aftercare tips will help you achieve the best possible lip filler before and after transformation—safe, smooth, and stunning.


FAQs About Lip Filler Before and After Results

1. How long do lip filler results last?

Lip filler longevity depends on the type of filler used, your metabolism, and lifestyle factors. Most hyaluronic acid fillers last 6 to 12 months. Some newer formulas can extend up to 18 months. Touch-up treatments are recommended to maintain volume.

Source: American Society of Plastic Surgeons


2. What should I expect during a lip filler procedure?

The procedure usually takes 15 to 30 minutes. A topical numbing cream or local anesthetic is applied to minimize discomfort. The injector uses fine needles or cannulas to place filler precisely. Most patients experience mild swelling or bruising afterward.

Source: Mayo Clinic – Lip Augmentation


3. Are lip fillers safe?

When performed by a qualified professional, lip fillers are generally safe. However, risks such as swelling, bruising, infection, or vascular complications exist. Choosing an experienced injector and following aftercare reduces these risks.

Source: FDA – Dermal Fillers Safety


4. Can lip fillers be reversed if I don’t like the results?

Yes. Hyaluronic acid fillers can be dissolved using an enzyme called hyaluronidase, which quickly reverses the filler effects if needed.

Source: American Academy of Dermatology


5. How do I choose the best type of lip filler?

Discuss your goals with your provider. Popular options include Juvederm and Restylane, both FDA-approved hyaluronic acid fillers with slightly different textures and longevity suited for lip augmentation.

Source: American Society for Dermatologic Surgery


6. What’s the difference between lip filler and lip implants?

Lip fillers are injectable, temporary solutions that add volume and shape. Lip implants are a surgical, permanent option involving silicone or other materials, with higher risk and longer recovery.

Source: American Society of Plastic Surgeons


7. How soon will I see my final lip filler results?

Initial swelling may mask the final look. Most swelling subsides within 1-2 weeks, revealing your true results. Follow-up visits help ensure symmetry and satisfaction.

Source: RealSelf – Lip Filler Recovery Timeline


8. Can I get lip fillers if I have allergies or medical conditions?

Always disclose your full medical history to your provider. Some conditions or allergies may require extra precautions or alternative treatments.


Additional Resources for Patients Considering Lip Fillers


This FAQ section addresses common concerns, helping readers make informed decisions and boosting the article’s performance in Answer Engine Optimization.


Frequently Asked Questions (FAQs) About Lip Filler Before and After

1. How long do lip filler results last?

Most hyaluronic acid lip fillers last 6 to 12 months, depending on your metabolism, the type of filler used, and lifestyle factors like smoking or sun exposure. Some advanced formulas may last up to 18 months.

Source: American Society of Plastic Surgeons


2. What can I expect during the lip filler procedure?

The procedure is quick, typically 15 to 30 minutes. A topical numbing cream is applied to minimize discomfort. The injector then carefully injects filler using fine needles or cannulas. Mild swelling or bruising is common afterward.

Source: Mayo Clinic – Lip Augmentation


3. Are lip fillers safe?

When performed by a licensed, experienced professional, lip fillers are generally safe. Side effects like swelling, bruising, or redness are temporary. Rare but serious risks include infection or vascular complications.

Source: FDA – Dermal Fillers Safety


4. Can lip fillers be reversed if I don’t like the results?

Yes. Hyaluronic acid fillers can be dissolved with an enzyme called hyaluronidase, which can quickly reverse the effects in case of unsatisfactory results or complications.

Source: American Academy of Dermatology


5. How do I choose the best lip filler for me?

Consult with a qualified provider who will recommend FDA-approved fillers like Juvederm or Restylane based on your lip anatomy, desired results, and medical history.

Source: American Society for Dermatologic Surgery


6. How soon will I see my final lip filler before and after results?

Swelling can obscure the final results initially. Most swelling subsides within 1-2 weeks, revealing the true shape and volume of your enhanced lips.

Source: RealSelf – Lip Filler Recovery Timeline


7. What aftercare is recommended following lip filler treatments?

Follow your injector’s aftercare instructions carefully. This typically includes avoiding strenuous activity, heat exposure, alcohol, and excessive lip movements for 24-48 hours.

Source: American Society of Plastic Surgeons


Conclusion: Achieving Beautiful and Safe Lip Filler Before and After Results

Lip fillers offer a versatile, effective way to enhance lip volume, shape, and symmetry with minimal downtime. Understanding the lip filler before and after process—from choosing the right provider, knowing what to expect during treatment, to proper aftercare—ensures you get the most beautiful and natural results safely.

Remember, the key to success lies in customized treatment plans tailored to your unique facial features and goals. By selecting a licensed, experienced injector and following expert guidance, you can enjoy confident, lasting lip enhancement that complements your overall appearance.

For anyone considering lip fillers, informed decisions, patience during recovery, and realistic expectations will lead to satisfaction and stunning transformations.

Upper Blepharoplasty Before and After: What to Expect From Results to Recovery

Upper blepharoplasty—commonly known as upper eyelid surgery or an eye lift—is a popular cosmetic and sometimes medically necessary procedure designed to enhance the appearance and function of the upper eyelids. For many, this surgery leads to both visual improvement and a more youthful look. This guide provides a complete, in-depth explanation of what to expect before and after upper blepharoplasty, including the surgical process, recovery timeline, visual outcomes, and FAQs.


What Is Upper Blepharoplasty?

Upper blepharoplasty is a surgical procedure to remove excess skin, fat, or muscle from the upper eyelids. It’s most often performed for cosmetic reasons, but it can also be medically necessary if sagging skin interferes with vision.

What Does Upper Eyelid Surgery Do?

As we age, the skin loses elasticity, and the muscles around the eyes can weaken. This leads to:

  • Drooping or hooded upper eyelids
  • Puffiness or bulges caused by fat deposits
  • A tired or angry appearance, even when well-rested

Upper blepharoplasty corrects these by reshaping the upper eyelid contours, offering both functional and aesthetic benefits.

Who Is a Good Candidate for Upper Blepharoplasty?

Ideal candidates are individuals who:

  • Are in good general health
  • Have excess upper eyelid skin that affects their appearance or vision
  • Are non-smokers or willing to quit before and after surgery
  • Have realistic expectations about what upper blepharoplasty before and after results can achieve

Case Study: A 55-year-old female patient with hooded upper eyelids underwent blepharoplasty for cosmetic and visual reasons. Post-surgery, she reported clearer vision and greater self-confidence, noting that she looked “10 years younger.” Her results stabilized by week six, with minimal scarring.

Upper vs. Lower Blepharoplasty: What’s the Difference?

AspectUpper BlepharoplastyLower Blepharoplasty
Target AreaUpper eyelidLower eyelid
PurposeRemoves excess skin, muscle, and fatReduces bags, puffiness, and fine lines
Medical NeedOften performed to improve obstructed visionMostly cosmetic
Scarring VisibilityHidden in the natural eyelid creaseHidden under the lash line or inside eyelid

While both types fall under the blepharoplasty category, upper eyelid surgery is more frequently performed for functional impairment, whereas lower blepharoplasty is almost entirely cosmetic.


Answer Engine FAQs (for Upper Blepharoplasty)

What is the purpose of upper blepharoplasty?
The goal is to remove sagging skin or fat from the upper eyelid to improve vision and create a more youthful appearance.

Is upper eyelid surgery permanent?
While results can last 10–15 years, natural aging will continue. Maintenance procedures may be required later.

Can upper blepharoplasty improve vision?
Yes. If drooping eyelids obstruct your field of view, surgery can enhance both peripheral and central vision.


Why People Choose Upper Eyelid Surgery

The decision to undergo upper blepharoplasty often stems from a mix of cosmetic desires and functional needs. For many individuals, sagging or puffy upper eyelids do more than affect appearance—they can also hinder vision, cause discomfort, and reduce self-confidence.

Understanding the motivations behind upper eyelid surgery helps potential patients set clear expectations and determine whether the procedure aligns with their goals.


Cosmetic Benefits: A Younger, Refreshed Appearance

One of the most common reasons people seek upper blepharoplasty before and after transformations is to achieve a more alert, youthful look.

As skin ages and collagen levels drop, the upper eyelids may droop, making someone appear older, tired, or even angry. Upper blepharoplasty tightens this loose skin, restoring a smoother and more lifted contour.

Aesthetic outcomes people report include:

  • Reduction in “hooded” eyelids
  • Improved symmetry between both eyes
  • A brighter, more open eye area
  • Restoration of natural eyelid folds

“After my upper eyelid surgery, I couldn’t believe the difference. I finally looked like myself again—rested and energized.” — Patient Testimonial, Cleveland Clinic

A study published in JAMA Facial Plastic Surgery found that patients who underwent upper eyelid surgery were consistently rated as appearing more youthful, more energetic, and more approachable by observers (source).


Medical Benefits: Improved Vision from Lifted Eyelids

Beyond cosmetics, upper blepharoplasty has legitimate functional benefits for individuals experiencing vision problems caused by drooping skin (also known as dermatochalasis).

Key medical issues corrected include:

  • Impaired upper and side vision due to sagging eyelids
  • Eye strain and fatigue, especially when reading or driving
  • Headaches from trying to keep eyes open by raising eyebrows

In cases where visual fields are compromised, the surgery may be considered medically necessary and partially or fully covered by insurance. According to the American Academy of Ophthalmology, upper eyelid surgery is one of the most common oculoplastic procedures performed for vision obstruction (source).


Common Concerns People Want to Correct

Whether for appearance or vision, patients often pursue upper blepharoplasty to correct specific issues:

  • Loose or sagging skin that alters the natural contour of the upper eyelid
  • Fatty deposits that create puffiness
  • Skin irritation or discomfort from excess skin folding over the lashes
  • Difficulty applying makeup due to drooping lids

Many individuals also report feeling self-conscious in photos or on video calls due to eye asymmetry or a tired appearance, prompting them to consider surgery after seeing before and after upper blepharoplasty photos online.


Answer Engine FAQs

Is upper blepharoplasty just for cosmetic reasons?
No. While many undergo the procedure to enhance appearance, it also helps improve vision obstructed by sagging upper eyelid skin.

Can upper eyelid surgery reduce eye fatigue?
Yes. Patients often experience relief from chronic eye strain and headaches after removing excess upper lid skin.

Do men get upper blepharoplasty too?
Absolutely. In fact, upper blepharoplasty is one of the most common cosmetic surgeries among men, especially those over 50.


What to Expect Before Upper Blepharoplasty

If you’re considering upper eyelid surgery, it’s important to know what to expect in the days and weeks leading up to the procedure. Understanding the pre-operative process helps reduce anxiety, improves outcomes, and ensures your experience is as safe and comfortable as possible.

This section walks you through every step—from consultation to pre-op preparation—to help you feel informed and confident before undergoing upper blepharoplasty.


Pre-Surgery Consultation and Planning

The first step in the process is a comprehensive consultation with a board-certified plastic surgeon or oculoplastic surgeon. During this meeting, your surgeon will:

  • Evaluate the skin and muscle around your eyes
  • Discuss your goals and expectations
  • Take before photos for surgical planning and post-op comparison
  • Perform visual field testing if vision impairment is a concern
  • Review your medical history, medications, and allergies

Some surgeons may use digital imaging software to simulate your potential results, giving you a visual preview of your upper blepharoplasty before and after appearance.

According to the American Society of Plastic Surgeons, selecting a surgeon who is certified and experienced in eyelid procedures reduces the risk of complications and improves aesthetic outcomes (source).


What to Ask Your Plastic Surgeon

To make the most of your consultation, come prepared with questions. Here are a few essential ones:

  • Am I a good candidate for upper blepharoplasty?
  • What surgical technique will you use?
  • Where will the incisions be placed?
  • Will there be visible scars?
  • What are the risks or possible side effects?
  • What will recovery look like day by day?
  • Can I see before and after photos of your patients?

“A good surgeon should welcome your questions and provide detailed, honest answers. Their role is not just to perform the surgery—but to help you make an informed decision.” — Cleveland Clinic’s Department of Cosmetic Surgery (source).


How to Prepare in the Days Leading Up to Surgery

Proper preparation helps prevent complications and ensures smoother recovery. Your surgeon will provide custom pre-operative instructions, but here are common guidelines:

Two Weeks Before Surgery:

  • Stop smoking to promote healing
  • Avoid blood-thinning medications (e.g., aspirin, ibuprofen) unless advised otherwise
  • Arrange for someone to drive you home and stay with you for 24 hours after surgery

One Week Before Surgery:

  • Stock up on post-surgery supplies (ice packs, gauze, artificial tears, sunglasses)
  • Begin limiting alcohol and caffeine
  • Prepare your home with clean linens and easy meals

Day Before Surgery:

  • Shower and clean your face thoroughly—no makeup or moisturizers
  • Follow fasting instructions if anesthesia requires it
  • Set out loose, comfortable clothing for the next day

For a full pre-operative checklist, the Mayo Clinic offers detailed patient resources on preparing for outpatient surgeries like blepharoplasty (source).


What Happens on the Day of Surgery

On surgery day, you’ll arrive at the surgical center or outpatient facility. The procedure is typically performed under local anesthesia with sedation or, in some cases, general anesthesia, depending on the complexity and patient comfort.

The process usually takes 45 minutes to 1 hour for both upper eyelids. Here’s a quick overview:

  • Markings are drawn on your eyelids for precision
  • The surgeon makes incisions along the natural crease of your upper eyelid
  • Excess skin, muscle, and fat are carefully removed or repositioned
  • The incision is closed with fine sutures for minimal scarring

You’ll rest in a recovery area for about an hour before being discharged.


Answer Engine FAQs

Do I need to stop medications before upper eyelid surgery?
Yes. Avoid blood thinners and certain supplements at least 7–10 days before surgery, but always follow your surgeon’s specific advice.

How should I prepare for upper blepharoplasty recovery?
Have cold compresses, lubricating eye drops, prescribed ointments, and someone available to help you for the first 24–48 hours post-op.

Can I eat or drink before my eyelid surgery?
If general anesthesia is used, you may be asked to avoid food or drink for 8 hours before surgery. Local anesthesia may have fewer restrictions.


Upper Blepharoplasty Procedure Explained

Understanding how upper blepharoplasty is performed can ease anxiety and help you make informed decisions. While it’s a relatively straightforward outpatient procedure, the techniques, anesthesia options, and surgical precision involved make it essential to choose a qualified surgeon.

Here’s a detailed look at what happens during upper eyelid surgery, how long it takes, and the types of techniques surgeons use to get optimal results.


Is Upper Eyelid Surgery Painful? What Type of Anesthesia Is Used?

Most patients describe the experience as mildly uncomfortable rather than painful. Surgeons commonly use local anesthesia with light sedation, so you’re relaxed but awake. In more complex or combined procedures, general anesthesia may be used.

“With proper local anesthetic and sedation, patients usually feel pressure but not pain during upper blepharoplasty.” — Johns Hopkins Medicine (source)

Post-op discomfort is typically minimal and easily managed with prescribed pain relievers or over-the-counter medication.


How Long Does Eyelid Surgery Take?

For upper blepharoplasty alone, the procedure generally takes 45 minutes to 1 hour. If combined with lower blepharoplasty or a brow lift, it may take up to 2 hours.

Here’s a typical surgical timeline:

StepEstimated Duration
Pre-op prep & marking15–20 minutes
Local anesthesia administration10 minutes
Surgery (both eyelids)45–60 minutes
Recovery room observation30–60 minutes

You’ll return home the same day, but you must have someone drive you, especially if sedation or general anesthesia is used.


What Techniques Do Surgeons Use for Upper Eyelids?

Surgeons select techniques based on your anatomy, aesthetic goals, and medical need. The most common approach is:

  • Incision placement along the natural upper eyelid crease, allowing hidden scars
  • Excision of redundant skin, sometimes muscle and fat if needed
  • Repositioning of fat to prevent a hollow or overcorrected look
  • Fine sutures to close the incision, often absorbable or removed within 5–7 days

Some surgeons perform a “skin-only blepharoplasty” for younger patients, while others include levator muscle tightening if there’s significant eyelid drooping (ptosis).

According to the American Society of Ophthalmic Plastic and Reconstructive Surgery (ASOPRS), a nuanced approach is critical to avoiding complications and ensuring natural results (source).


Can It Be Combined with Other Procedures Like a Brow Lift?

Yes, upper blepharoplasty is frequently combined with other facial procedures for comprehensive rejuvenation, including:

  • Brow lift: Raises sagging brows and further opens the upper eye area
  • Lower blepharoplasty: Addresses under-eye bags or puffiness
  • Laser resurfacing: Improves fine lines around the eyes

Combining procedures is common and can provide a balanced, harmonious outcome while minimizing overall recovery time.

“Patients who combine brow lifts with upper eyelid surgery often report more dramatic yet natural-looking improvements.” — American Academy of Ophthalmology (source)


Answer Engine FAQs

Where are the incisions placed in upper eyelid surgery?
Incisions are typically hidden in the natural crease of the upper eyelid, making scars almost invisible once healed.

Do I need general anesthesia for blepharoplasty?
Not always. Most upper blepharoplasty surgeries are safely performed with local anesthesia and sedation.

What if I want to combine eyelid surgery with other facial procedures?
You can combine procedures like a brow lift or lower eyelid surgery. Discuss this with your surgeon during consultation for optimal planning.


Upper Blepharoplasty Recovery Timeline

Understanding what to expect during the recovery period is just as important as understanding the surgery itself. While upper blepharoplasty is a relatively low-risk outpatient procedure, proper post-operative care is essential for a smooth recovery and ideal before and after results.

Below is a breakdown of the typical healing timeline, how to manage common side effects like swelling and bruising, and what activities to avoid during recovery.


What to Expect in the First 24–48 Hours

The first two days after surgery are the most delicate and require strict rest and eye protection. Expect:

  • Moderate swelling and bruising around the eyes
  • Mild discomfort or tightness in the eyelids
  • Blurred vision due to ointment or temporary swelling
  • Watery eyes or slight light sensitivity

Your surgeon will likely recommend the following care:

  • Cold compresses every hour for 10–15 minutes
  • Sleeping with your head elevated
  • Applying antibiotic ointment or lubricating eye drops
  • Avoiding screen time and reading to reduce eye strain

“Patients should avoid rubbing their eyes or applying any pressure on the eyelids during the first 48 hours.” — Mayo Clinic Blepharoplasty Guide (source)


Swelling and Bruising: How Long Does It Last?

Bruising typically peaks around Day 2 or 3 and begins to fade by the end of the first week. Swelling can persist slightly longer, especially in the morning or after physical activity.

SymptomExpected Duration
Bruising7–10 days
Swelling2–3 weeks (gradually reduces)
Mild irritation1 week
Final scar fading3–6 months

According to the American Society of Plastic Surgeons (ASPS), most patients return to normal appearance within 10–14 days post-surgery, but subtle changes may continue for several months (source).


When Can You Return to Work or Normal Activities?

Most patients can return to work in 7 to 10 days, depending on the intensity of their job and how quickly they heal. However, there are activity restrictions:

  • 0–3 days: Rest, avoid screens and strenuous movement
  • 4–7 days: Light activity, short walks, no bending or lifting
  • 1–2 weeks: Resume work (non-physical), still avoid exercise
  • After 2 weeks: Gentle exercise may resume
  • After 4–6 weeks: Resume full physical activity

Wearing sunglasses outdoors and using broad-spectrum sunscreen on the eyelid area (once healed) is crucial to prevent pigmentation or scar darkening.


How to Speed Up Healing and Reduce Swelling

Following your surgeon’s instructions is critical, but you can also take the following steps to support optimal healing:

  • Cold compresses for the first 72 hours
  • Sleep with extra pillows to keep your head elevated
  • Avoid alcohol, smoking, and salty foods
  • Take prescribed medications as directed
  • Keep the incision area clean and dry
  • Use lubricating eye drops to relieve dryness and irritation

“Good post-op care significantly reduces the risk of complications and leads to more natural upper blepharoplasty before and after results.” — American Academy of Ophthalmology (source)


Recovery Do’s and Don’ts

Do:

  • Follow your surgeon’s timeline and medication schedule
  • Wear dark sunglasses outdoors
  • Attend all follow-up appointments

Don’t:

  • Rub or touch your eyelids
  • Wear eye makeup until cleared by your surgeon
  • Resume workouts or heavy lifting too soon
  • Skip medications or aftercare routines

Answer Engine FAQs

How long does it take to fully heal from upper eyelid surgery?
Initial healing takes 1–2 weeks, but full results—including scar fading—can take 3–6 months.

When can I wear makeup after upper blepharoplasty?
Usually after 10–14 days, once your incisions are fully closed and healed. Always confirm with your surgeon first.

Can I work out after upper eyelid surgery?
Light walking is okay after a few days, but avoid intense workouts, bending, or lifting for at least 2–3 weeks.


Before and After Upper Blepharoplasty: What Results Look Like

One of the most common—and important—questions patients ask is: What will my eyes look like after surgery? While results vary from person to person, a well-performed upper blepharoplasty should restore a more youthful, alert, and rested appearance—without changing your natural facial identity.

In this section, we’ll cover what to expect at each phase of recovery, what kind of improvements you can realistically anticipate, and how to evaluate before and after upper blepharoplasty results for yourself or others.


When Will I See Final Results?

Initial changes are visible within the first 1–2 weeks, but full results take several months to develop.

Here’s a realistic healing and result timeline:

TimelineVisible Changes
Week 1Major swelling and bruising subside; eyes look less puffy
Week 2Most bruising gone; you’ll start to see your new eye contour
Weeks 3–4Eyelids look natural and defined; light makeup may be applied
Months 2–3Swelling fully resolved; scars begin to fade
Month 6 and beyondFinal results set in; subtle scar lines barely visible (if at all)

According to the American Society of Plastic Surgeons, patients see full cosmetic results in 3 to 6 months and enjoy outcomes that last up to 10–15 years (source).


What Kind of Results Can I Expect?

Upper blepharoplasty is known for subtle but powerful rejuvenation. It doesn’t drastically alter your face—it simply enhances your natural features.

Typical before and after improvements:

  • Less hooding over the eyes
  • Brighter, more defined upper eyelid crease
  • Reduced puffiness or sagging
  • A more rested, less “angry” expression
  • Improved upper peripheral vision

“I didn’t want to look like a different person—I just wanted to look awake again. Two weeks after surgery, I couldn’t believe the difference.” — Verified patient review on RealSelf

Surgeons often recommend reviewing before and after galleries of actual patients. The Cleveland Clinic and ASPS both offer examples to help set expectations and show real outcomes for men and women of different ages and ethnicities:


Factors That Influence Your Results

Every patient is different, so your final outcome will depend on several key factors:

FactorImpact on Result
Surgeon’s experiencePrecision of tissue removal and scar placement
Skin quality and ageYounger skin may bounce back faster; mature skin needs more healing time
Post-op care adherenceFollowing recovery instructions helps reduce scarring and improve healing
Genetics and healingSome patients scar more easily than others
Lifestyle factorsSmoking, sun exposure, and poor nutrition can delay healing or reduce results

Choosing a board-certified surgeon is the single most important factor for achieving ideal before and after results.

“The best outcomes come from procedures performed by certified professionals with specialized experience in eyelid surgery.” — American Academy of Ophthalmology (source)


What If I’m Not Happy with My Results?

While most patients are satisfied, there is a small chance of asymmetry, overcorrection, or minor irregularities. In such cases:

  • Discuss your concerns with your surgeon first
  • Wait until at least 3–6 months post-surgery before considering a revision
  • Minor issues may resolve naturally as swelling fully subsides

In rare cases, revision blepharoplasty may be performed, but this is best done by a surgeon who specializes in eyelid corrections.


Answer Engine FAQs

How dramatic are upper blepharoplasty before and after results?
Most results are subtle but significantly refreshing. You’ll look more alert and youthful, not drastically different.

Do scars from upper eyelid surgery show?
No, incisions are placed in the eyelid crease and become nearly invisible over time.

How long do upper blepharoplasty results last?
On average, 10–15 years. Aging will continue naturally, but the improvements are long-lasting.


Upper Blepharoplasty Before and After Photos and How to Evaluate Them

Reviewing before and after upper blepharoplasty photos is one of the most important steps in researching the procedure and selecting a surgeon. However, not all photos are equally informative—or honest. Knowing how to critically evaluate these images will help you set realistic expectations and avoid misleading results.

Let’s walk through what to look for (and avoid) when analyzing upper eyelid surgery results.


Why Before and After Photos Matter

Visual documentation gives insight into:

  • A surgeon’s skill level and aesthetic style
  • The types of patients they typically work with (age, gender, skin type)
  • The range and subtlety of improvements achievable
  • Scarring and symmetry after healing
  • The surgeon’s ability to produce natural, non-overdone results

“A reputable plastic surgeon should have a portfolio of consistent, well-documented before and after photos for blepharoplasty.” — American Board of Cosmetic Surgery (source)


How to Analyze Upper Blepharoplasty Before and After Photos

1. Consistent Lighting and Angles

Ensure photos use natural, even lighting and identical angles before and after. Inconsistent lighting can exaggerate or hide flaws. Also look for:

  • No makeup or filters
  • Full-face view + close-up of the eyes
  • Neutral facial expression in both photos

Poor photo quality or dramatic lighting differences are red flags that the results may be misrepresented.

2. Natural Looking Crease and Contour

The upper eyelid crease should look natural—not too high, sharp, or hollow. Look for:

  • Smooth contour from brow to lash line
  • Eyelids that match and align symmetrically
  • No visible “pulled” appearance

Overdone blepharoplasty may cause a sunken or startled appearance, which indicates excessive fat or skin removal.

3. Scar Positioning and Healing

Scars from upper blepharoplasty should be virtually invisible within 2–3 months and well-hidden in the eyelid crease. In after photos:

  • Look for no visible stitch marks
  • The eyelid crease should look natural and uninterrupted
  • The skin should lie flat without lumps, folds, or retractions

According to the American Society of Plastic Surgeons, well-performed upper eyelid surgery leaves little to no permanent visible scarring (source).


Examples of Trusted Before and After Photo Galleries

To see real, high-quality examples of upper blepharoplasty before and after results, check:


Red Flags in Blepharoplasty Photo Galleries

Photos lacking consistency in angle, lighting, or expression
No scar visibility even in close-up photos (may indicate digital retouching)
Overly dramatic results that seem too good to be true
Unlabeled or unverified sources (e.g., stock images used on clinic websites)
Limited examples across different patient demographics


Answer Engine FAQs

What makes a good before and after blepharoplasty photo?
Good photos use the same lighting, angles, and facial expression. Look for realistic, subtle improvements with minimal visible scarring.

Why do some before and after results look too dramatic?
They may include photo editing, makeup, or manipulated lighting. Trust only galleries from board-certified surgeons with verified credentials.

How long after surgery are ‘after’ photos usually taken?
Photos are typically taken at 3 months post-op or later, once most swelling has resolved and scars have begun to fade.


Frequently Asked Questions About Upper Blepharoplasty Before and After

How long does upper blepharoplasty last?

Upper blepharoplasty results typically last 10 to 15 years. Aging will continue naturally, but most patients do not need a second procedure unless significant sagging reappears.

Will I have visible scars after upper eyelid surgery?

Scars are placed in the natural eyelid crease and usually fade significantly within a few months. With proper care, most scars become nearly invisible.

Is upper blepharoplasty worth it?

Yes—according to RealSelf, over 90% of patients rate the procedure as “worth it,” citing improved confidence, restored vision, and a more youthful appearance.

What is the ideal age for upper blepharoplasty?

There’s no fixed age, but most patients are in their 40s to 60s, when eyelid drooping becomes more noticeable. Some younger patients with genetic hooding or puffiness may also benefit.

Can upper blepharoplasty improve vision?

Yes. If sagging eyelid skin obstructs your upper visual field, the procedure may significantly improve peripheral vision. In medically necessary cases, insurance may even cover it.

How soon will I look “normal” again after surgery?

Most patients feel comfortable appearing in public again after 10–14 days. Swelling and bruising subside steadily, and makeup can usually be worn after two weeks.


Conclusion: What to Take Away from Upper Blepharoplasty Before and After

Upper blepharoplasty offers a powerful yet subtle facial enhancement, helping patients look more refreshed, alert, and youthful. Whether done for cosmetic reasons or to improve vision, the procedure is one of the most reliable and rewarding facial surgeries available.

When reviewing upper blepharoplasty before and after images, focus on natural-looking results, symmetry, and scar concealment. Always choose a board-certified plastic or oculoplastic surgeon with extensive eyelid surgery experience. The right surgeon will ensure you look like the best version of yourself—not someone else.

By understanding the before, during, and after process, you can go into the procedure with confidence and come out with results that last for years.

Mouth Breathing Face: How Chronic Mouth Breathing Can Reshape Your Appearance and Health

What You Need to Know About the “Mouth Breather Face” Phenomenon

Mouth breathing is often dismissed as a minor habit — something people do when they have a cold or during heavy exercise. But when it becomes chronic, especially in children and teens, the effects go far beyond just dry lips or bad breath. Over time, habitual mouth breathing can actually reshape the structure of the face, alter jaw development, and affect long-term health. This condition, sometimes referred to as “mouth breathing face” or “mouth breather face,” is gaining attention not only from parents and orthodontists, but also from professionals in sleep medicine, ENT (ear, nose, and throat), and craniofacial research.

In this guide, we’ll explore what a mouth breathing face is, how it develops, the health risks associated with it, and what you can do to prevent or reverse it. We’ll also cover the science behind facial growth, provide actionable advice for parents and adults, and answer some of the most common questions people have about this under-discussed but important topic.

Why Does This Matter?

According to a study published in the Journal of Otolaryngology – Head & Neck Surgery, up to 50% of children show signs of habitual mouth breathing, and many parents aren’t even aware of it. If left untreated, this seemingly harmless habit can affect not only facial development, but also oral health, breathing efficiency, posture, and cognitive function.

“Mouth breathing is not just an aesthetic problem — it’s a health problem. The face grows differently when the mouth is habitually open. That changes everything.”
Dr. John Mew, Orthotropic Specialist

We’ll break down this concept section-by-section, starting with the basics of what mouth breathing is and how it differs from the natural and optimal method of nasal breathing.


What Is Mouth Breathing?

Mouth breathing refers to the act of inhaling and exhaling through the mouth instead of the nose. While it’s normal to breathe through the mouth occasionally — such as during intense exercise or when the nose is blocked — chronic mouth breathing becomes problematic when it becomes a person’s default breathing mode, even during rest or sleep.

Definition and Explanation

Mouth breathing is defined as persistent breathing through the mouth during waking hours and/or sleep, particularly when it is not due to temporary congestion or illness. It often starts in childhood but can persist into adulthood if not addressed.

How It Differs From Nasal Breathing

FeatureNasal BreathingMouth Breathing
FiltrationFilters allergens, dust, and pathogensNo filtration
MoisturizationHumidifies and warms the airDries out mouth and throat
Oxygen EfficiencyNitric oxide boosts oxygen absorptionLess efficient oxygen uptake
Facial DevelopmentSupports proper jaw and palate growthCan lead to long face, recessed jaw, etc.

Common Causes of Mouth Breathing

Many people don’t realize they’re breathing through their mouths until symptoms or facial changes become apparent. The causes of mouth breathing can be structural, habitual, or medical.

Here are the most common causes:

  1. Nasal Blockages
    • Chronic allergies
    • Nasal polyps
    • Deviated septum
  2. Enlarged Tonsils or Adenoids
    • Often seen in children
    • Blocks airflow through the nose, forcing mouth breathing
  3. Poor Oral Posture or Habitual Behavior
    • Slouching posture, slack jaw, or poor tongue position
    • Breathing through the mouth becomes a learned habit
  4. Obstructive Sleep Apnea
    • Interrupts nasal breathing during sleep
    • May cause mouth to open involuntarily to maintain airflow
  5. Facial or Craniofacial Abnormalities
    • Narrow palate or small nasal passages
    • Genetic or developmental conditions that make nasal breathing difficult

Why Is This Important to Catch Early?

In children, especially during crucial developmental years (ages 2–12), breathing method directly influences facial growth, jaw alignment, and even the shape of the dental arch. If mouth breathing is not identified early, these changes can become permanent, leading to the phenomenon known as a “mouth breathing face.”

Fact: The tongue is nature’s orthodontic retainer. When it rests on the roof of the mouth (as it should during nasal breathing), it helps widen the palate and shape the midface properly.


FAQs for Answer Engine Optimization (AEO)

What is mouth breathing?
Mouth breathing refers to the act of breathing through the mouth instead of the nose. While temporary mouth breathing can occur during illness, chronic mouth breathing can lead to health and facial structure issues.

Is mouth breathing bad for you?
Yes, habitual mouth breathing can lead to poor sleep, dry mouth, dental issues, and changes in facial structure over time.

Can you fix mouth breathing?
Yes, through nasal breathing training, myofunctional therapy, and in some cases, surgery or orthodontic intervention, mouth breathing can be corrected.

Great — let’s move on to the next section:

What Is a “Mouth Breathing Face”?

The term “mouth breathing face” refers to the distinct facial characteristics that may develop over time due to chronic mouth breathing, especially when it begins in childhood. This is not just a slang term — it is rooted in clinical observations by orthodontists, ENT specialists, and researchers who study craniofacial development.

Understanding the Term “Mouth Breather Face”

While the term has sometimes been used pejoratively in pop culture, medically, it describes a set of structural changes in the face caused by abnormal breathing patterns. These changes happen subtly and gradually as the bones of the face and skull develop in response to improper tongue posture, airway resistance, and jaw positioning.

According to the American Journal of Orthodontics and Dentofacial Orthopedics, nasal breathing promotes proper craniofacial development, whereas mouth breathing can lead to noticeable physical alterations. When the mouth is open for prolonged periods, it changes the resting position of the tongue and jaw, which in turn reshapes the face.

“Chronic mouth breathing alters the balance of orofacial muscles and tongue posture, contributing to facial skeletal changes such as a long face and narrow jaw.”
Journal of Clinical Pediatrics Dentistry (source)


Facial Features Commonly Linked to Mouth Breathing

Here are the common physical traits and structural changes that define a mouth breathing face:

1. Long, Narrow Face

Mouth breathers often develop a vertically elongated face due to the downward pull of gravity on the jaw and tongue when the mouth is open. This condition is sometimes referred to as “long face syndrome.”

2. Recessed Chin and Weak Jawline

A lack of proper tongue pressure on the palate can cause the mandible (lower jaw) to grow downward and backward rather than forward, leading to a weak chin and poor jaw definition.

3. Narrow Palate and Crowded Teeth

Mouth breathing can cause the tongue to rest on the bottom of the mouth instead of the roof, which prevents the upper palate from expanding properly. This leads to dental crowding, overbites, and crooked teeth — common reasons for braces or palate expanders in children.

4. Dark Circles and Droopy Eyes

Chronic oxygen deprivation and poor sleep quality associated with mouth breathing can result in under-eye shadows and a tired appearance. Swollen nasal tissues may also contribute to eye puffiness.

5. Gummy Smile or Low Resting Lip Posture

Mouth breathers may develop an altered smile where more of the gum is visible, or the upper lip appears shorter due to muscular adaptation.


Visual Summary: Mouth Breather Face Features

Facial FeatureHow Mouth Breathing Affects It
JawlineWeakens, recesses backward
ChinAppears smaller, less defined
Face lengthGrows longer vertically
EyesTired, droopy look; dark under-eye circles
LipsDry, parted at rest; upper lip may thin over time
PalateBecomes narrow, causing dental crowding

Before and After Cases of Mouth Breathing Face

In clinical settings, orthodontists and myofunctional therapists have documented dramatic improvements in facial structure when mouth breathing is corrected early — particularly in children.

  • A case study published in Sleep and Breathing documented a 12-year-old boy with obstructive breathing and mouth breathing habits. After 12 months of myofunctional therapy and nasal expansion, significant improvements in nasal airflow, facial width, and jaw posture were observed. (source)

Is “Mouth Breather Face” Recognized by Doctors?

Yes, though doctors may use clinical terms like “long face syndrome,” “adenoid facies,” or “craniofacial dysmorphology,” many in the medical and dental fields recognize the link between mouth breathing and altered facial growth.

The American Association of Orthodontists states:
“Breathing problems can impact facial development, particularly when chronic mouth breathing is present during early growth periods.”
AAO (source)


FAQs for Answer Engine Optimization (AEO)

What are the signs of a mouth breathing face?
Typical signs include a long, narrow face, recessed chin, narrow jaw, dark under-eye circles, and open mouth posture.

Can you tell if someone is a mouth breather by looking at them?
In some cases, yes. Facial features such as a weak chin, narrow dental arch, and constantly open lips may suggest habitual mouth breathing.

Does mouth breathing change your face permanently?
Yes, especially in children whose bones are still growing. If uncorrected, changes can become permanent. However, some improvements can be made with therapy or orthodontic intervention.


How Does Mouth Breathing Affect Facial Structure?

Facial structure is not solely determined by genetics — it’s also shaped by how we use our facial muscles and oral posture during development. One of the most significant functional factors is how we breathe. Chronic mouth breathing, especially during childhood and adolescence, can significantly alter the growth and alignment of facial bones, contributing to what’s commonly called a mouth breathing face.

Studies in orthodontics and craniofacial development have shown that the position of the tongue, lips, and jaw — all influenced by breathing patterns — play a major role in the way the face forms during growth.


Effects in Children and Teens

The most critical period for facial development occurs before puberty, roughly between ages 2 and 12. During this time, the bones of the skull and face are highly malleable. If a child habitually breathes through the mouth during this phase, it can change the structure of their face, jaws, and airway.

How Mouth Breathing Affects a Developing Face

  1. Low Tongue Posture:
    When breathing through the nose, the tongue naturally rests against the roof of the mouth, exerting light upward pressure that helps widen the palate and stimulate forward facial growth.
    With mouth breathing, the tongue rests low in the mouth, leading to a narrow upper jaw (maxilla) and a longer, flatter midface.
  2. Open Mouth Posture:
    Children who breathe with an open mouth tend to develop a longer lower face, drooping cheeks, and poor lip seal. Over time, this posture pulls the lower jaw downward and backward.
  3. Underdeveloped Jaw and Chin:
    Nasal breathers tend to have a more forward-growing mandible, while mouth breathers often develop a recessed or “weak” chin.
  4. Narrow Dental Arches:
    Without the tongue’s support on the palate, the dental arches become narrower, often leading to crowded teeth, crossbites, and overbites.
  5. Impaired Airway Development:
    Long-term mouth breathing can also narrow the nasal cavity and reduce airflow capacity, which may lead to snoring, sleep apnea, and poor oxygenation.

Clinical Evidence:
A landmark study in the American Journal of Orthodontics showed that children who mouth breathed over long periods developed significantly longer faces, steeper mandibular planes, and narrower palates than nasal breathers. (source)


Changes in Adult Facial Appearance

In adults, the bones of the face have largely finished growing. However, habitual mouth breathing can still affect facial appearance, especially in ways related to muscle tone, posture, and sleep quality.

Common Adult Facial Changes Linked to Mouth Breathing:

  • Sagging or hollow cheeks
  • Forward head posture, which changes the profile and neck alignment
  • Narrower jaw and nasal passages
  • Increased likelihood of bruxism (teeth grinding) and TMJ issues
  • Dry, wrinkled lips and a perpetually tired appearance

Although the structural changes are less dramatic than in children, adults may still develop what resembles a “mouth breathing face,” especially if the behavior persists over many years.

Research Insight:
A study published in Sleep Medicine Reviews found that adult mouth breathers were more likely to report poor sleep quality, facial muscle fatigue, and signs of premature aging, due in part to compromised nasal airflow and low oxygenation. (source)


Can Facial Changes Be Prevented or Reversed?

Yes — partially, and the earlier the intervention, the better.

  • In children, early detection and treatment can often reverse or prevent most of the craniofacial changes associated with mouth breathing.
  • In adults, improvements in posture, breathing patterns, and oral function can enhance appearance and health, though some structural issues may require orthodontic or surgical correction.

Dr. Derek Mahony, an internationally recognized orthodontist, notes:
“When mouth breathing is addressed early — ideally by age 7 — we can redirect facial growth with interventions like myofunctional therapy and palate expansion.”
(source)


Comparative Overview: Nasal vs Mouth Breathing Impact on Facial Development

Breathing PatternFacial Outcome
Nasal BreathingBalanced midface, wider jaw, strong chin, good oral posture, healthy airway
Mouth BreathingLong face, narrow palate, recessed chin, poor lip seal, high risk of dental issues

FAQs for Answer Engine Optimization (AEO)

Can mouth breathing cause facial deformities?
Yes. Chronic mouth breathing can change the shape of the face, especially in children. This includes a long face, narrow jaw, and recessed chin.

Is it too late to fix mouth breathing in adults?
While bone growth is complete in adults, improvements can still be made through breathing therapy, dental correction, and in some cases, surgery.

Why does mouth breathing make your face longer?
The open-mouth posture allows gravity and muscle tension to pull the jaw downward. Over time, this leads to a longer, vertically grown face.


Health Effects of Chronic Mouth Breathing

Chronic mouth breathing isn’t just a cosmetic or facial development issue — it has significant health consequences that can impact breathing quality, oral health, sleep, and even cognitive function. Understanding these health risks is essential for recognizing the importance of addressing mouth breathing early.


1. Poor Oral Health

Mouth breathing leads to a dry mouth because saliva evaporates faster when breathing through the mouth. Saliva is crucial for:

  • Neutralizing acids
  • Washing away bacteria
  • Preventing tooth decay and gum disease

Without sufficient saliva, mouth breathers are at higher risk for:

  • Tooth decay
  • Gingivitis and periodontal disease
  • Bad breath (halitosis)
  • Mouth sores and irritation

A 2018 study in the Journal of Clinical Pediatric Dentistry found a significant correlation between mouth breathing and increased risk of dental caries and gum inflammation. (source)


2. Sleep-Related Breathing Disorders

Chronic mouth breathing is often linked to obstructive sleep apnea (OSA) and other sleep-disordered breathing issues. Mouth breathers tend to have narrower airways, increasing the risk of airway collapse during sleep.

Common consequences include:

  • Snoring
  • Interrupted sleep cycles
  • Daytime fatigue and sleepiness
  • Poor concentration and memory

According to the American Sleep Apnea Association, untreated sleep apnea due to mouth breathing can increase risks for high blood pressure, heart disease, stroke, and diabetes. (source)


3. Impaired Oxygenation and Cognitive Function

Nasal breathing produces nitric oxide, a molecule that helps increase oxygen absorption in the lungs and supports cardiovascular health. Mouth breathing bypasses this mechanism, leading to less efficient oxygen delivery to the brain and tissues.

Studies suggest that chronic mouth breathers may experience:

  • Lower cognitive performance
  • Reduced attention span
  • Increased anxiety and irritability

A 2017 clinical review in the International Journal of Pediatric Otorhinolaryngology links mouth breathing with poor academic performance and behavioral issues in children. (source)


4. Altered Facial and Postural Development

As covered earlier, mouth breathing impacts facial development, but it also affects posture. Mouth breathers often develop forward head posture and neck strain, which can lead to chronic pain and muscle tension.


5. Increased Risk of Respiratory Infections

The nose acts as a natural filter, trapping dust, allergens, and pathogens before they reach the lungs. Mouth breathing bypasses this filter, increasing vulnerability to:

  • Common colds
  • Sinus infections
  • Bronchitis and respiratory illnesses

The European Respiratory Journal highlights that nasal breathing is crucial for respiratory defense mechanisms. (source)


Summary Table: Health Effects of Chronic Mouth Breathing

Health IssueImpact of Mouth BreathingReference
Oral HealthDry mouth, cavities, gum diseaseJ Clin Pediatr Dent, 2018
Sleep QualitySnoring, obstructive sleep apnea, daytime fatigueAmerican Sleep Apnea Association
Oxygenation & CognitiveReduced oxygen absorption, impaired focusInt J Pediatr Otorhinolaryngol, 2017
Posture & MusculoskeletalForward head posture, neck and muscle painClinical observations
Respiratory HealthIncreased infections, reduced airway defenseEur Respir J, 2008

FAQs for Answer Engine Optimization (AEO)

Can mouth breathing cause sleep problems?
Yes, it is strongly linked to obstructive sleep apnea, snoring, and poor sleep quality.

Why does mouth breathing cause bad breath?
Because it dries out saliva, which normally cleanses the mouth and controls bacteria.

Does mouth breathing affect mental focus?
Chronic mouth breathing may reduce oxygen efficiency, negatively affecting concentration and cognitive function.


How to Prevent and Correct Mouth Breathing Face

Addressing mouth breathing early is crucial to preventing the long-term facial and health consequences associated with a mouth breathing face. Fortunately, a combination of medical, dental, and therapeutic interventions can help correct breathing patterns and improve facial structure over time.


1. Early Diagnosis and Treatment

The first step is early recognition of mouth breathing, especially in children. Pediatricians, dentists, and orthodontists play a vital role in screening for signs of mouth breathing during routine visits.

Key signs to watch for:

  • Chronic open mouth posture
  • Snoring or noisy breathing during sleep
  • Frequent colds or nasal congestion
  • Dental crowding or malocclusion

Early diagnosis allows for prompt intervention, which is more effective during the critical growth periods of childhood.

Reference: The American Academy of Pediatrics recommends screening for breathing disorders in children to prevent developmental issues. (AAP Policy Statement)


2. Medical Management of Nasal Obstruction

Many mouth breathers suffer from nasal obstructions such as:

  • Enlarged adenoids or tonsils
  • Chronic allergies
  • Deviated septum
  • Nasal polyps

Treating these conditions medically or surgically can restore nasal airflow and encourage nasal breathing.

Common treatments include:

  • Allergy management (antihistamines, nasal steroids)
  • Adenoidectomy or tonsillectomy
  • Septoplasty for structural correction

According to the American Academy of Otolaryngology–Head and Neck Surgery, resolving nasal obstructions significantly improves breathing patterns in children and adults. (AAO-HNS Guidelines)


3. Myofunctional Therapy

Orofacial myofunctional therapy (OMT) involves exercises designed to retrain the muscles of the mouth, tongue, and face to promote nasal breathing and correct oral posture.

OMT can help:

  • Strengthen lip seal
  • Correct tongue resting position
  • Improve swallowing patterns
  • Enhance nasal airflow

A 2019 meta-analysis in the Journal of Oral Rehabilitation confirmed that myofunctional therapy improves nasal breathing and reduces mouth breathing in both children and adults. (source)


4. Orthodontic and Dental Interventions

Dental appliances and orthodontics can play a crucial role in correcting the anatomical changes caused by mouth breathing:

  • Palatal expanders widen a narrow upper jaw to improve airflow and create room for teeth.
  • Braces or aligners correct malocclusion caused by improper oral posture.
  • Mandibular advancement devices can improve jaw positioning and airway space.

The American Association of Orthodontists notes that these treatments, combined with breathing correction, can lead to substantial improvements in facial structure and function. (AAO Patient Info)


5. Breathing Retraining and Lifestyle Changes

Encouraging nasal breathing through conscious effort and lifestyle adjustments helps maintain the improvements from other treatments.

Tips include:

  • Practicing nasal breathing exercises daily
  • Keeping lips closed at rest
  • Using humidifiers to prevent nasal dryness
  • Managing allergies and avoiding irritants

Some breathing retraining methods like the Buteyko method have been shown to reduce mouth breathing and improve respiratory health. (Buteyko Institute)


Summary Table: Prevention and Correction Strategies

StrategyPurposeEffectivenessReference
Early screening and diagnosisIdentify mouth breathing earlyHigh in childrenAAP
Medical treatmentClear nasal obstructionsHighAAO-HNS
Myofunctional therapyRetrain orofacial musclesModerate to highJ Oral Rehab
Orthodontic treatmentCorrect dental/facial structureHigh when combined with therapyAAO
Breathing retrainingPromote nasal breathing habitModerateButeyko Institute

FAQs for Answer Engine Optimization (AEO)

How can I stop mouth breathing naturally?
Focus on nasal breathing exercises, keeping lips closed, and managing nasal congestion. Consulting a healthcare provider is important if symptoms persist.

Is myofunctional therapy effective for mouth breathing?
Yes, it helps retrain oral muscles to promote nasal breathing and improve facial posture.

Can braces fix a mouth breathing face?
Braces can help correct dental issues caused by mouth breathing but are most effective when combined with therapies addressing the underlying breathing pattern.


Long-Term Outlook and When to See a Specialist for Mouth Breathing Face

Understanding the long-term implications of a mouth breathing face is essential for both prevention and treatment. If left unaddressed, chronic mouth breathing can lead to permanent structural changes and health complications. Early intervention is ideal, but specialized care can help at any stage.


Long-Term Consequences of Untreated Mouth Breathing

If mouth breathing persists without correction, the following issues may become permanent or worsen:

  • Structural facial changes: Long, narrow face; recessed chin; high-arched palate
  • Dental problems: Crowded teeth, malocclusion, and increased risk of periodontal disease
  • Sleep disorders: Chronic snoring, obstructive sleep apnea (OSA), and daytime fatigue
  • Cognitive and behavioral effects: Poor concentration, learning difficulties, and mood disorders
  • Chronic respiratory issues: Frequent infections and compromised lung function

A study in the European Respiratory Journal underscores that untreated mouth breathing can contribute to lifelong respiratory and sleep-related health problems. (source)


When to See a Specialist

It’s crucial to seek professional help if you or your child exhibit any of the following signs related to mouth breathing:

  • Persistent open mouth posture
  • Frequent nasal congestion or difficulty breathing through the nose
  • Snoring, gasping, or pauses in breathing during sleep
  • Dental crowding or noticeable changes in facial shape
  • Daytime sleepiness, difficulty concentrating, or behavioral issues

Types of Specialists to Consult

  1. Pediatrician or Primary Care Physician
    For initial evaluation and referral, especially in children.
  2. Otolaryngologist (ENT Specialist)
    To assess and treat nasal obstructions, enlarged tonsils/adenoids, and sinus issues.
  3. Orthodontist or Dentist
    To diagnose and manage dental and jaw alignment problems related to mouth breathing.
  4. Sleep Specialist
    For evaluation and treatment of sleep-related breathing disorders like obstructive sleep apnea.
  5. Myofunctional Therapist or Speech-Language Pathologist
    For muscle retraining and correction of oral posture.

According to the Mayo Clinic, multidisciplinary care often yields the best outcomes for chronic mouth breathing and its effects. (source)


Prognosis and Expectations

  • Early treatment in childhood often results in complete or near-complete reversal of facial and functional issues.
  • Adult treatment can still improve symptoms and quality of life but structural changes may require orthodontic or surgical correction.
  • Ongoing monitoring is recommended to prevent relapse or progression.

Case Study: Successful Intervention

A 10-year longitudinal study published in The Angle Orthodontist demonstrated that early intervention combining adenotonsillectomy, orthodontics, and myofunctional therapy led to significant improvements in facial structure and airway function in children with chronic mouth breathing. (source)


FAQs for Answer Engine Optimization (AEO)

How do I know if mouth breathing is affecting my child’s face?
Look for signs like an open mouth posture, narrow upper jaw, dental crowding, and frequent nasal congestion.

Can adults reverse mouth breathing face?
While some structural changes may be permanent, many symptoms can be improved with therapy, orthodontics, or surgery.

Which doctor should I see first for mouth breathing issues?
Start with your primary care physician or pediatrician for initial assessment and referral.


Conclusion: Understanding and Addressing Mouth Breathing Face

Mouth breathing face is more than a cosmetic concern—it is a sign of underlying breathing and health issues that can have lasting effects on facial development, oral health, sleep quality, and overall wellbeing. Recognizing the signs early and seeking professional care is essential to prevent long-term complications.

By combining medical treatments to address nasal obstructions, orthodontic interventions to correct dental structure, myofunctional therapy to retrain oral muscles, and lifestyle changes promoting nasal breathing, individuals can significantly improve both their facial appearance and health outcomes.

If you or your child exhibit symptoms of mouth breathing, consult healthcare providers promptly. Early intervention offers the best chance for positive, lasting results.


Frequently Asked Questions (FAQs) about Mouth Breathing Face

1. What is a mouth breathing face?

A mouth breathing face describes the characteristic facial features that develop over time due to chronic mouth breathing, including a long narrow face, recessed chin, and dental malformations.

2. Why does mouth breathing affect facial development?

Mouth breathing changes the natural resting posture of the tongue and lips, disrupting normal muscle function and bone growth, which alters facial structure, especially in children.

3. Can mouth breathing cause health problems besides facial changes?

Yes, chronic mouth breathing is linked to poor oral health, sleep apnea, cognitive issues, and increased respiratory infections.

4. How can I tell if I’m a mouth breather?

Signs include frequently breathing through the mouth, dry mouth, snoring, nasal congestion, and noticing an open mouth posture at rest.

5. Is mouth breathing reversible?

Early intervention can reverse many effects of mouth breathing, especially in children. Adults can improve symptoms, though some structural changes may require orthodontics or surgery.

6. What treatments are available for mouth breathing face?

Treatments include medical management of nasal obstructions, myofunctional therapy, orthodontics, breathing retraining exercises, and sometimes surgery.

7. When should I see a specialist for mouth breathing?

If you notice persistent open mouth posture, snoring, difficulty breathing through the nose, or dental and facial changes, seek evaluation from a pediatrician, ENT, or orthodontist.

8. Can my child’s school performance be affected by mouth breathing?

Yes, mouth breathing can lead to sleep disturbances and reduced oxygenation, which may negatively impact concentration and academic performance.


Additional Resources